
Lesson 1 - Build and Set Up - Think Inside the Box (120 mins minimum)
Preparation
Materials
For each group of 2-3 students
- EV3 Core Set
- EV3 Software installed on a tablet or PC
- Blank Paper (4 per group)
- Scissors
- Clear Tape
Classroom Setup
- Have student groups ready
- Students group should sit together for easy access to the <span> components
- Ensure that the batteries are charged and the kits are in working order
Coding Activity
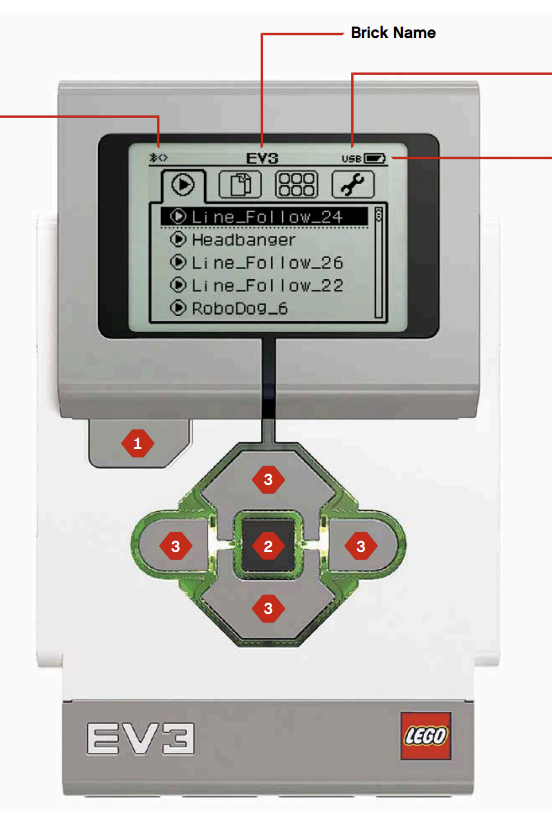
- On the EV3 Brick, the 4 lettered ports are for motors. The 4 numbered ports are for sensors.
- Watch the Programming Quick Start Video for guidance
- Practice the procedure for connecting the EV3 to a tablet or computer
- Practice creating the code and running it on the EV3 brick
- Reviewed the sample code for the ‘Test It’ task
- (optional) complete the "Modify It" task yourself
STEAM Activity
- Review the activity answer sheet
- Review the learning objectives
- Review the sample solution code
1. Introduction
Description
- Become familiar with the FIRST LEGO League Competition
- Get setup for the lessons to come!
- Build the Driving Base, which can be used for the remainder of the course
- Become familiar with the connecting procedure.
- Learn the first basic blocks that allow the robot to do certain behaviour such as make sounds, display things on the screen, and change the colour of the lights.
- Next, create a product package for the EV3 robots, students will discover relationships between volume and surface area and how it relates to the real world. At the same time, they can make their package interactive using the blocks they just learned, and use the outside of the package to communicate what they know about the EV3 robot.
What is FIRST all about?
Why is this Lesson Important for FIRST LEGO Teams?
- Understanding how to build things that are strong and sturdy using LEGO parts is the first step in creating an effective FIRST LEGO League robot.
- You may decide to build more features and attachments later, but starting with a solid base that can drive well will set your team up for success down the road.
- This lesson has instructions for a great driving base, but after the course you may decide to rebuild your own base that is even better using what you have learned.
- As you are building the robot using the instructions, observe some of the features that makes it a good driving base.
- What are some of the tips from this video that the robot you are going to build makes use of?
- Let your creativity run wild, and practice building. Learn from other teams and videos online. Some of the world champion LEGO robots will blow your mind.
Get Started
- The Robot Educator embedded in the LEGO EV3 Education Software has a video instruction on how to connect the EV3 Brick to your Computer or Tablet for the first time.
- Please see the EV3 Setup page for a link to download the LEGO EV3 Education Software for Desktop or iPad.
- Have the students proceed to Quick Start > Programming > Programming (Video)
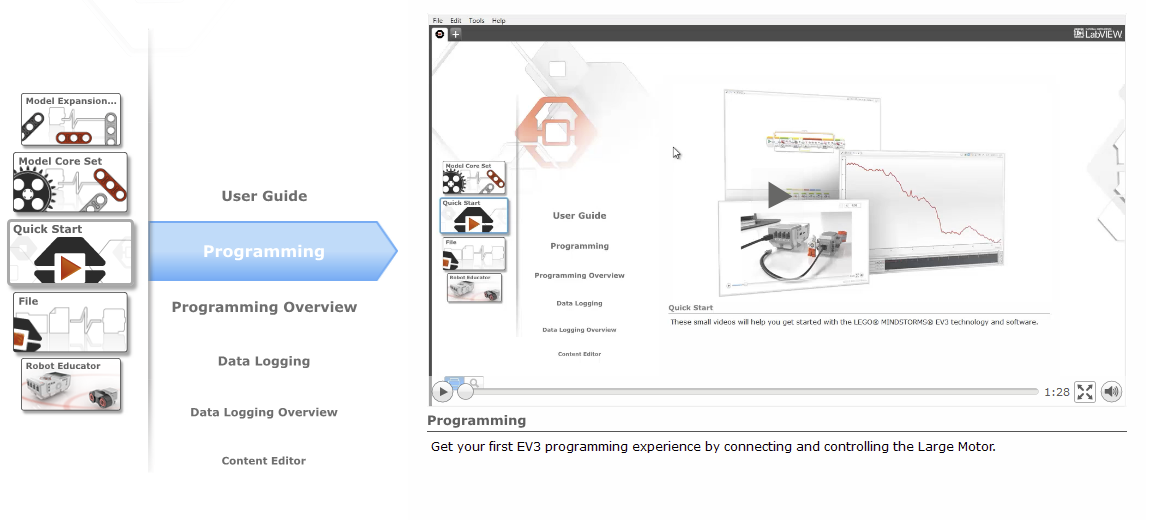
Video
- Watch the video as a class, and follow the process of connecting to the EV3 Brick
- If you are using the LEGO EV3 Home Version the video is not available
- (Alternatively) Walk students through the connection process on a projector.
- Run a simple program as a test (for example plug in a motor and make it move)
2. Building Activity
Required Building
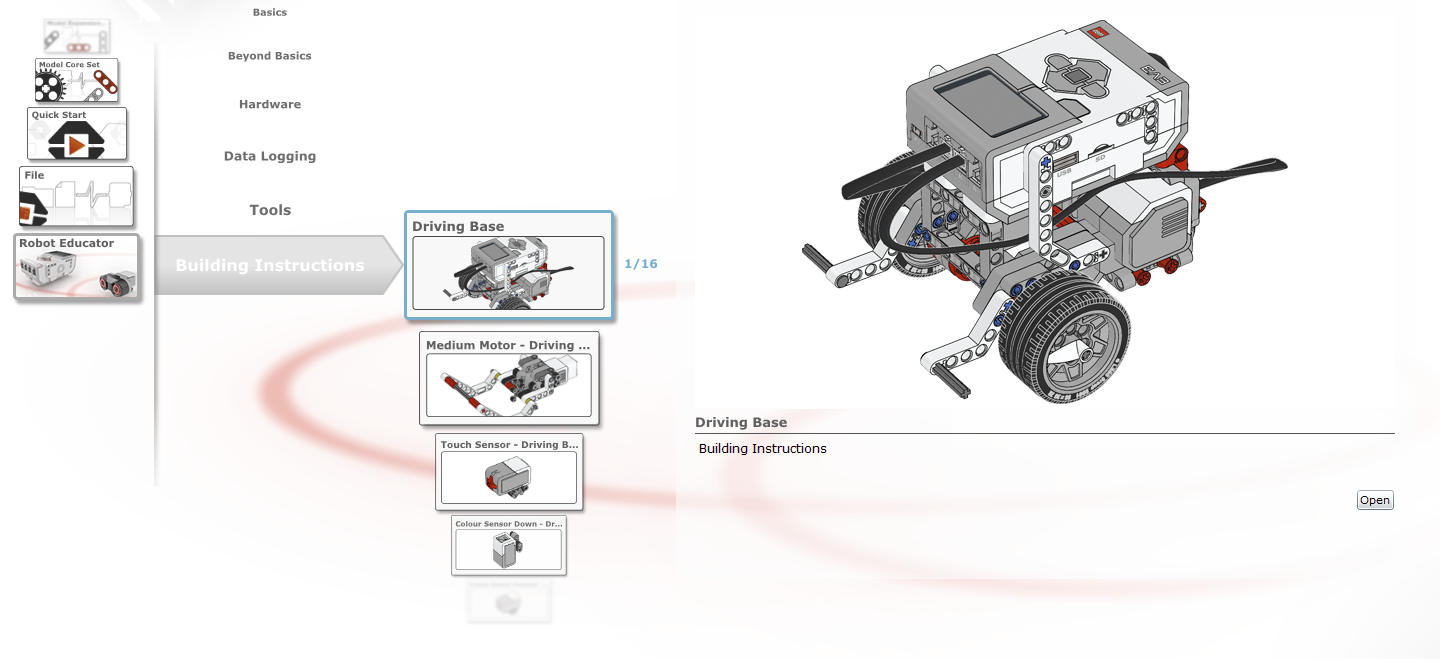
- Start by building the Driving Base
- Instructions can be found using any of the three methods below
"Build It" (Robot Educator)
- The Robot Educator embedded in the LEGO EV3 Education Version, contains on-screen instructions for this lesson.
- Please see the EV3 Setup page for links to download the software.
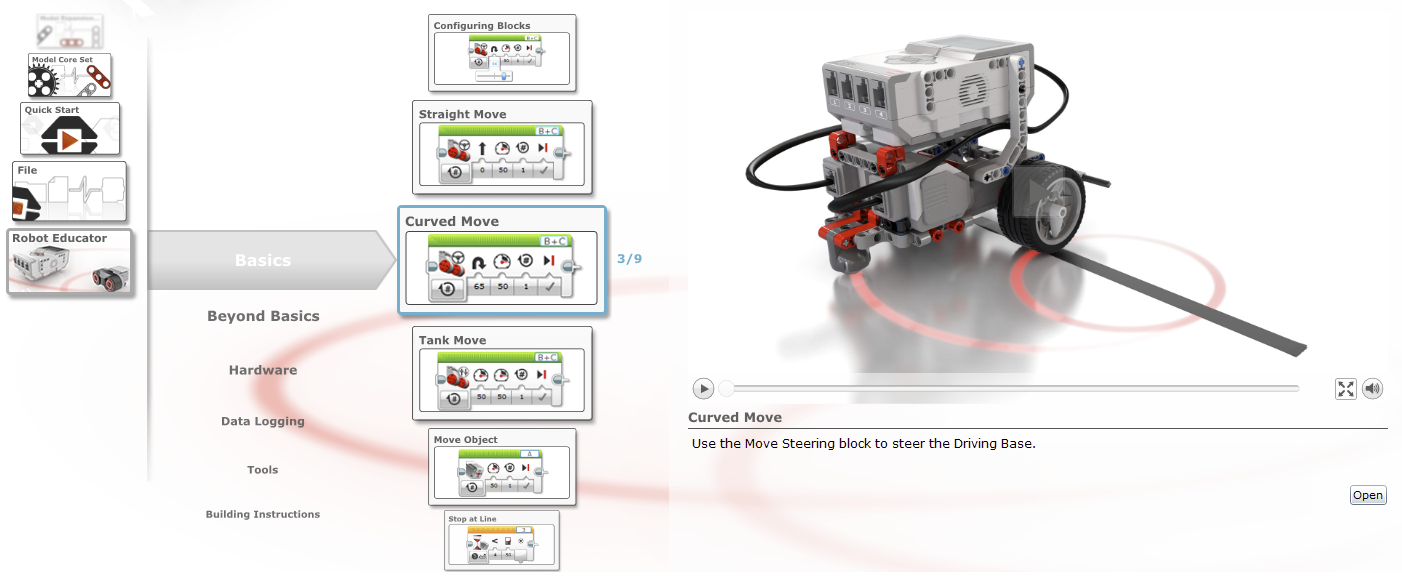
- Complete the instructions contained in Robot Educator > Basics > Curved Move

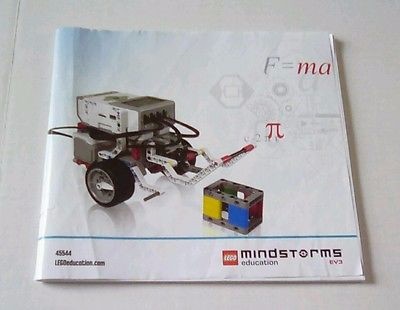
"Build It" (Printed Booklet)
- Students can use the printed instruction booklet included in the EV3 Core set.
"Build It" (PDF)
- Download the PDF and save it to the student's Desktop or iPads
- (Alternatively) Print booklets for students
3. Coding Activity
Objectives
- Download and run some basic code on the robot.
- Control lights, display, and sounds
- Clicking on a block gives more options
- The wait block delays the operation of the code
- With a wait block in front, the code will perform the previous block until some time has passed
"Test It" & "Modify It"
- Display this section on a projector screen
Part 1:
- Test the code below to make the robot play an elephant call
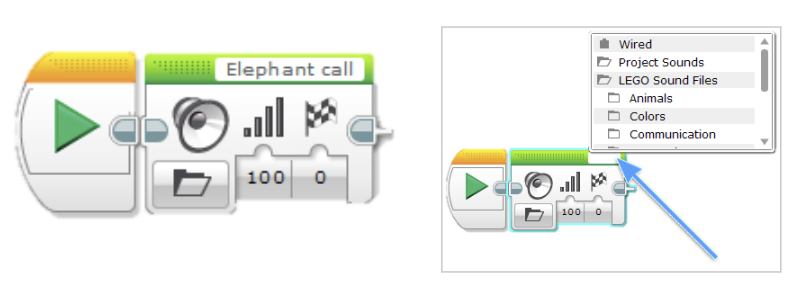
- Modify the program to make the robot play another cool sound
Part 2:
- Test the code below to makethe robot display "MINDSTORMS" in the EV3 Brick Display
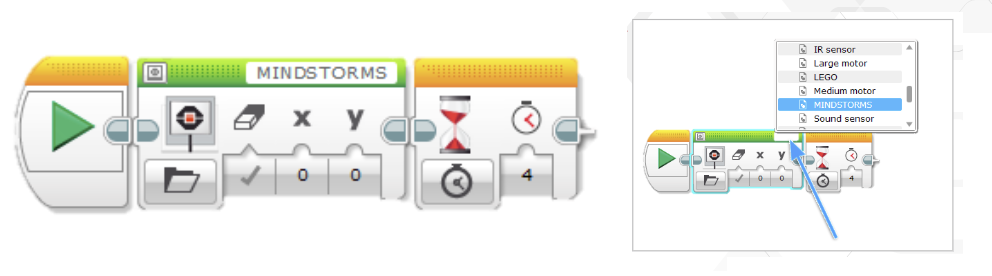
- Modify the code to makethe robot display an image or your own text
Part 3:
- Test the code below to make therobot flash the Brick Status Light

- Modify the Code to make the Brick Status Light flash another colour
Challenge
- Combinethe 3 modified parts above to get your robot to do them in order
- This is called creating a sequence
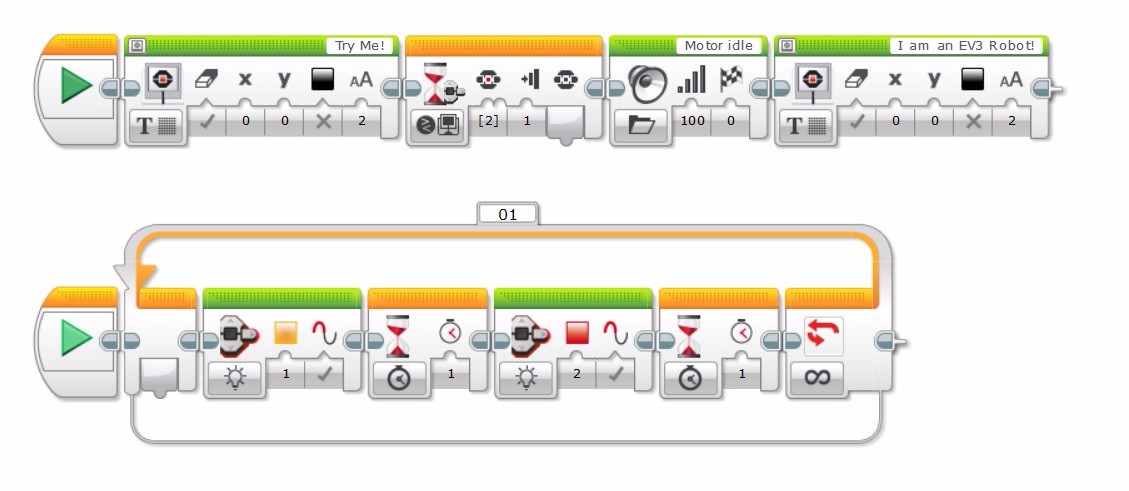
Sample Solution:

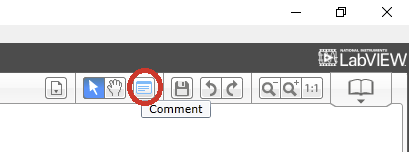
Commenting
- Comments can be added by pressing this button here:
- Ensure that each group takes the time to describe the robot’s behavior in their own words, while running the program
- This encourages the students to reflect on what they see and how it relates to the programming blocks
- The comments should be presented to the educator before proceeding to the next section
Extension Activity
- Change the wait blocks to get input from the buttons.
- This is accomplished by clicking on the wait block and then selecting “brick buttons”.
Sample Solution:

4. STEAM Activity
Challenge
- By creating a product package for their EV3 robots, students will discover relationships between volume and surface area and how it relates to the real world.
- Using the blocks they just learned in the coding activity, students can make their packages interactive using lights, sounds, and the display to include features such a "try me" button.
- Labeling a package gives students the opportunity to explain what they've learned about their new robots and display it in a clear and interesting way.
Sample Solution:
Student Worksheet
Print for students to complete
Extension Activity
5. Consolidate
Question Sheet
Print this question sheet for students to complete.
Answer Key
Discussion Questions
Discuss as a class:
- Might have used the wrong components in a step and had to go back and change the model, or had difficulty finding parts, especially the smaller ones.
- Click the top right hand corner of the programming block and select a file.
- The EV3 Software asked for a firmware update. (or) You must insert the USB cable the correct way up
Clean Up
- The Driving Base will be required for Lesson 2
Assessment
- See the Assessmentpage.
Ontario - Educational Standards
Math – Measurement
Lesson 3 - Move Object - Bridge Crossing (120 mins minimum)
Preparation
Materials
For each group of 2-3 students
- EV3 Core Set
- EV3 Software Installed on a Tablet or PC
- The students will need to gather homemade building materials (unless you want to supply some, use rolled up paper and string <- which works well for a fair test)
Classroom Setup
- Create floor space for students to drive their robots
- Have student groups ready
- Students group should sit together for easy access to the LEGO components
- Ensure that the batteries are charged and the kits are in working order
Coding Activity
- Reviewed the sample code for the ‘Test It’ task
- (optional) complete the "Modify It" task yourself
- Find several objects of different shapes and sizes that may or may not fit in the frame of the Medium Motor Module.
- For the Challenge you will need to prepare an obstacle course on the floor. You can use a large sheet of paper, markers, or sticky tape. See example below
STEAM Activity
- Review the activity answer sheet
- Review the learning objectives
- Review the sample solution code
1. Introduction
Description
- Students will be constructing light weight bridges which can be carried by the robot arm, deployed on command, and carry the robot itself. This will demonstrate their understanding of both coding, forces, and design considerations.
Why is this Lesson Important for FIRST LEGO Teams?
- You will need to add motorized arms and attachments to score additional points on the field.
- This lesson will give you an instructional build of a good motorized arm that can be adapted for FIRST LEGO Competitions. You may choose to build your own design after this course.
- Notice how this robot effectively uses a medium motor and a simple arm to grab loops and collect the game pieces
- Many arms can be controlled with one motor using gears.
- Designs of arms and attachments can become very elaborate.
- Notice how this robot effectively uses several arms, and hooks, powered by the medium motor to collect loops.
Get Started
- Have students open the LEGO EV3 Education Software (see EV3 Setuppage to download)
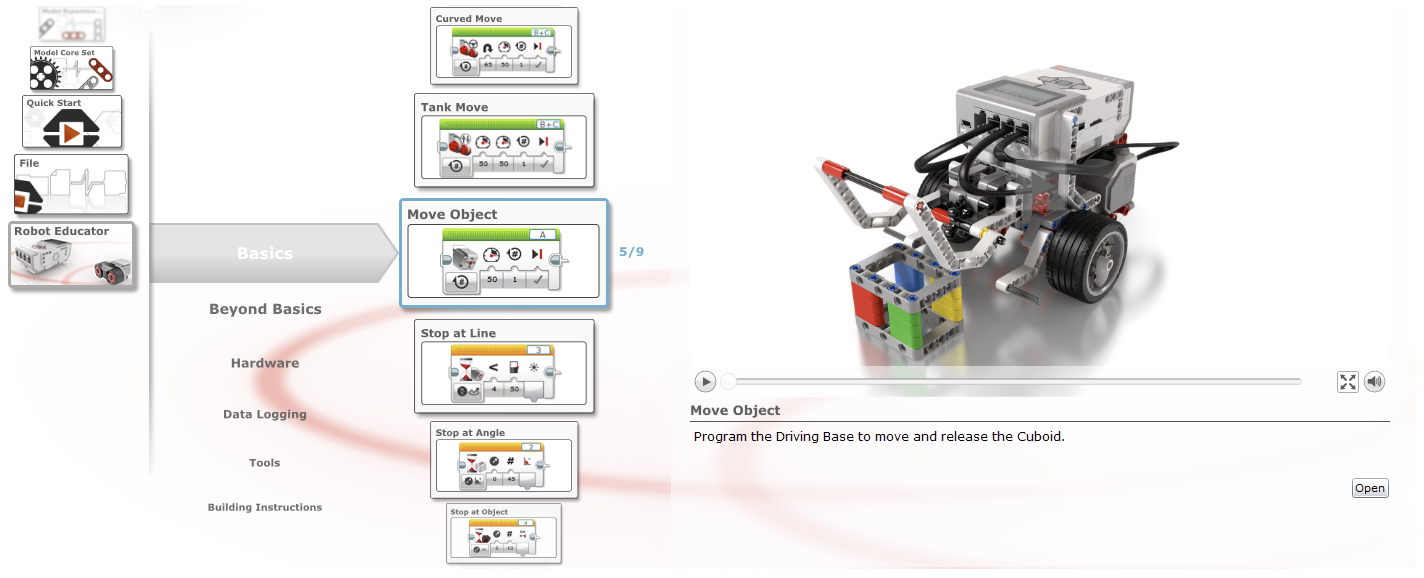
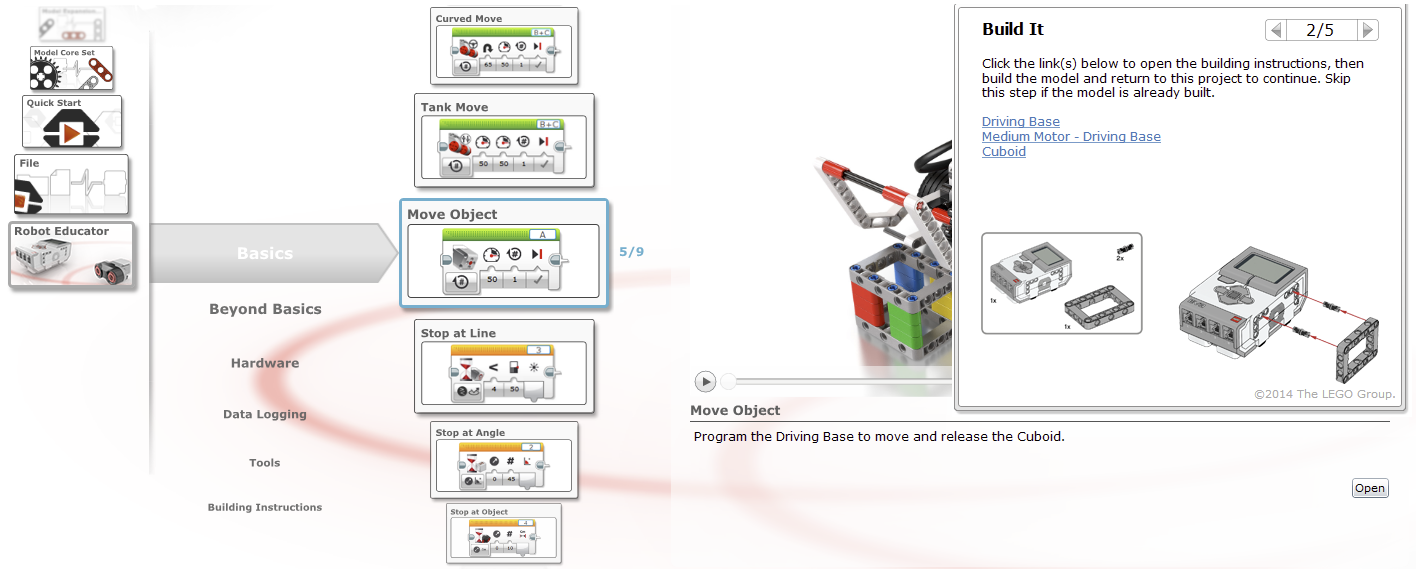
- Navigate to Robot Educator > Basics > Move Object > Move Object (Video)
- Students can follow along on own devices for these upcoming sections:
- 1. Introduction - Video
- 2. Building Activity - "Build It"
- 3. Coding Activity - Interactive Animation
- 3. Coding Activity - "Test It"
- 3. Coding Activity - "Modify It"
- Not available if you are using the LEGO EV3 Home Version
Video
- Have the students view the embedded video as a teaser of what their robot will be able to do
- Proceed to the Building Activity
2. Building Activity
Required Building
- The Driving Base instructions can be skipped if the model is still intact from Lesson 2.
- The Medium Motor and Cuboid are new for this lesson, and need to be built
- All the instructions are below for reference
"Build It" (Robot Educator)
- The LEGO EV3 Education Software contains embedded building instructions for this lesson
- Navigate to: Robot Educator > Basics > Move Object > Build It
"Build It" (Printed Booklet)
- Students can use the printed instruction booklet included in the EV3 Core set.
"Build It" (PDF)
- Download the PDFs and save it to the student's Desktops or Tablets
- (Alternatively) Print booklets for students
3. Coding Activity
Objectives
- Grab, Move and Release an Object
- Medium Motor Control
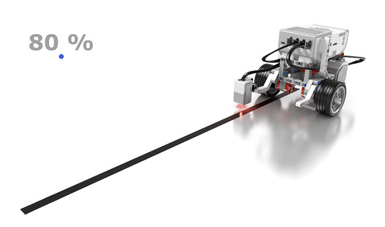
- Setting the Power/Speed of a motor
- Moving a Motor a Specific Number of Degrees
- Navigate to: Robot Educator > Basics > Move Object > Interactive Animation
- Allow students to click blocks to play
- Skip if you are using the LEGO EV3 Home Version
"Test It"
- Navigate to: Robot Educator > Basics > Move Object > Test It
- (Alternatively) Display this section on a projector screen
- Recreate
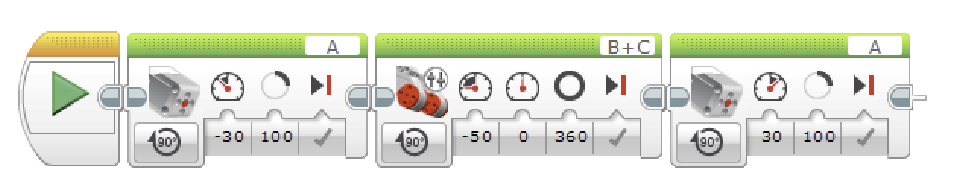 Using the Medium Motor Module, the robot lowers the frame and grabs the Cuboid . It then reverses before raising the frame to release the Cuboid.
“Modify It”
- Navigate to: Robot Educator > Basics > Move Object > Modify It
- Modify the program to move objects of different shapes and sizes.
Commenting
- Comments can be added by pressing this button here:
- Ensure that each group takes the time to describe the robot’s behavior in their own words, while running the program
- This encourages the students to reflect on what they see and how it relates to the programming blocks
- The comments should be presented to the educator before proceeding to the next section
Challenge
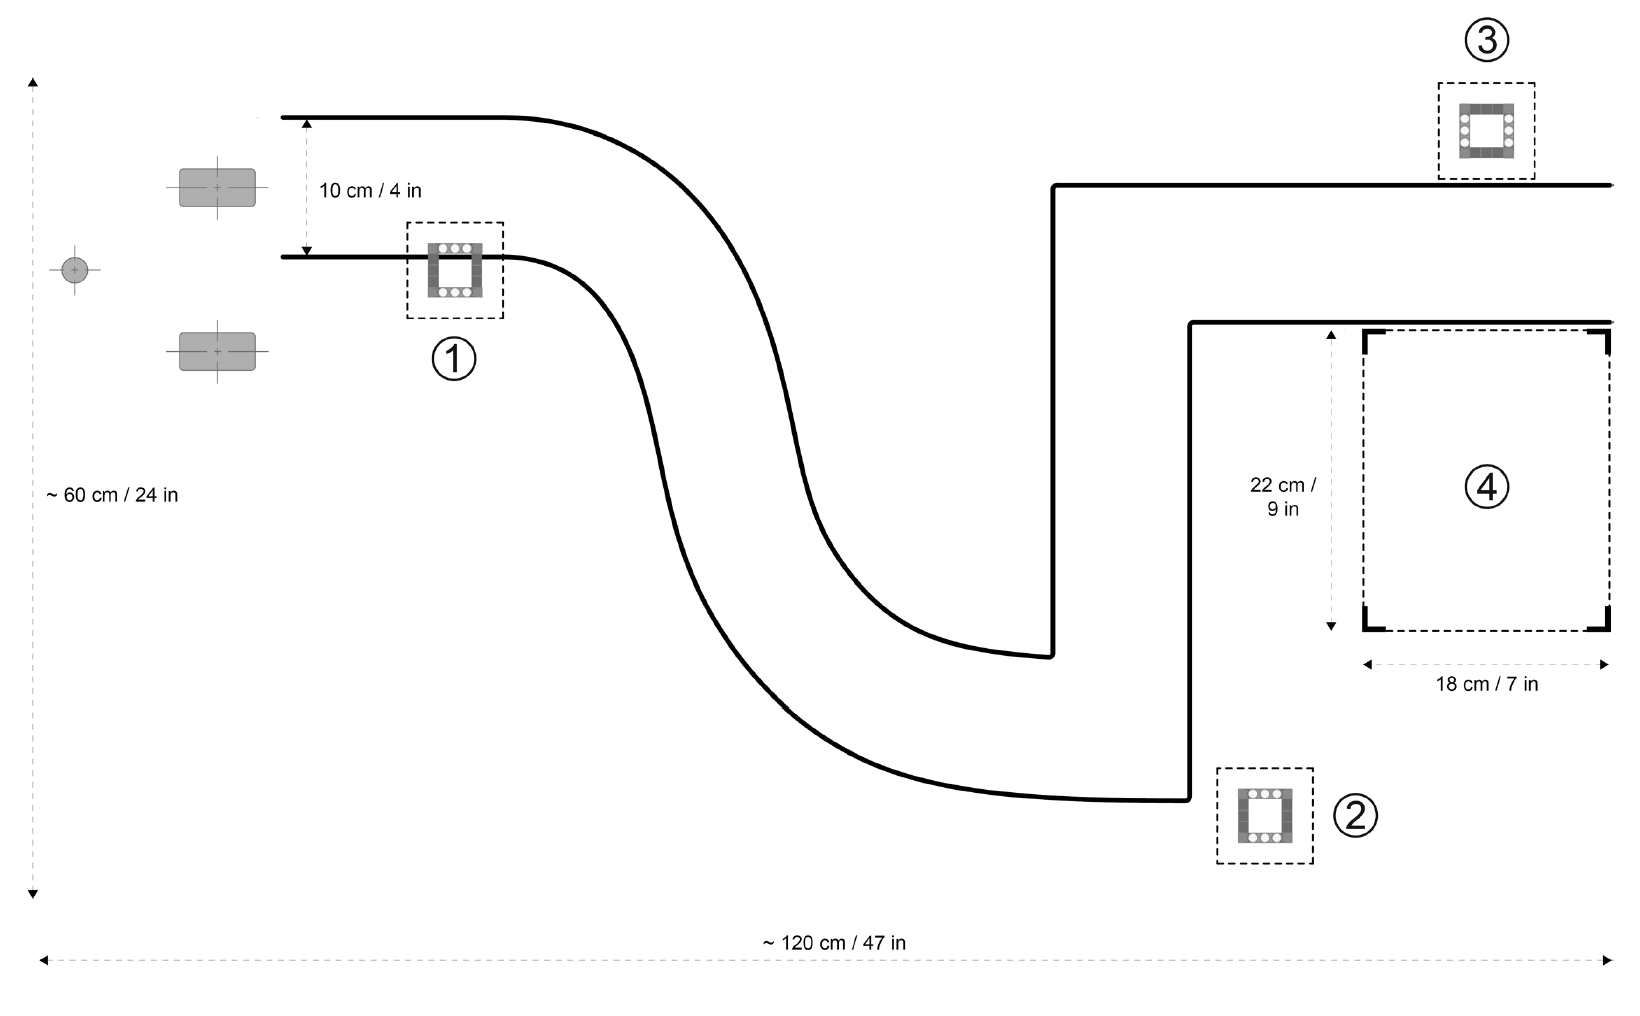
A. Combine the optional challenge of Lesson 2 with moving the Cuboid (or another object) from predetermined start and end positions (see illustration below) .
B. For an additional challenge, students can also use the Ultrasonic Sensor to help detect the Cuboid (see Lesson 4 for further details).
4. STEAM Activity
Challenge
- Students will be constructing light weight bridges which can be carried by the robot arm, deployed on command, and carry the robot itself. This will demonstrate their understanding of both coding, forces, and design considerations.
- The front arm lifter will need to be modified slightly so it looks more like a forklift. This will allow the robot to carry and release a mobile bridge.
- Students will need to either bring materials from home, or roll pieces of paper into tight cylinders. The robot is quite heavy so some strong materials will be necessary. You can tweak the span requirements depending on the resources available to the students.
- Students will also need to come up with a simple sequence so their robot can approach deploy, back-up and traverse.
Sample Solution Code

Student Worksheet
Print this activity sheet for students to complete.
Extension
- Attempt to have your robot pick the bridge up once it has crossed over to the other side. This may require changing the other side of your bridge so that it’s more symmetrical.
5. Consolidate
Question Sheet
Print for students to complete
Answer Key
Discussion Questions
Discuss as a class:
- Modified the Medium Motor Module frame to fit the larger objects.
- The number of degrees of the Medium Motor Block had to be changed.
- In order for the robot to lower the Medium Motor Module, the Medium Motor Block Power setting must be set to a negative (-) value.
Clean Up
- The Driving Base and Cuboid are required for Lesson 4
- The Medium Motor can be saved for Lesson 8
Ontario - Educational Standards
Science – Form and Function
Lesson 8 - Animal Adaptions (120 mins minimum)
Preparation
Materials
For each group of 2-3 students
- EV3 Core Set
- EV3 Software Installed on a Tablet or PC
- (Optional) Craft Materials to Decorate Student's Robots/Habbitats
Classroom Setup
- Create floor space for students to drive their robots
- Have student groups ready
- Students group should sit together for easy access to the LEGO components
- Ensure that the batteries are charged and the kits are in working order
Coding Activity
- Review the sample code for the ‘Test It’ task
- (optional) complete the "Modify It" task yourself
STEAM Activity
- Review the activity answer sheet
- Review the learning objectives
- Review the sample solution code
1. Introduction
Description
- The students will using everything they know about the EV3 robot in order to create a set of animal adaptions which allow their new imagined organism to fit into the ecosystem.
- Every adaption will be backed up with a justification, as well as programmed into the robot as it reacts to its environment using the sensors, and screen display.
- This activity works well for students who want to show off their creativity, as well as their understanding of how animal adaptions come about due to their place in the ecosystem.
Practice Makes Perfect!
- FIRST LEGO league is exciting like any sports competition. You can cheer for your team, and there is intense pressure when your team needs to score those last few points to win. Of course there is always a little bit of luck involved, but you can drastically improve your odds of winning by practicing and improving your skills as a team.
- Just like in basketball you may practice 3-pointers, or in soccer you can work on passing, or in hockey you can get really good at your slap shot, there are many skills in programming (coding) and building that you can develop to improve how well your robot does on the game field during a FIRST LEGO League Competition.
- Check out some of these amazing robots for inspiration, and continue to practice all the skills involved in making your own amazing robots.
2. Building Activity
Required Building
- The Driving Base and Colour Sensor instructions can be skipped if the models are still intact from Lesson 7
- The Ultrasonic Sensor, Medium Motor, Gyro Sensor, Cuboid instructions can be skipped if they are intact from previous lessons
- The Touch Sensor is a new for this lesson, and needs to be built.
- All the instructions are below for reference
"Build It" (Robot Educator)
- The LEGO EV3 Education Software contains embedded building instructions for this lesson
- Navigate to: Robot Educator > Building Instructions
- Have students build accessories as needed for their creature.
"Build It" (Printed Booklet)
- Students can use the printed instruction booklet included in the EV3 Core set.
"Build It" (PDF)
- Download the PDF and save it to the students' Desktops or iPads
- (Alternatively) Print booklets for students
3. Coding Activity
Review Coding Concepts
Lesson 1
- Creating Sounds
- Displaying Images
- Controlling the Brick Status Light
- Wait Block, Delay Code for a Specific Amount of Time
- Creating Sequences of Actions
Lesson 2
- Drive Motor Control
- Move Block
- Steering
- Navigating Obstacles
- Point Turns
- Single-motor Turns
- Curved Turns
Lesson 3
- Grab, Move and Release an Object
- Medium Motor Control
- Setting the Power/Speed of a motor
- Moving a Motor a Specific Number of Degrees
Lesson 4
- Reading Data from the Ultrasonic (Distance) Sensor
- Detect Changes in Sensors (Change Mode)
- Compare the Value of a Sensor (Compare Mode)
- Using The Wait Block to Delay the Code with a Sensor Condition
Lesson 5
- Reading Data From the Gyro Sensor
- Performing Exact Turns using the Gyro Sensor
- Exploring Sensor Accuracy
- Compensating for Sensor Errors
Lesson 6
- Reading Data From The Colour Sensor
- Calculating an Appropriate Threshold Value
- Using the Port View App
- Reading Colour Data
- Stopping on a Black Line
- Stopping on a Specific Colour Line
- Setting Default Actions when no Colour is Detected
Lesson 7
- Switches
- Loops
- Using a Loop and Switch Combination for State-Based Programming
- Creating a Line-Following Algorithm for a Black Line
- Optimizing Line-Following for Smoother Motion
- Optimizing Line-Following for Faster Speeds
- Following a Gray Line
4. STEAM Activity
Challenge
- The students will using everything they know about the EV3 robot in order to create a set of animal adaptions which allow their new imagined organism to fit into the ecosystem.
- Every adaption will be backed up with a justification, as well as programmed into the robot as it reacts to its environment using the sensors, and screen display.
- This activity works well for students who want to show off their creativity, as well as their understanding of how animal adaptions come about due to their place in the ecosystem.
- Let students know if they're allowed to use paper and tape to decorate their robots for extra effect.
Student Worksheet
Print this activity sheet for students to complete.
Extension
If you’ve got a great animal you’re happy with, partner up with another group and try and make them have some sort of automated interaction. This could be a fight for resources, or a predator prey interaction.
5. Consolidate
Question Sheet
Print for students to complete
Answer Key
Ontario - Educational Standards
Science - Interactions In the Environment
Course Overview
About FIRST LEGO League

Global Site: http://www.firstlegoleague.org
What is FIRST LEGO League?
FIRST LEGO League introduces younger students to real-world engineering challenges by building LEGO-based robots to complete tasks on a thematic playing surface. FIRST LEGO League teams, guided by their imaginations and adult coaches, discover exciting career possibilities and, through the process, learn to make positive contributions to society.
Students get to:
- Design, build, test and program robots using LEGO MINDSTORMS® technology
- Apply real-world math and science concepts
- Research challenges facing today’s scientists
- Learn critical thinking, team-building and presentation skills
Get Started with FIRST LEGO League in your Class
Logics Academy, in partnership with FIRST Robotics Canada is pleased to offer courses to achieve curriculum based learning objectives in an engaging, inquiry based, and experiential way. This method of delivery has proven to improve engagement, retention, and deeper understanding of core math, science and language knowledge and skills. Through this course, a student can progress with no background in programming an EV3 Robot to confidently participate as part of a team in a FIRST LEGO League event!
Click on a Course to Get Started!


Find out more:
- When are the next FIRST LEGO League Ontario Regional competitions?
- When are the FIRST LEGO League Ontario Provincial competitions?
- When are the next FIRST LEGO League Ontario Practice events?
- How do I start my own team?
- What does a typical calendar of a season look like?
- What training and resources are available?
- Can I volunteer to help at a competition?
- Where do I register and find about this years challenge?
What People Are Saying About FIRST LEGO League
"I have always enjoyed building with LEGO and have participated in FIRST LEGO League for the past 5 years. It is exciting to see all the capabilities of the robots with their sensors and programming. I am looking forward to FIRST Robotics Competition to expand my knowledge and possibly shape my educational and career choices.”
— Brandon McAuley, FIRST LEGO League Team Member
"I find this is a great program and think all schools should be a part of the FIRST LEGO League program."
— FIRST LEGO League Coach
"To introduce myself, my name is Brent Freer. My wife, Laurie and I coach team 1787 “Sensored” (Bluewater Robotics). This is our third year coaching. FIRST LEGO League is an awesome program. We continually hear from parents that this program offers opportunities for kids that don’t play sports. The day they want to go to school is “robotics day”I look forward to next year and more."
– Brent, FIRST LEGO League Coach for team 1787 "Sensored"
FIRST Mission
Our mission is to inspire young people to pursue further studies and careers in the field of science, technology and engineering. Our vision is of a world which celebrates success in science, technology and engineering and in which young people dream of becoming science and technology heroes. We pursue our mission primarily through running robotics competitions for school-age students at the elementary, junior high school and senior high school level.
FIRST Motivation
- We believe that as a society we face enormous challenges, and that to confront these challenges, we will need the full benefit of the energy, talent and dedication of our next generation of scientists, engineers and technologists.
- We believe that in any community, we encourage what we celebrate. When we celebrate success in sports, we motivate youth to excel in sports. When we celebrate success in entertainment and the arts, we motivate youth to excel as entertainers and artists.We believe it is important to celebrate, at the high school level and earlier, participation in and success in science, technology and engineering, in order to inspire young people to pursue further studies and careers in these areas.
- We believe that our prosperity as a society is driven by our productivity. For our society to be as productive as it can be, it must be as innovative as it can be. Investing in programs that encourage young people to develop related skills is one of the most important investments our society can make.
FIRST values
- Gracious Professionalism™: We instill this value at every opportunity. We expect, require and reward on-field and off-field conduct that models the best values of professional respect and courtesy.
- Coopertition®: Our programs are designed so that to succeed, teams must be able to cooperate with other teams as well as compete with other teams. This is an important real world skill. The principles of “gracious professionalism™” and coopertition™ work hand in hand.
- judged awards: We make significant efforts to recognize and reward accomplishment, whether or not it is reflected in success on the playing field. We make it clear that our most prestigious awards are our judged awards. We deliberately seek judges of considerable standing and seniority (e.g., in the FRC context, university professors, engineering vice presidents) so that students know, when making presentations to such judges or when receiving an award from them, that the award is truly a meaningful one.
- indirect learning: Our mission is to inspire, not to formally educate, but participation in one of our events involves the application of a remarkable range of creative and analytical skills, as well as the development of valuable social intelligence skills. Students must learn to problem-solve collectively, as members of a team, while under constraints of time, cost, weight, size, game rules and regulations and other restrictions.
- learning from mentors: We believe that much valuable learning takes place when students work side to side with adult mentors who are taking time from their professional careers to share their knowledge of and enthusiasm for science, technology and engineering with students. We work hard to put strong mentoring relationships in place. We value mentors as teachers and as role models.
- Respect for diversity, inclusion and volunteerism: Participating students fully reflect the diversity of contemporary Ontario society. Our program is volunteer led and volunteer delivered. Part of our mandate is to encourage more young women to consider careers in science, technology and engineering and we appear to be having some success in this regard.
Setting Up EV3 in the Clasroom
1. Install Software
LEGO EV3 Education Version (Recommended)

LEGO EV3 Home Version (Limited)

2. Organize Parts
Sorting Guides
- EV3 Core Set 45544
- EV3 Expansion Set 45560 (NOT required)
3. Label Kits
- Label each LEGO Bin
- Label each EV3 Brick
- Create and label a Spare Bin to store each robot, or each partially build robot.
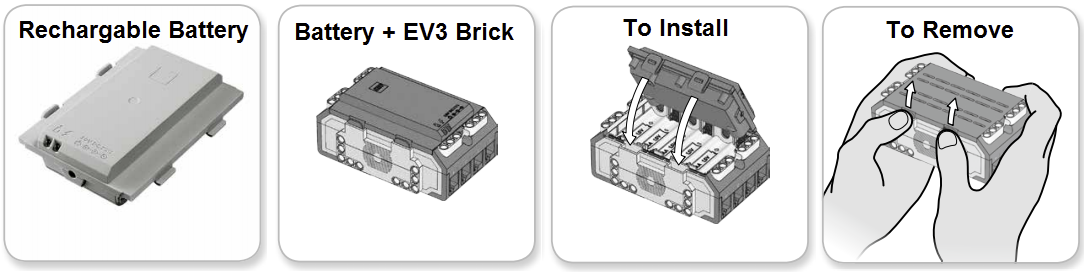
4. Charge Batteries
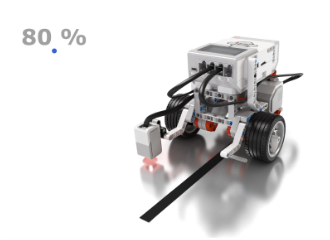
- Using the enclosed power adaptor cord, connect the Rechargeable Battery to a wall outlet.
- When you plug theuncharged battery into a wall socket, a red light will be lit.
- When charging is complete, the red light will go out and the green light will be illuminated.
- The recharging process will generally take three to four hours.
- Charge the batteries when the robots are not being used so they are ready for the next class
- It is safe to leave the batteries charging overnight.
5. Connect and Test
6. Name the EV3 Brick
- Assign a name to each EV3 Brick on using the screen and buttons, or the EV3 Software.
- The EV3 Brick name especially important for Bluetooth when using Tablets
- When the EV3 Brick is connected, look for a text field next to the "Brick Information" icon at bottom right in the code editor. (You may have to click the small triangle to the left of the three vertical EV3 buttons to expand the info window). Default name is "EV3". Just click in that text field and edit.
7. Turn Off the EV3 Brick
- To turn the EV3 Brick off, press the Back button (button 1 above) until you see the Shut Down screen.
- The Abort X will already be selected.
- Use the Right button to select the Accept check mark, then press the Center button for OK.
- Your EV3 Brick is now turned off.
8. Charge Batteries when not Being Used !
Course Objectives

Course Description
This course consists of eight lessons that begin with the building of the educational robot, and end with a culminating challenge. The lessons can be run independently, but work best in succession to progressively build upon and develop coding & problem-solving skills for students of varying degrees of familiarity with programming an EV3 robot. Each lesson teaches the student a new coding tool, which is then used to demonstrate, or discover the curriculum based learning objectives.
The coding portion of the lessons will teach students to control a robot to stop at an object, move in a controlled manner, use sensors to follow a line, and finally create a animal with various behaviours to demonstrate their overall proficiency.
The curriculum based objectives in each lesson have a common mathematics thread, but specific lessons also touch on many core sciences and language learning objectives as well. An activity sheet guides the students through the curriculum investigation, and asks them thoughtful questions about their journey.
All resources are provided for complete lesson delivery, including lesson plan, building instructions, and student activity sheets. In addition to the LEGO EV3 educational kit and software, you will need a few common items such as chart paper, markers, masking tape, electrical tape, elastics, string, and scissors.
Course Overview
Lesson 1 - Think Inside the Box
- Creating Sounds
- Displaying Images
- Controlling the Brick Status Light
- Wait Block, Delay Code for a Specific Amount of Time
- Creating Sequences of Actions
Science
- Volume
- Surface Area
Lesson 2 - Heated Presentation
Coding
- Drive Motor Control
- Move Block
- Steering
- Navigating Obstacles
- Point Turns
- Single-Motor Turns
- Curved Turns
Science
- Heat
- Particle Theory
Lesson 3 - Bridge Crossing
- Grab, Move and Release an Object
- Medium Motor Control
- Setting the Power/Speed of a Motor
- Moving a Motor a Specific Number of Degrees
Science
- Forces, Form and Function
- Structures
Lesson 4 - Changes of State
- Reading Data from the Ultrasonic (Distance) Sensor
- Detect Changes in Sensors (Change Mode)
- Compare the Value of a Sensor (Compare Mode)
- Using The Wait Block to Delay the Code with a Sensor Condition
Science
- Particle Theory
- Changes of State
Lesson 5 - Unique Triangles
- Reading Data From the Gyro (Angle) Sensor
- Performing Exact Turns using the Gyro Sensor
- Exploring Sensor Accuracy
- Compensating for Sensor Errors
- Geometry of Unique Triangles
- Exterior and Interior Angles
Lesson 6 - A Bit of Light Sorting
- Reading Data From The Colour Sensor
- Calculating an Appropriate Threshold Value
- Using the Port View App
- Reading Colour Data
- Stopping on a Black Line
- Stopping on a Specific Colour Line
- Setting Default Actions when no Colour is Detected
Science
- Separating Mixtures
Lesson 7 - Movement Towards Knowledge
- Switches
- Loops
- Using a Loop and Switch Combination for State-Based Programming
- Creating a Line-Following Algorithm for a Black Line
- Optimizing Line-Following for Smoother Motion
- Optimizing Line-Following for Faster Speeds
- Following a Gray Line
- Interaction in the Environment Vocabulary
Lesson 8 - Animal Adaptions
- Application of Previous Concepts
Science
- Ecosystems and Animal Adaptions
Lesson Overview
Overview
- The role of the educator in this environment is to act as a coach or mentor as the students work together and progress through the self-guided activities.
- Learning alongside the students is encouraged.
- Every lesson has the same format to assist with ease of delivery and clarity for everyone involved.
- Each lesson includes the following sections:
Preparation
Materials
- LEGO Kit to Student Ratios
- Purchasing of any additional materials
Classroom Setup
- Floor space
- Desk arrangement
- Student groups
- LEGO Kit preparation
Coding activity
- Preparation specific to the Coding Activity
STEAM Activity
- Preparation specific to the STEAM Activity
1. Introduction
Description
- Introduce the lesson
- Remind students of any logistical considerations
Get Started
- Direct students to the appropriate lesson in the Robot Educator embedded in the LEGO EV3 Education Software
- Skip this section if you are using the LEGO EV3 Home Version
Video
- An introductory video of what the robot will do after the Building and Coding Activities
- Skip this section if you are using the LEGO EV3 Home Version
- Lesson 8 has no video
2. Building Activity
- Students will start their activities by using the LEGO components to build the Driving Base or a specific attachment (Cuboid, Medium Motor, etc)
- If the lessons are being completed in sequence, the students can often re-use what they have built from previous lessons
- There are 3 ways for students to access building instructions:
- Robot Educator: "Build It" Instructions are embedded in the LEGO EV3 Education Software
- Printed Booklet: A printed booklet is included in each LEGO EV3 Education Core Set
- PDF: Available through this site for printing or download to student devices
3. Coding Activity
- Use a "Click Blocks to Play" animation to understand how the code in the "Test It" section will work
- Skip this section if you are using the LEGO EV3 Home Version
- Lesson 1 and Lesson 8 have no Interactive Animation
- Students view an example code from the Robot Educator in the LEGO EV3 Education Software
- (Alternatively) Example code is presented on a projector
- Students recreate the code on their own device in the EV3 software
- Students then download the code and observe the resulting behavior of the robot
- If the robot does not do what was expected, students should double check that their code is correct
- The robot behavior should be demonstrated to the educator before proceeding to the the next section
"Modify it"
- Students use the code from the "Test It" section as a starting point
- The code must be modified to achieve another objective outlined in the lesson
- The robot behavior should be demonstrated to the educator before proceeding to the the next section
- The "modify it" task can be communicated verbally, on a projector, or using the Robot Educator in the LEGO EV3 Education Software.
Commenting
- Ensure that each group takes the time to describe the robot’s behavior in their own words, while running the program
- This encourages the students to reflect on what they see and how it relates to the programming blocks
- The comments should be presented to the educator before proceeding to the next section
- Students are given specific challenges that will require starting a new code from scratch
- The challenges will require them to apply what they have learned in the previous sections
- The robot behavior should be demonstrated to the educator before proceeding to the the next section
- Challenge instructions can be communicated verbally or via projector
Extension
- An additional challenge is provided for eager students.
4. STEAM Activity
Challenge
- Students participate in an activity which incorporate aspects of STEAM (Science, Technology, Engineering, Arts, and Math)
Student Worksheet
- The Student Worksheet will help guide the students through the activity
- The students will use their robot and new coding skills to learn/reinforce specific ministry objectives in Science and/or Math
Extension
- An additional challenge is provided for eager students
5. Consolidate
- Print and have the students complete the Question Sheet
- The Question Sheet will reflect on the Coding, Science and Math objectives.
Answer Key
- Take up the questions as a group
- Have students share their learning. Go over any common issues or misconceptions
Discussion Questions
- Additional questions for group discussion
Clean Up
- Disassemble any accessories not required for the next lesson
- The Driving Base can remain assembled until the end of the course. It is used in every lesson
- Don't forget to plug in the batteries for the next lesson
- Have students review their friend’s worksheet, or hand in the sheet
- The goal is to have the questions from the activity sheet be only assessment left at the end of the class
Tips and Tricks
- Use the "Lego EV3 Education" version of the software: It is more convenient if the students are using the Lego EV3 Education version of the software as this has all of the building instructions and guides for the programming component. For those not using the education software, a document detailing the steps is provided.
- Define roles when working in pairs: As in most classroom students will be working in small groups, it may be beneficial to have defined roles for the students at certain times throughout the lesson to make sure everyone is getting the full experience. Also, switching groups often can be beneficial to mix up student chemistry. You can also then decide whether you want each student answering all of the questions, or if they are submitting it as a group.
- Create a folder for each student's worksheets: If you are handing out the student activity sheets, a student folder where they can organise and collect them as the course progresses is recommended.
- Use a naming convention when saving code: If students will be starting to code, and then stopping before they are complete, having a cloud based solution where students can save their code, using a name convention such as (Student1FirstName_Student2FirstName_Lesson #) can be very useful, so that you don’t need to keep track of which device each group was using.
- Keep a common robot configuration throughout the course: As the lesson progresses for the first time, it asks students to add sensors. The EV3 ‘edubot’ can work fine with all of the sensors attached so there is no need to disassemble the robot after the first build.
- Plan for storage and charging: Make sure you have a planned strategy for the students to 1) access the robots 2) store the robots and 3) charge the robots. This is not difficult but to avoid issues, students must be diligent and well trained.
- Review directional language as it pertains to the robot: Students have some common misconceptions when programming with EV3. For example, when you tell a robot to turn, it turns relative to itself, not the student.
- The "Wait" block is key to using sensors: The course really comes down to understanding the use of the wait block in EV3 code. Put simply, the wait block is a gate that will keep previous blocks running, or simply pause the code until something happens. A wait block can be used with any sensor.
- There are many solutions to the same problem: It is beneficial to review and understand the sample solution code prior to the class. Keeping in mind though, that there are other correct solutions then the ones provided.
Assessment
Overview
The assessment tracking sheet is designed to help the teacher paint a picture of the student’s successes as the lesson is unfolding, and hopefully see the differences between the achievement of the coding learning objectives and the curriculum objectives. The goal is to assess the students during the lesson by observing as they are working on their challenges, answering questions and checking off how well they’ve done each section. This will hopefully reduce the amount of assessment time after the lesson. After the lesson, you can mark their activity sheets, for their completeness, correctness, and comprehension questions.
Assessment Tracking Sheet
- Print one per lesson
Assessment Guide
Lesson 4 - Stop at Object - Change of State (120 mins minimum)
Preparation
For each group of 2-3 students
- EV3 Core Set
- EV3 Software Installed on a Tablet or PC
- Optional pen set up to contain the robots when they're bouncing around in the STEAM activity
Classroom Setup
- Create floor space for students to drive their robots
- Have student groups ready
- Students group should sit together for easy access to the LEGO components
- Ensure that the batteries are charged and the kits are in working order
- Reviewed the sample code for the ‘Test It’ task
- (optional) complete the "Modify It" task yourself
- Make sure you’re familiar with the port view feature on the brick. It shows you the values coming in from each of the sensor ports. This turns the EV3 unit into a measuring device.
- Make sure you understand the difference between Change and Compare Modes.
- When using Compare Mode, the program waits for a certain distance to be read by the sensor.
- When using the Change Mode, the program reads the distance and then waits for a certain increase or decrease in distance.
- For the Challenge, you will need to prepare an obstacle course on the floor. You can use a large sheet of paper, markers, or sticky tape. See example below.
STEAM Activity
- Review the activity answer sheet
- Review the learning objectives
- Review the sample solution code
1. Introduction
Description
The students will use programs similar to the coding activity to demonstrate their understanding of particles in the three states of matter. The ultrasonic sensor will allow the robot to change how far away it vibrates from other particles (robots) in the material.
Why is this Lesson important for FIRST LEGO Teams?
- The Ultrasonic sensor can help your robot avoid collisions on the field, turn at exact distances away from the wall, and detect if an object is close enough to grab.
- See if you can identify how the sensor is being used in all three ways in this video
- The ultrasonic sensor can also detect and count objects on the field, so the robot can grab a specific object in the set.
- In this video the robot grabs the second object, but with the right coding, another object could be selected by (for example) pressing the buttons on the robot at the start.
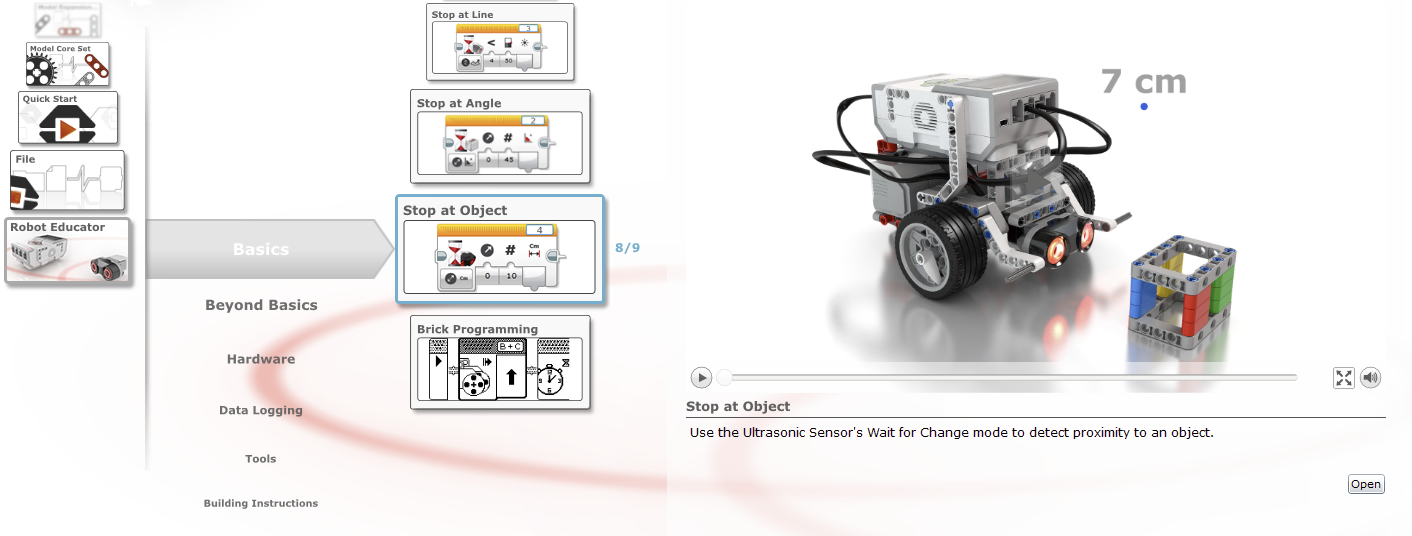
Get Started
- Have students open the LEGO EV3 Education Software (see EV3 Setup page to download)
- Navigate to: Robot Educator > Basics > Stop at Object > Stop at Object (Video)
- Students can follow along on own devices for these upcoming sections:
- 1. Introduction - Video
- 2. Building Activity - "Build It"
- 3. Coding Activity - Interactive Animation
- 3. Coding Activity - "Test It"
- 3. Coding Activity - "Modify It"
- Not available if you are using the LEGO EV3 Home Version
Video
- Have the students view the embedded video as a teaser of what their robot will be able to do
- Proceed to the Building Activity
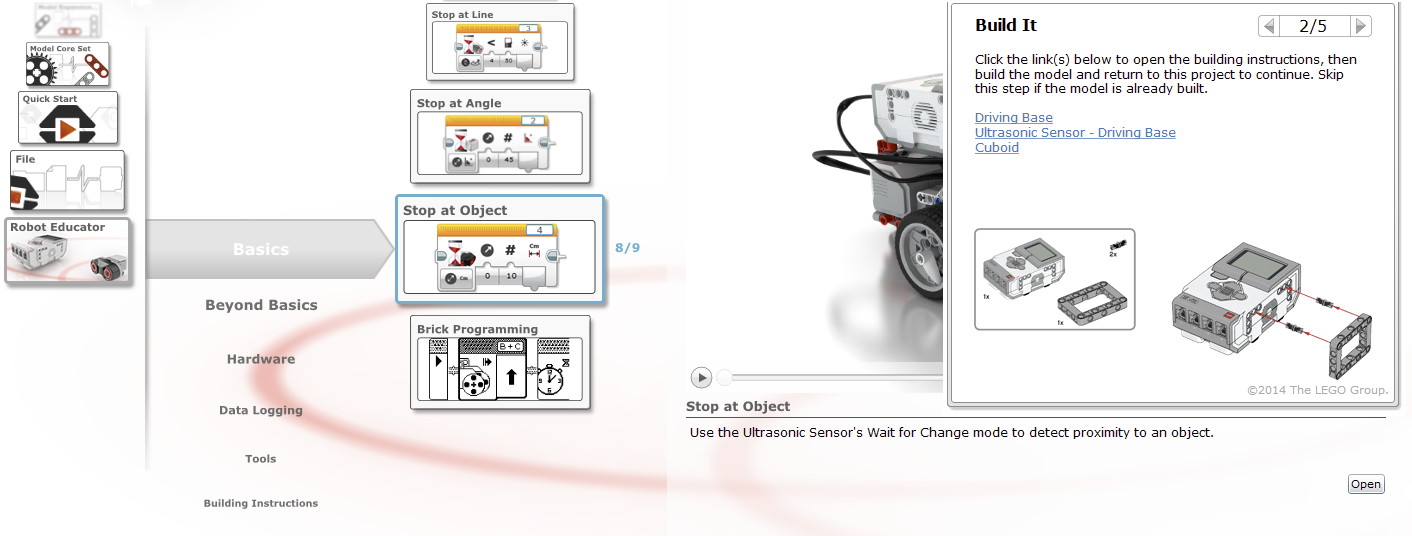
2. Building Activity
Required Building
- The Driving Base and Cuboid instructions can be skipped if the models are still intact from Lesson 3
- The Ultrasonic Sensor is new for this lesson and needs to be built
- All the instructions are below for reference
"Build It" (Robot Educator)
- The LEGO EV3 Education Software contains embedded building instructions for this lesson
- Navigate to: Robot Educator > Basics > Stop at Object > Build It
"Build It" (Printed Booklet)
- Students can use the printed instruction booklet included in the EV3 Core set.
"Build It" (PDF)
- Download the PDF and save it to the student's Desktop or iPads
- (Alternatively) Print booklets for students
3. Coding Activity
Objectives
- Reading Data from the Ultrasonic (Distance) Sensor
- Detect Changes in Sensors (Change Mode)
- Compare the Value of a Sensor (Compare Mode)
- Using The Wait Block to Delay the Code with a Sensor Condition
- Navigate to: Robot Educator > Basics > Stop at Object > Interactive Animation
- Allow students to click blocks to play
- Skip if you are using the LEGO EV3 Home Version
"Test it"
- Navigate to: Robot Educator > Basics > Stop at Object > Test It
- (Alternatively) Display this section on a projector screen
- Recreate

- Measuring distance using the Ultrasonic Sensor, the robot moves forward until it detects a decrease of 11 cm from the Cuboid and stops. The robot then reverses until it detects an increase of 6 cm from the Cuboid.
“Modify It”
- Navigate to: Robot Educator > Basics > Stop at Object > Modify It
- Move
Challenge
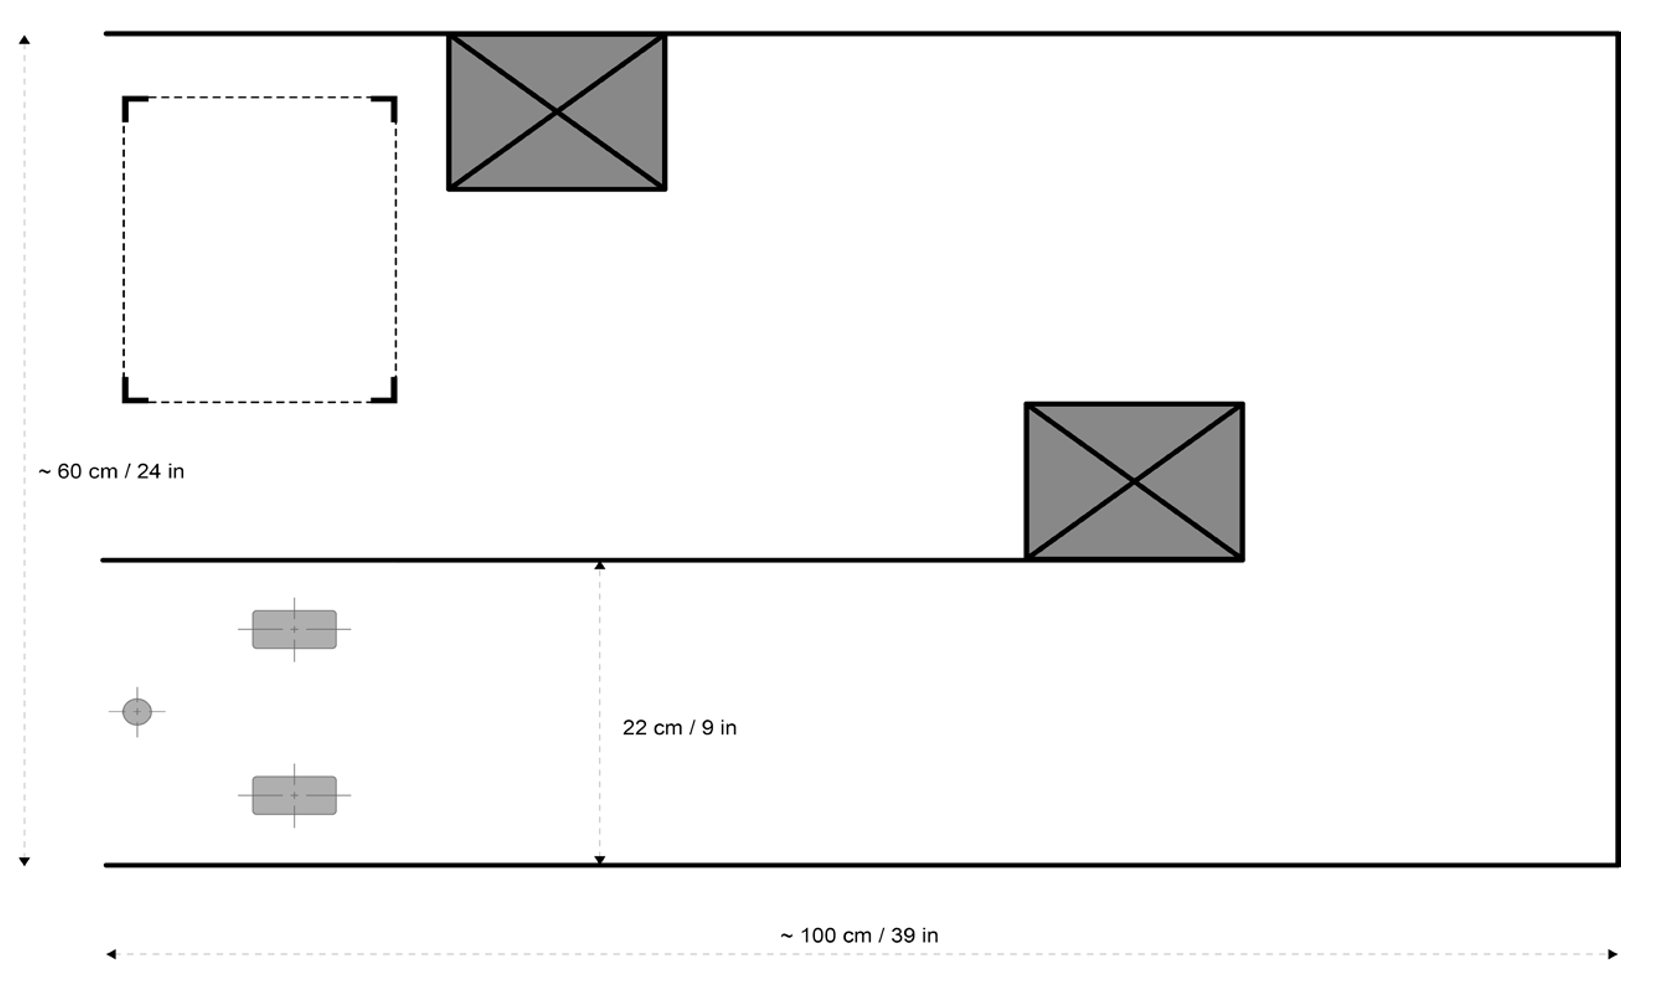
- Students attach the Medium Motor Module and grab the Cuboid (see illustration below).
- Remind students to use the Wait Block’s Ultrasonic Sensor in Compare Mode so that the robot moves close enough to the Cuboid.
- The following scenarios can be used:
A. Cuboid in position 1 → robot in start position → make the robot move the Cuboid to position 2 and return to the start position
B. Cuboid in position 1 → robot in start position → make the robot move the Cuboid to position 3 and then park in position 4
C. Cuboid in position 3 → robot starts in position 4 → make the robot move the Cuboid to position 1 following the path
Extension
- Create a program that drives up to a wall at a 45 o and stops exactly 20cm away.
- The number you use for the sensor will likely not be 20cm
4. STEAM Activity
Challenge
- The students will use programs similar to the coding activity to demonstrate their understanding of particles in the three states of matter. The ultrasonic sensor will allow the robot to change how far away it vibrates from other particles (robots) in the material.
- The main difference to the coding challenge is that the robot will back-up at an angle, allowing it to interact with other robots nearby.
- In order for this simulation to look convincing, you will need to have more than at least 4 robots in close proximity.
- A pen (perhaps made out of cardboard) allows the robots to bounce around a 'container' and makes the simulation more accurate. It also allows for conversations around temperature and pressure in a gas.
- Try and prod students to see how far they can carry the analogy, and bring up an flaws as well.
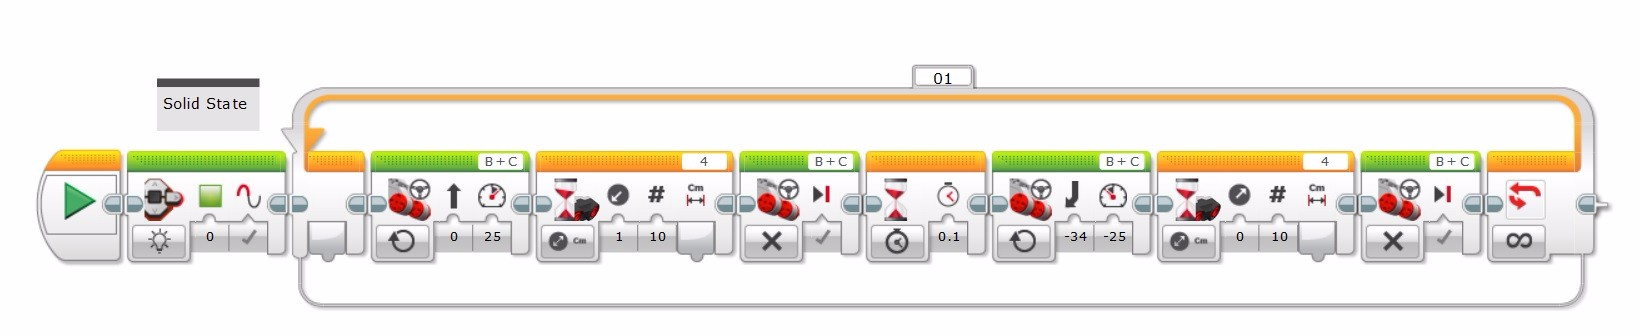
Sample Solution Code


Student Worksheet
Print this activity sheet for students to complete.
Extension
- State change: Instead of an infinite (unlimited) loop, change the exit condition to 10 seconds in your solid state program. Then add on your gas state program. Put your robots in the ring and start them all at the same time, and witness the change of state!
Q: What change of state is this? __________________
5. Consolidate
Question Sheet
Print for students to complete
Answer Key
Discussion Questions
Discuss as a class
- The Medium Motor Module knocks over or pushes aside the Cuboid before it can take hold of it.
- Change Mode reads the distance and then waits for an increase or decrease. Compare Mode waits for a certain predefined distance.
Discovery: What happens to the robot when it drives towards a round object?
- The Ultrasonic Sensor does not always recognize the shape, as it is unable to receive a signal back.
Clean Up
- The Driving Base is required for Lesson 5
- Ultrasonic Sensor and Cuboid can be saved for Lesson 8
Ontario - Educational Standards
Science – Heat in the Environment
Lesson 5 - Stop at Angle - Unique Triangles (120 mins minimum)
Preparation
Materials
For each group of 2-3 students
- EV3 Core Set
- EV3 Software Installed on a Tablet or PC
- Chart Paper, Washable Markers, Elastics or Masking Tape
Classroom Setup
- Create floor space for students to drive their robots
- Have student groups ready
- Students group should sit together for easy access to the LEGO components
- Ensure that the batteries are charged and the kits are in working order
Coding Activity
- Review the sample code for the ‘Test It’ task
- (optional) complete the "Modify It" task yourself
- Familiarize yourself with the Gyro Sensor to ensure that you can detect when it is drifting and how to correct it. The Gyro Sensor chapter in the User Guide will help familiarize you with the sensor.
- This topic is also covered in Coding Activity.
- Using sticky tape and protractors, students can create different angles on the floor to validate the turning angle of their robot. For tasks 6a and 6b, you will need to provide rubber bands to allow the students to attach a pen to their robot. For task 6c, you will need to prepare a maze on the floor. You can use a large sheet of paper, objects, markers, or sticky tape. See example below.
STEAM Activity
- Review the activity answer sheet
- Review the learning objectives
- Review the sample solution code
1. Introduction
Description
- Learn how to use the Gyro Sensor to make accurate turns.
- Understand that robots need to turn the exterior angles dimensions, to make a given turn angle. For example, a 45 degree turn needs an 135 degree turn by the robot.
- Investigate how unique triangles are communicated
- Through experience see that angles alone are not enough to communicate unique triangles
Why Is this Lesson is Important for FIRST LEGO Teams?
- Making precise turns can be difficult on a FIRST LEGO League field especially if the wheels are prone to slip or there are pesky objects that are in the way of your turns. Any misalignment of your robot could mean that it misses its targets and losses out on important game points.
- The gyro sensor, which you will learn how to use in this lesson, can help you make exact turns and drive straight regardless of what is going on in the field.
- Notice how the robot in this video uses the gyro sensor located on top to make very exact turns that always line up to the objects on the field. Dragging a heavy truck along in the attachment would normally cause the robot to slip and miss its goal, but with the trusty gyro sensor measuring the angle of the turn, the robot completes the mission successfully.
Get Started
- Have students open the LEGO EV3 Education Software (see EV3 Setup page to download)
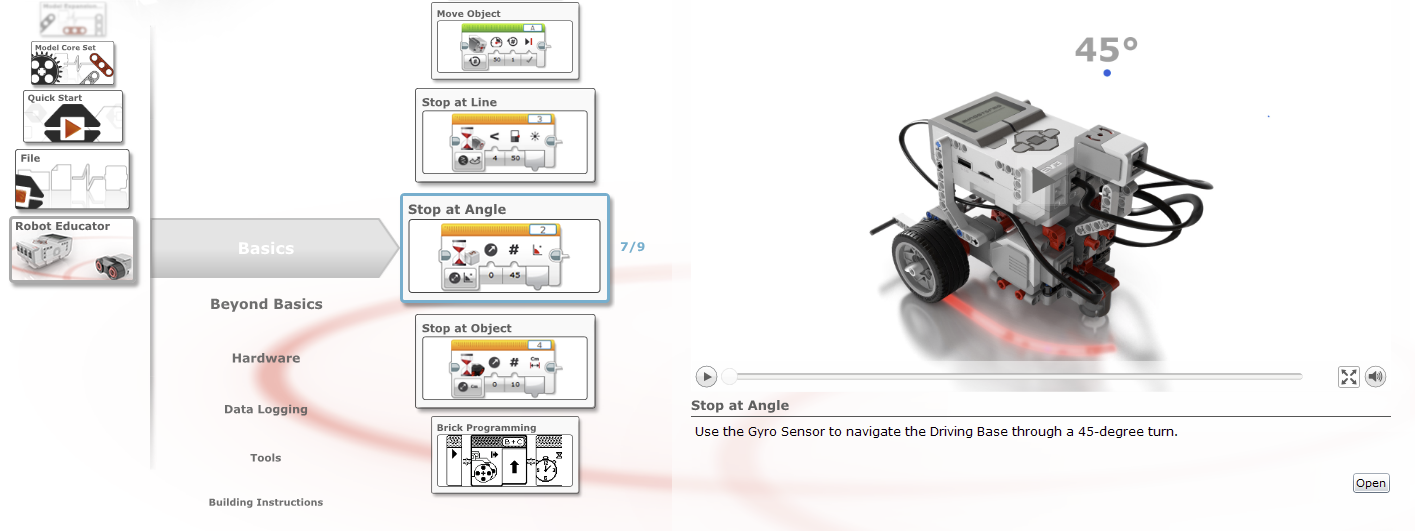
- Navigate to:Robot Educator > Basics > Stop at Angle > Stop at Angle (Video)
- Students can follow along on own devices for these upcoming sections:
- 1. Introduction - Video
- 2. Building Activity - "Build It"
- 3. Coding Activity - Interactive Animation
- 3. Coding Activity - "Test It"
- 3. Coding Activity - "Modify It"
- Not available if you are using the LEGO EV3 Home Version
Video
- Have the students view the embedded video as a teaser of what their robot will be able to do
- Proceed to the Building Activity
2. Building Activity
Required Building
- The Driving Base instructions can be skipped if the model is still intact from Lesson 4
- The Gyro Sensor is new for this lesson and must be built
- All the instructions are below for reference
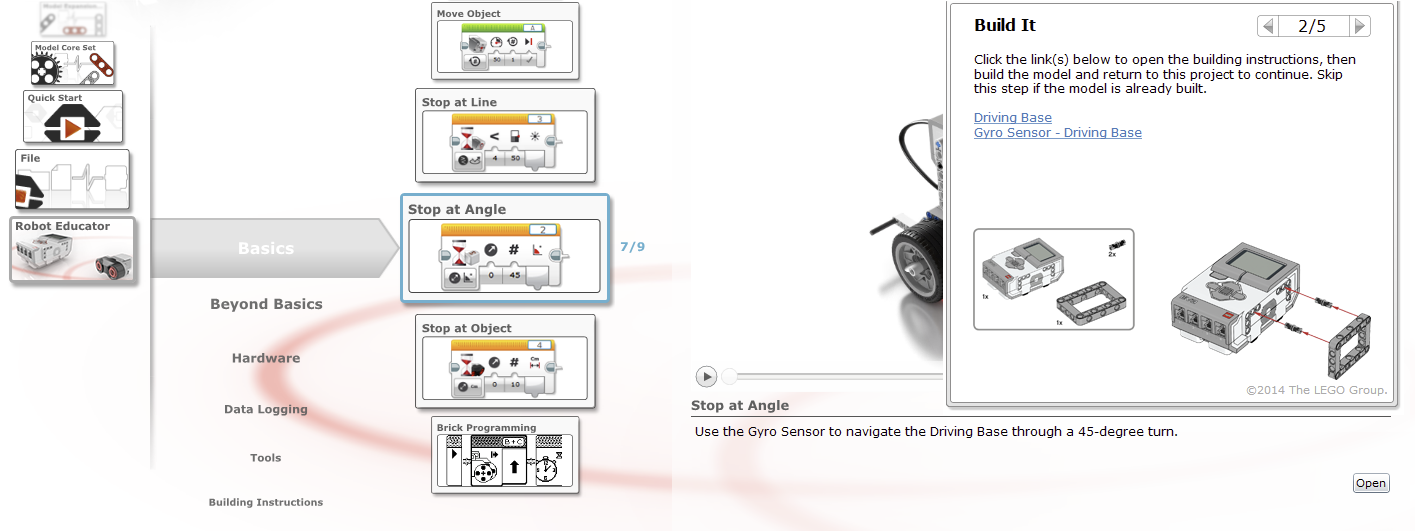
"Build It" (Robot Educator)
- The LEGO EV3 Education Software contains embedded building instructions for this lesson
- Navigate to:Robot Educator > Basics > Stop at Angle > Build It
"Build It" (Printed Booklet)
- Students can use the printed instruction booklet included in the EV3 Core set.
"Build It" (PDF)
- Download the PDF and save it to the students' Desktops or iPads
- (Alternatively) Print booklets for students
3. Coding Activity
Objectives
- Using the wait block to turn 45 degrees and then 90 degrees
- Setting the an Appropriate Threshold Value
- Navigate to: Robot Educator > Basics > Stop at Angle > Interactive Animation
- Allow students to click blocks to play
- Skip if you are using the LEGO EV3 Home Version
"Test It"
- Navigate to: Robot Educator > Basics > Stop at Angle > Test It
- (Alternatively) Display this section on a projector screen
- Recreate

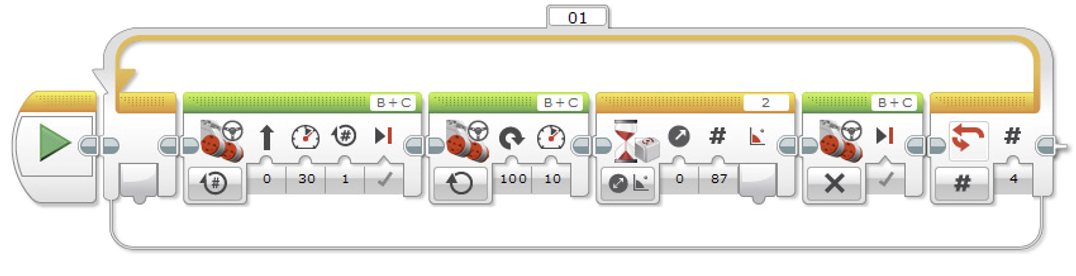
Measuring rotational angle using the Gyro Sensor, the robot point turns until it detects an angle increase of 45 degrees. The robot then drives forward for one rotation and stops.
"Modify
- Navigate to: Robot Educator > Basics > Stop at Object > Modify It
- Now
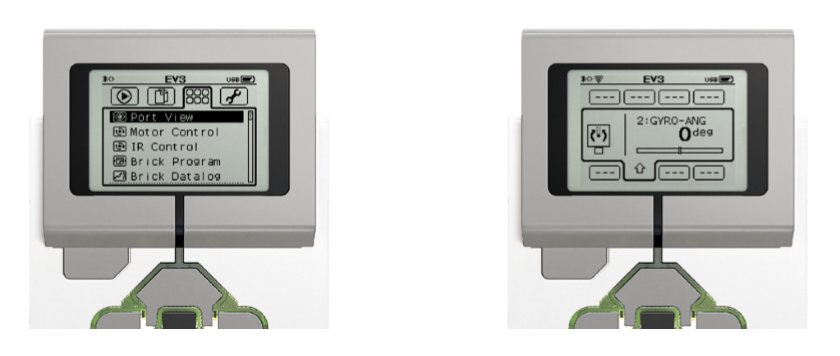
- Introduce the EV3 Brick Port View App as a method of checking the sensor reading. As the Gyro Sensor has a tolerance of +/- 3 degrees, you should therefore expect to compensate for that in the programs (e.g. to make a 90-degree turn, you may have to set the Threshold Value parameter of the Wait Block’s Gyro Sensor – Change – Angle Mode to 87 degrees).
- In the “Modify It” task, you may want to introduce students to the Loop Block as a way of decreasing the number of blocks needed to drive in a square. However, allow the students sufficient time to work it out for themselves.
Commenting
- Comments can be added by pressing this button here:
- Ensure that each group takes the time to describe the robot’s behavior in their own words, while running the program
- This encourages the students to reflect on what they see and how it relates to the programming blocks
- The comments should be presented to the educator before proceeding to the next section
Challenge
A. Attach a pen to the robot, then use a Gyro Sensor to program your robot to draw the letter “Z .”
B. Attach a pen to the robot, then use a Gyro Sensor to program your robot to draw a star shape (consisting of five identical angles). Next, try increasing or decreasing the angle. How does the shape change?
C. Challenge students to make their robot navigate through a maze using the Gyro Sensor (see illustration below).
4. STEAM Activity
Challenge
- This activity is designed to teach students through their own experience that not all specifications are created equal.
- Specifically, unique triangles need three dimensions, and one of those must be side, so as to tell you the size of the triangle.
- By tracing out different triangles with the robot, students will discover most of their triangles are the same as other groups, except for the one specified by only angles.
Sample Solution:

Student Worksheet
Print this activity sheet for students to complete.
Extension
Coding:
Automate the process using variables and math blocks so all you have to enter is the angles and the side lengths and the robot draws the triangles all by itself.
Math:
After drawing a triangle, program your robot to draw the mirror image of the same triangle flipped along a line of symmetry.
5. Consolidate
Question Sheet
Print for students to complete
Answer Key
Discussion Questions
Discuss as a class:
- Slow down the rotation speed of the robot and potentially set the angle to a value lower than 90 degrees.
- This can make the difference between whether or not the robot reacts to the input of the sensor. It is also a way in which the robot can be ‘fine-tuned’ to make it more accurate.
- Change Mode - Wait for the selected value to change.
- Compare Mode - Wait to reach a selected value.
Clean Up
- The Driving Base is required for Lesson 6
- The Gyro Sensor can be saved for Lesson 8
Ontario - Educational Standards
Math – Geometry and Spacial Sense
Lesson 6 - Stop at Line - A Bit of Light Sorting (120 mins minimum)
Preparation
Materials
For each group of 2-3 students
- EV3 Core Set
- EV3 Software Installed on a Tablet or PC
- Students will need either construction paper or a set of markers (and regular paper)
Classroom Setup
- Create floor space for students to drive their robots
- Have student groups ready
- Students group should sit together for easy access to the LEGO components
- Ensure that the batteries are charged and the kits are in working order
Coding Activity
- Reviewed the sample code for the ‘Test It’ task
- (optional) complete the "Modify It" task yourself
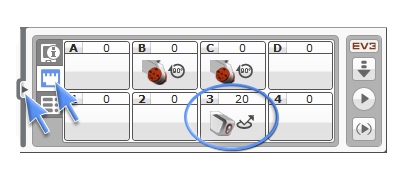
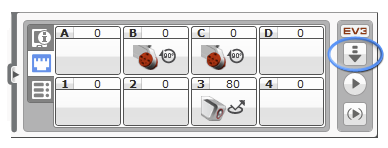
- Familiarize yourself with the operation of the Port View feature on the EV3 robot.
- Navigate to the the default on Port 3 (reflected light intensity).
- The Port View can also measure colour and ambient light as well by pressing the center button and changing the options.
STEAM Activity
- Review the activity answer sheet
- Review the learning objectives
- Review the sample solution code
1. Introduction
Description
- Students will be turning their robot into a kind of colour sorting machine.
- The robot, being surrounded by paper, will spin until it sees a colour which matches the wait block in the program and then nudge it over.
- In a kind of meta-game, students will separate, separating methods by how they work to accomplish their goals.
Why is this Lesson Important For FIRST LEGO Teams?
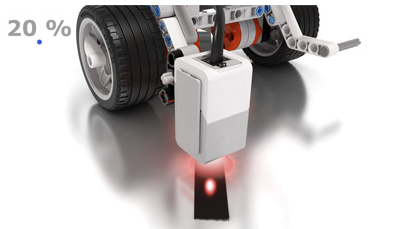
- The most common use of the colour sensor is to stop at lines on the game field. The sensor may need to know to drive over one colour line and stop at another colour. Notice how the robot in the video uses a colour sensor pointing down to stop on the red and black line to help with positioning
- The colour sensor can also detect the colour of game objects. In this video the robot needs to pull out the loop that matches the colour indicated by the random spinner. Notice the two colour sensors pointing forward. These sensors detect the color of the spinner, so that the robot can decide which colour loop to pull out.
- Using two colour sensors the robot can square itself to a line.
- This eliminates positioning errors, and makes the programing more reliable, similar to aligning to a wall in Lesson 2
- Notice that no matter what angle the robot approaches the line, the robot will straighten itself out, ready for the next mission.
Get Started
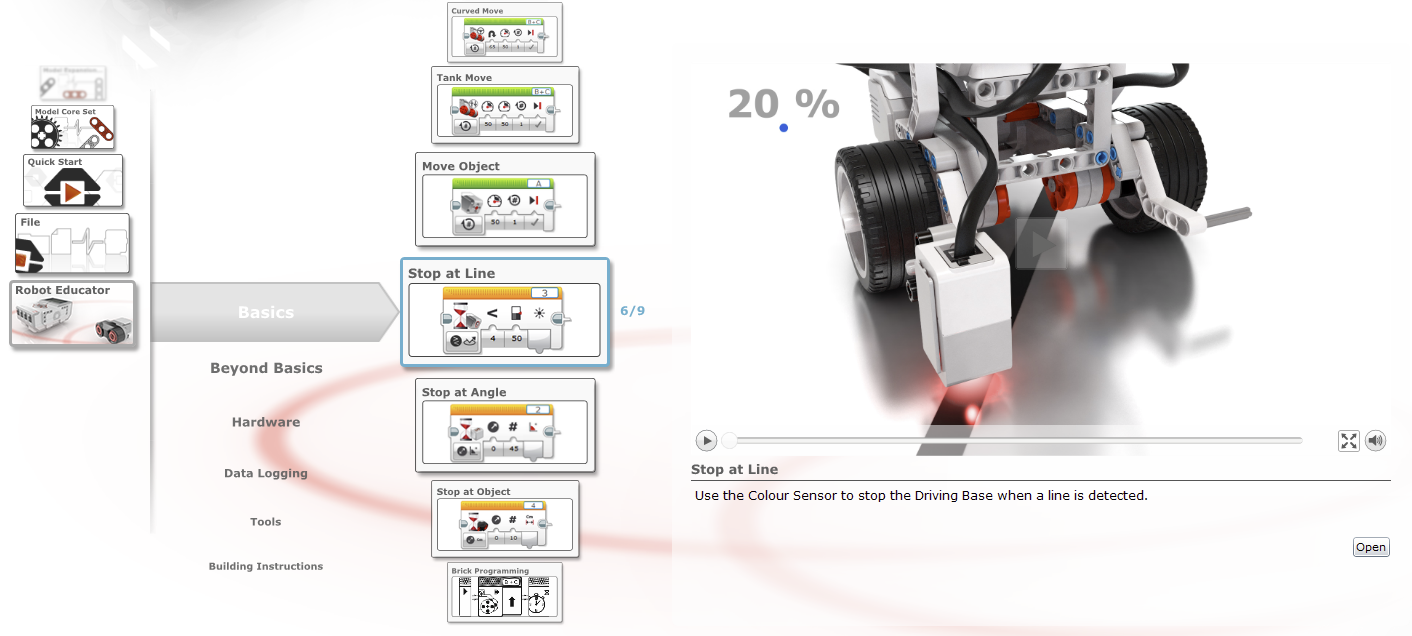
- Have students open the LEGO EV3 Education Software (see EV3 Setup page to download)
- Navigate to: Robot Educator > Basics > Stop at Line > Stop at Line (Video)
- Students can follow along on own devices for these upcoming sections:
-
- 1. Introduction - Video
- 2. Building Activity - "Build It"
- 3. Coding Activity - Interactive Animation
- 3. Coding Activity - "Test It"
- 3. Coding Activity - "Modify It"
- Not available if you are using the LEGO EV3 Home Version
Video
- Have the students view the embedded video as a teaser of what their robot will be able to do
- Proceed to the Building Activity
2. Building Activity
Required Building
- The Driving Base instructions can be skipped if the model is still intact from Lesson 5
- The Colour Sensor is new for this lesson and needs to be built
- All the instructions are below for reference
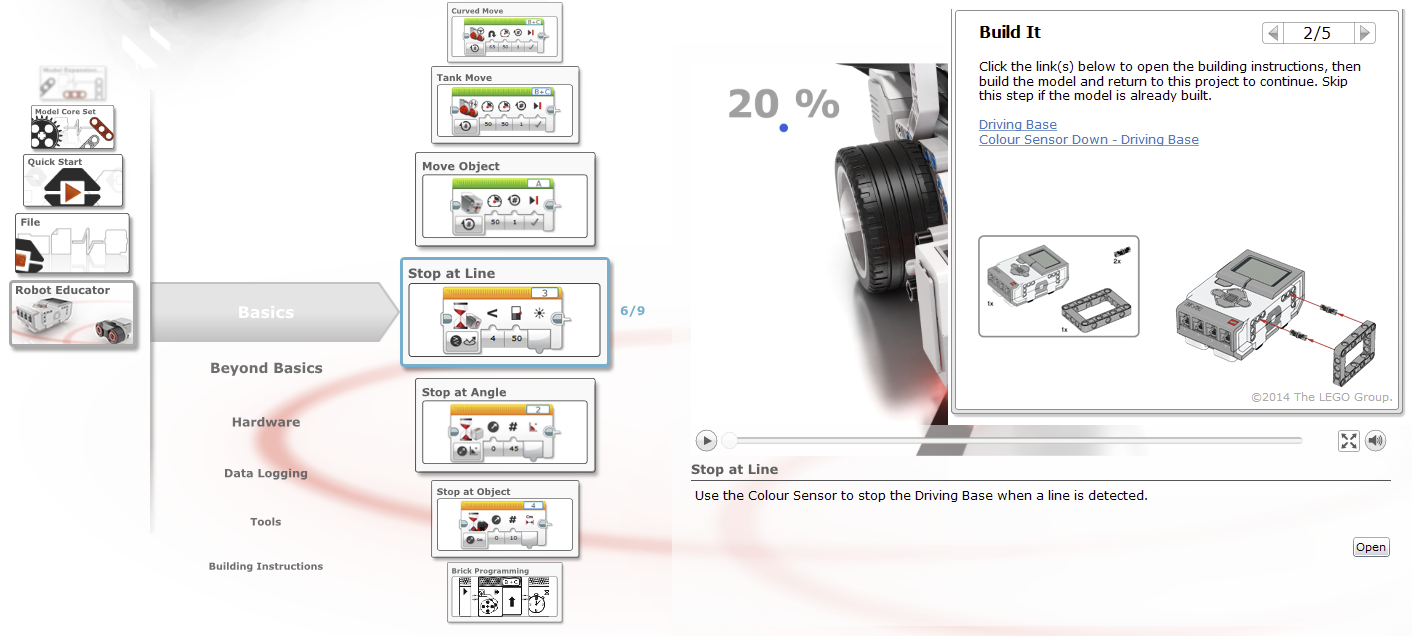
"Build It" (Robot Educator)
- The LEGO EV3 Education Software contains embedded building instructions for this lesson
- Navigate to: Robot Educator > Basics > Stop at Line > Build It
"Build It" (Printed Booklet)
- Students can use the printed instruction booklet included in the EV3 Core set.
"Build It" (PDF)
- Download the PDF and save it to the students' Desktops or iPads
- (Alternatively) Print booklets for students
3. Coding Activity
Objectives
- Reading Data From The Colour Sensor
- Calculating an Appropriate Threshold Value
- Using the Port View App
- Reading Colour Data
- Stopping on a Black Line
- Stopping on a Specific Colour Line
- Setting Default Actions when no Colour is Detected
- Navigate to: Robot Educator > Basics > Stop at Line > Interactive Animation
- Allow students to click blocks to play
- Skip if you are using the LEGO EV3 Home Version
“Test It”
- Navigate to: Robot Educator > Basics > Stop at Line > Test It
- (Alternatively) Display this section on a projector screen
Port View App
- Provide the students with different colored paper or sticky tape, and a sheet of white paper with a thick black line printed across it. Follow these steps to test whether the Colour Sensor can read the selected colour materials correctly:
- Turn on the EV3 Brick and connect a Colour Sensor to Port 3.
- Navigate to the Port View App and open it.
- Use the Right Button to navigate to Port 3.
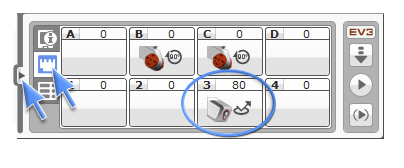
- The value shown is the Reflected Light Intensity (COL-REFLECT) . Press the Center Button to change the mode.
- Scroll down the displayed list, select Colour Mode (COL-COLOR) and then point the sensor at the colored material. The value displayed equates to the following colors: 0, No Color; 1, Black; 2, Blue; 3, Green; 4, Yellow; 5, Red; 6, White; and 7, Brown.
- If the value does not match the colour of your material, you will need to use another material.
- Note: For best accuracy when in Colour Mode or Reflected Light Intensity Mode, the sensor must be held perpendicular and close to, but not touching the surface being detected.
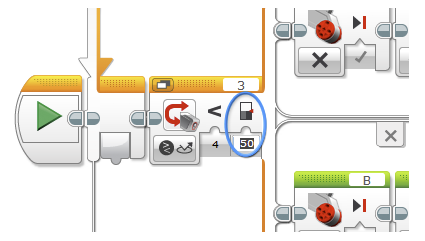
Setting the Threshold Value
- Students read and practice setting the Threshold Value to enable the best results from the Colour Sensor.
- A

- First, make sure the Driving Base is connected via USB and then move the Colour Sensor over the dark line.
- Next, open the Hardware Page and note down the value shown on Port 3. This is the minimum value (x).
- Now
- Note
- To

- Measuring the Reflected Light-Intensity using the Colour Sensor, the robot turns until it detects the black line and then stops.
"Modify It"
- Navigate to: Robot Educator > Basics > Stop at Line > Modify It
- See
Commenting
- Comments can be added by pressing this button here:
- Ensure that each group takes the time to describe the robot’s behavior in their own words, while running the program
- This encourages the students to reflect on what they see and how it relates to the programming blocks
- The comments should be presented to the educator before proceeding to the next section
Challenge
- Ask the students to change the mode of the Colour Sensor to Colour Mode and see if they can get the robot to stop on a blue line.
Sample Solution

- Ask the students to find out what the No Colour parameter does (it causes the robot to react when the Colour Sensor fails to detect a colour that matches any of the predefined colours).
Extension
- Task students to turn slight right when it senses a dark line and slight left when they see light.
- Have them put this in a loop so it repeats.
- When the robot is put on the left side of a dark line, it will follow along it in a zig-zag pattern.
4. STEAM Activity
Challenge
- Students will be turning their robot into a kind of colour sorting machine.
- The robot, being surrounded by paper, will spin until it sees a colour which matches the wait block in the program and then nudge it over.
- In a kind of meta-game, students will separate, separating methods by how they work to accomplish their goals.
- Standing up the paper can be a bit precarious, but with careful planning (and possibly some tape it can be done successfully.
Sample Solution:
Student Worksheet
Print this activity sheet for students to complete.
Extension
- Incorporate the use of the robot arm to knock over the pieces of paper (or replace paper with something more creative).
5. Consolidate
Question Sheet
Print for students to complete
Answer Key
Discussion Questions
Discuss as a class:
- White reflects the most and black reflects the least.
- When detecting a colour, the colour is just selected. When reacting to reflected light, a good threshold value must be found in order for the robot to behave as expected. Colour is easier if the Colour Sensor recognizes the colour.
- Use the Wait Block set to read the Colour Sensor in Reflected Light Intensity Mode.
Clean Up
- The Driving Base and Colour Sensor are required for Lesson 7
Ontario - Educational Standards
Science – Heat in the Environment
2.3 investigate processes (e.g., filtration, distillation, settling, magnetism) used for separating different mixtures
Lesson 7 - Switch Block - Movement Towards Knowledge (120 mins minimum)
Preparation
Materials
For each group of 2-3 students
- EV3 Core Set
- EV3 Software Installed on a Tablet or PC
- Print outs of the major definitions in the unit "interactions in the environment"
Classroom Setup
- Create floor space for students to drive their robots
- Have student groups ready
- Students group should sit together for easy access to the LEGO components
- Ensure that the batteries are charged and the kits are in working order
Coding Activity
- Reviewed the sample code for the ‘Test It’ task
- (optional) complete the "Modify It" task yourself
STEAM Activity
- This lesson needs lots of tape. About one roll per group.
- Electrical tape works really well because of its dark colour, and it doesn’t leave residue, but any tape in contrast to your floor will work.
- Review the activity answer sheet
- Review the learning objectives
- Review the sample solution code
1. Introduction
Description
Students will create remote control programs that allow them to use the buttons on the robot to race towards an important curriculum word on the ground. This can work as a great review, but can also act as a quick introduction as it only takes one confident group to reinforce the definition to everyone else in the class.
Why is this Lesson Important for FIRST LEGO teams?
- Following lines on the game field allows the robot navigate tight spaces and align to the game objects.
- This lesson will give students an understanding of how a basic line following program works.
- Notice how this robot effectively uses line following especially for the first half of the game
- When watching the video, look for the signature side-to-side driving (left and right wiggling motion) that happens when a robot follows a line
- Advanced programmers will use proportional line following for the smoothest way to follow a line
- Proportional line following requires using a math equation and data wires to implement.
Get Started
- Have students open the LEGO EV3 Education Software (see EV3 Setup page to download)
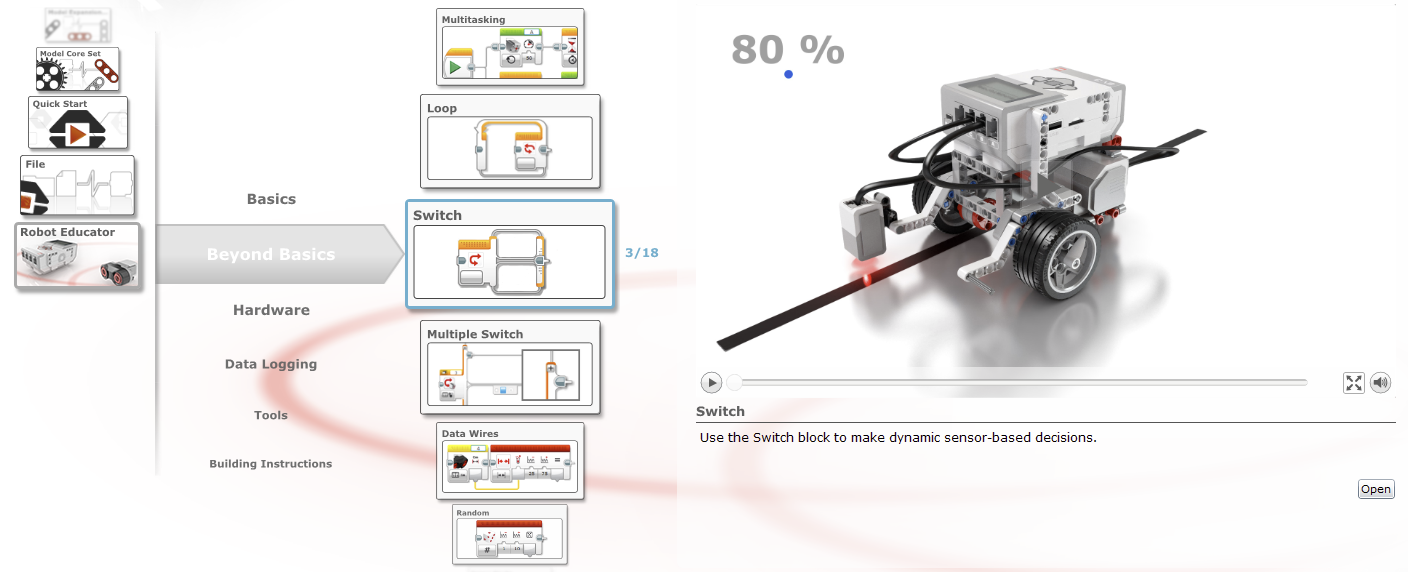
- Navigate to: Robot Educator > Beyond Basics > Switch > Switch (Video)
- Students can follow along on own devices for these upcoming sections:
-
- 1. Introduction - Video
- 2. Building Activity - "Build It"
- 3. Coding Activity - Interactive Animation
- 3. Coding Activity - "Test It"
- 3. Coding Activity - "Modify It"
- Not available if you are using the LEGO EV3 Home Version
Video
- Have the students view the embedded video as a teaser of what their robot will be able to do
- Proceed to the Building Activity
2. Building Activity
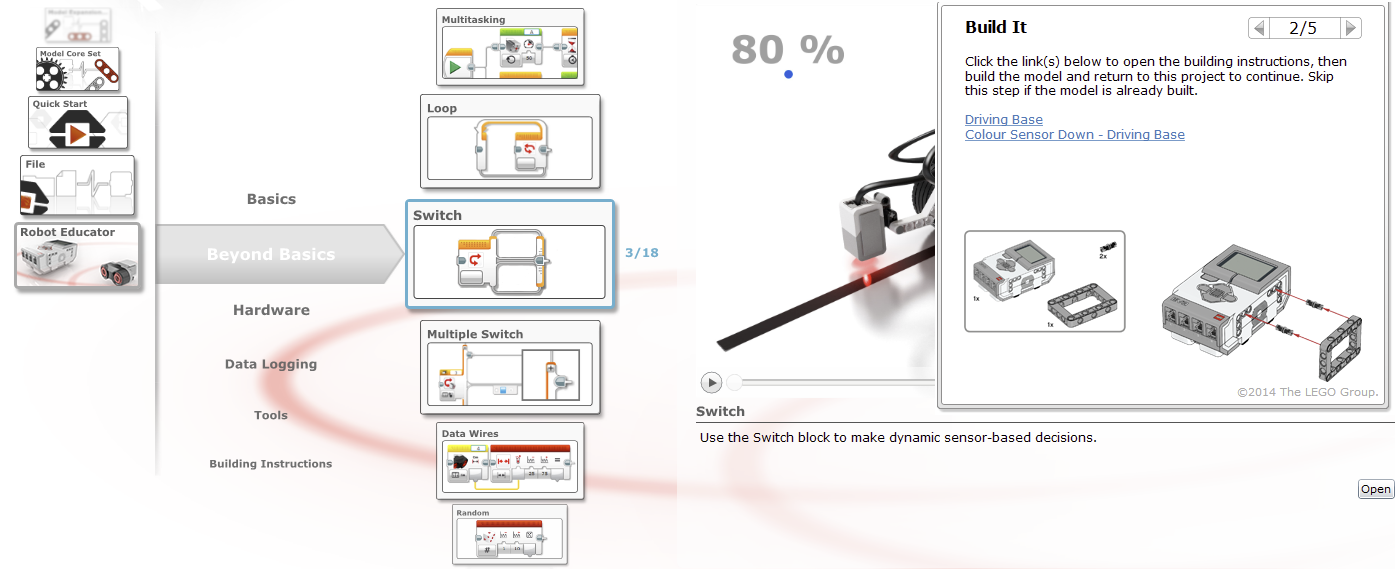
Required Building
- The Driving Base Colour Sensor instructions can be skipped if the models are still intact from Lesson 6
- There is no other building needed for this lesson
- All the instructions are below for reference
"Build It" (Robot Educator)
- The LEGO EV3 Education Software contains embedded building instructions for this lesson
- Navigate to: Robot Educator > Beyond Basics > Switch > Build It
"Build It" (Printed Booklet)
- Students can use the printed instruction booklet included in the EV3 Core set.
"Build It" (PDF)
- Download the PDF and save it to the students' Desktops or iPads
- (Alternatively) Print booklets for students
3. Coding Activity
Objectives
- Switches
- Loops
- Using a Loop and Switch Combination for State-Based Programming
- Creating a Line-Following Algorithm for a Black Line
- Optimizing Line-Following for Smoother Motion
- Optimizing Line-Following for Faster Speeds
- Following a Gray Line
- Navigate to: Robot Educator > Beyond Basics > Switch > Interactive Animation
- Allow students to click blocks to play
- Skip if you are using the LEGO EV3 Home Version
"Test It"
- Navigate to: Robot Educator > Beyond Basics > Switch > Test It
- (Alternatively) Display this section on a projector screen
- Recreate
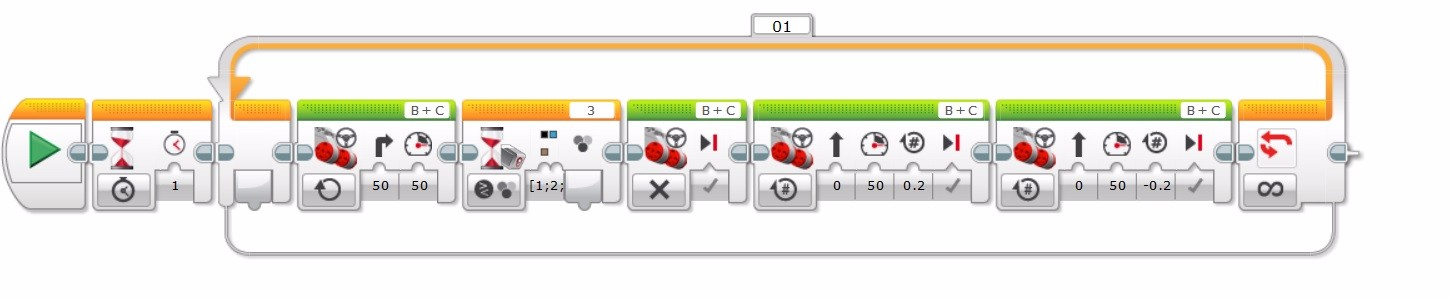
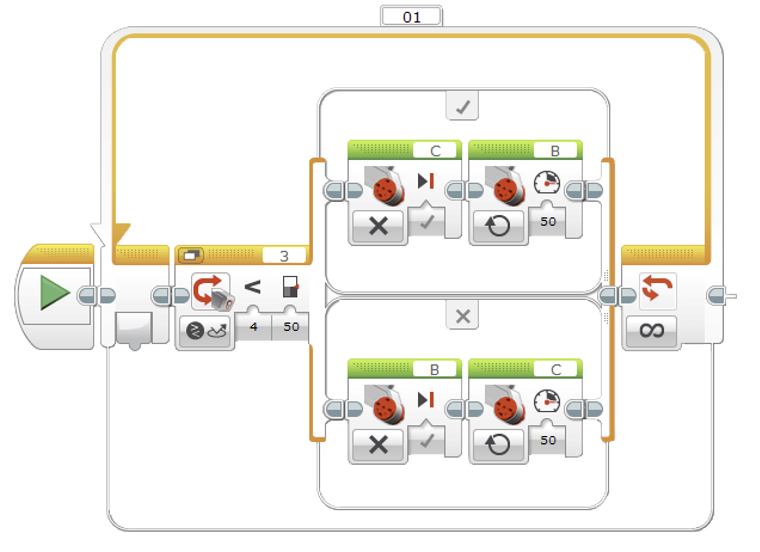 Moving forward along a line, the robot uses the Colour Sensor to alternately switch each motor on and off when it detects changes in brightness reflected by the dark line and bright surface . This is why the robot “wiggles” forward.
- On
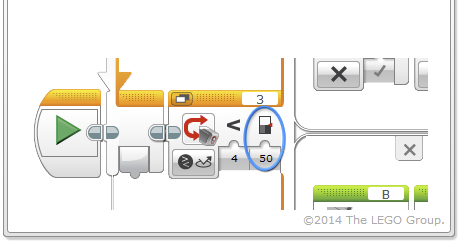
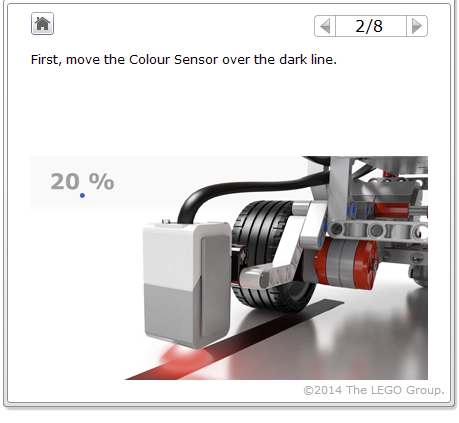
- First, move the Colour Sensor over the dark line.
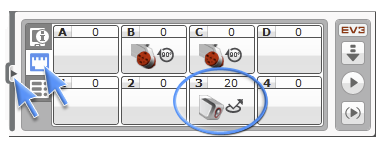
- Next, open the Hardware Page and note down the value shown on Port 3. This is the minimum value (x).
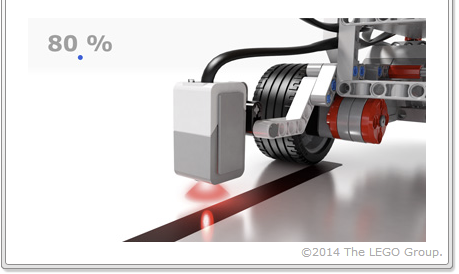
- Now move the Colour Sensor away from the dark line.
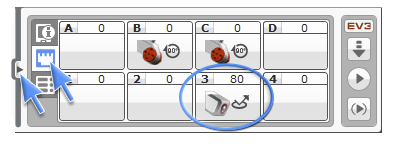
- Note down the value shown on Port 3. This is the maximum value (y).
- To set the threshold, calculate the equation (x+y)/2 and enter the result in the Switch block (your value may differ from the example shown).
- Next, download the program.
- Unplug
"Modify It"
- Navigate to: Robot Educator > Beyond Basics > Switch > Modify It
- Test if your Driving Base works when following a lighter-coloured line! If not, try setting the threshold again.
Challenge
A. Ask the students to test how fast they can make their robot follow a line.
B. Make a line-follower program that uses Move Steering Blocks to perform curved turns rather than the sharp single-motor turns used in the tutorial.
C. The "Test It" program uses a Switch Block to create a line follower. Can students produce the same result without using a Switch Block?
Extension
- Task students to follow lines that have very sharp turns. Their robots will have to be carefully tuned. Alternatively, if the course becomes less curved, you can make the robots then go faster and optimize for speed (have a race!).
- The steering blocks allow for easier tuning of line following then controlling each wheel separately.
4. STEAM Activity
Callenge
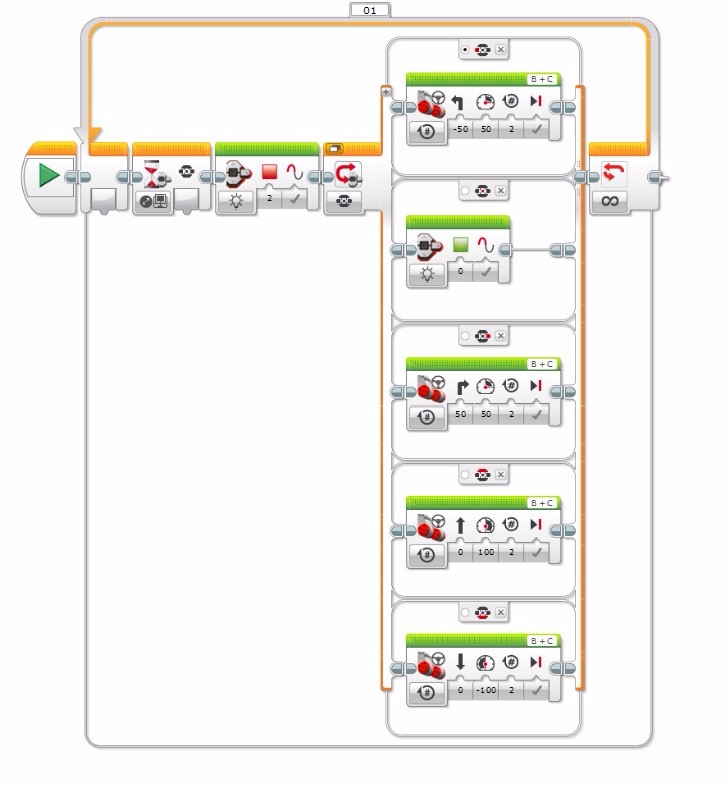
- Students will create remote control programs that allow them to use the buttons on the robot to race towards an important curriculum word on the ground. This can work as a great review, but can also act as a quick introduction as it only takes one confident group to reinforce the definition to everyone else in the class.
Sample Solution:
Student Worksheet
Print this activity sheet for students to complete.
Extension
- Instead of only moving a pre-defined distance with each button press, use a clever combination of wait blocks to have your robot go continuously in the direction of your choice while holding down the buttons (and have it stop when you release).
5. Consolidate
Question Sheet
Print for students to complete
Answer Key
Discussion Questions
Discuss as a class:
- Keep both motors running, one at a lower speed than the other, or use the Move Steering Blocks.
- The threshold value is the average number reading between light and dark. This is the number that you add to the Switch Block.
- Work out the average threshold value between white and gray.
Clean Up
- The Driving Base and Colour Sensor are required for Lesson 8
Ontario - Educational Standards
Science – Interactions in the Environment
Lesson 2 - Curved Move - Heated Presentation (120 mins minimum)
Preparation
Materials
For each group of 2-3 students
- EV3 Core Set
- EV3 Software Installed on a Tablet or PC
Classroom Setup
- Create floor space for students to drive their robots
- Have student groups ready
- Students group should sit together for easy access to the LEGO components
- Ensure that the batteries are charged and the kits are in working order
Coding Activity
- Reviewed the sample code for the ‘Test It’ task
- (optional) complete the "Modify It" task yourself
- For task 5b you will need rubber bands to allow students to attach a pen to their robot.
- For task 5c you will need to prepare an obstacle course on the floor. You can use a large sheet of paper and markers, or place sticky tape on the floor. See example below.
STEAM Activity
- Review the activity answer sheet
- Review the learning objectives
- Review the sample solution code
1. Introduction
Description
- Students will use their robots as particle analogs to demonstrate various methods of heat transfer.
Why is this Lesson Important For FIRST LEGO Teams?
- Driving and turning allow your robot to navigate the FIRST LEGO League field.
- Some missions can be completed without any additional motors or sensors. Just a great driving base will do. Make sure your robot can drive well so you don't miss out on these easy points.
- What type of turn is best for navigating around a game object?
- What type of turn is best when you are in a tight corner of the field?
- This robot scores all its points in one big trip around the field.
- What kind of turns does it use to maneuver in each situation?
- You will observe in this lesson that accurate alignment is key to ensure that your robot ends up in the intended position when driving far from the start.
- Notice how this robot's square design allows it to back into the wall repeatedly during the match to realign itself and correct for any errors in alignment.
- Notice the jigs that are used to line up the robot at the start, and how it uses the wall as a guide to ensure that the robot goes down the exact path that was intended.
- All these added alignments ensures that the robot re-sets itself to an exact starting position, and this helps prevent it from wandering off course.
Get Started
- Have students open the LEGO EV3 Education Software (see EV3 Setuppage to download)
- Navigate to Robot Educator > Basics > Curved Move > Curved Move (Video)
- Students will follow along on own devices for the upcoming sections:
- 1. Introduction - Video
- 2. Building Activity - "Build It"
- 3. Coding Activity - Interactive Animation
- 3. Coding Activity - "Test It"
- 3. Coding Activity - "Modify It"
- Not available if you are using the LEGO EV3 Home Version
Video
- Have the students view the video as a teaser of what their robot will do
- Proceed to the Building Activity
2. Building Activity
Required Building
- The Driving Base instructions can be skipped if the model is still intact from Lesson 1.
- There is no other building required for this lesson
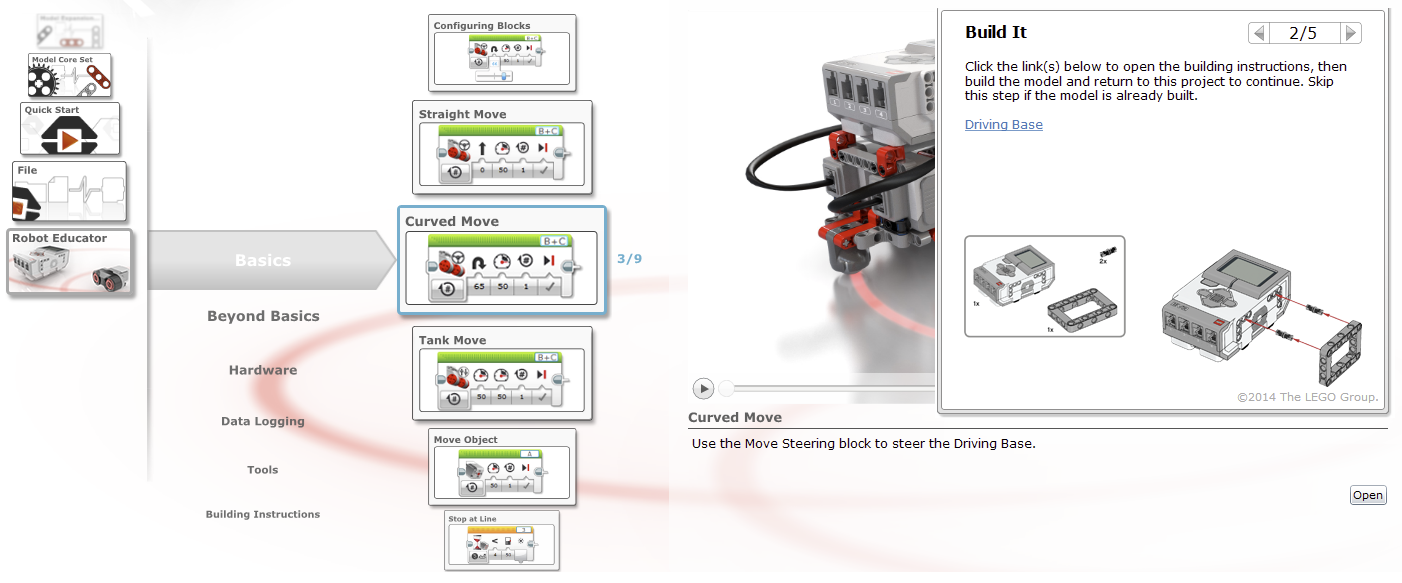
- The Driving Base instructions are below for reference
- The LEGO EV3 Education Software contains embedded building instructions for this lesson
- Navigate to: Robot Educator > Basics > Curved Move > Build It
"Build It" (Printed Booklet)
- Students can use the printed instruction booklet included in the EV3 Core set.
"Build It" (PDF)
- Download the PDF and save it to the student's Desktop or iPads
- (Alternatively) Print booklets for students
3. Coding Activity
Objectives
- Drive Motor Control
- Move Block
- Steering
- Navigating Obstacles
- Point Turns
- Single-motor Turns
- Curved Turns
- Navigate to: Robot Educator > Basics > Curved Move > Interactive Animation
- Allow students to click blocks to play
- Skip if you are using the LEGO EV3 Home Version
"Test It"
- Navigate to: Robot Educator > Basics > Curved Move > Test It
- (Alternatively) Project on a screen
- Recreate

- The robot performs a point turn, then a single-motor turn, and lastly, a curved turn. Each action is separated by a pause, which allows the robot to settle before executing the next action.
"Modify It"
- Navigate to: Robot Educator > Basics > Curved Move > Modify It
- Add three more Move Steering blocks to your program so that it makes the Driving Base return to its starting position.
Sample Solution:

Commenting
- Comments can be added by pressing this button here:
- Ensure that each group takes the time to describe the robot’s behavior in their own words, while running the program
- This encourages the students to reflect on what they see and how it relates to the programming blocks
- The comments should be presented to the educator before proceeding to the next section
Challenge
A. Program the robot to trace out a figure eight, the first letter of your name, or another letter or number. The final program should be presented to the educator before proceeding to the next section.
B. Attach a pen to the robot and program it to draw a cloverleaf, heart, flower, or another shape. The final program should be presented to the educator before proceeding to the next section.
C. To ensure that students know when to use the different kinds of turns (point turn, single-motor turn, or curved turn), make an obstacle course that requires different turning methods (see illustration below).
- Feel free to vary the course or use whatever materials are available in your classroom.
- Easy: The robot must drive in a straight line and then park in the parking area (4).
- Hard: The left wheel of the robot must follow a path and then park in the parking area (4).
- The final program should be presented to the educator before proceeding to the next section.
Extension
- Have students attempt to drive backwards through the same course. This will take more planning and awareness.
4. STEAM Activity
Challenge
- Students will be using their robot to demonstrate their understanding of heat transfer.
- You will need to split the class into three sections assigning them either, conduction, radiation, or convection. (A small class will need to do one at a time).
- The people with the same heat transfer type will get together and draw up a plan for how they will use their robots to act as particles in a substance, and demonstrate heat transfer. Strong hints are given to the students in the activity sheet.
- A fun way to present to the class is to have the other groups tell you what transfer type they're witnessing and how they know.
- Use this lesson as a discussion centered around the accuracy and limitations of this demonstration. This will carve the concepts into the students minds.
- Beyond movements, the lights, and sounds, students can get creative with props etc. and really show they know what they're talking about.
Sample Solution Code
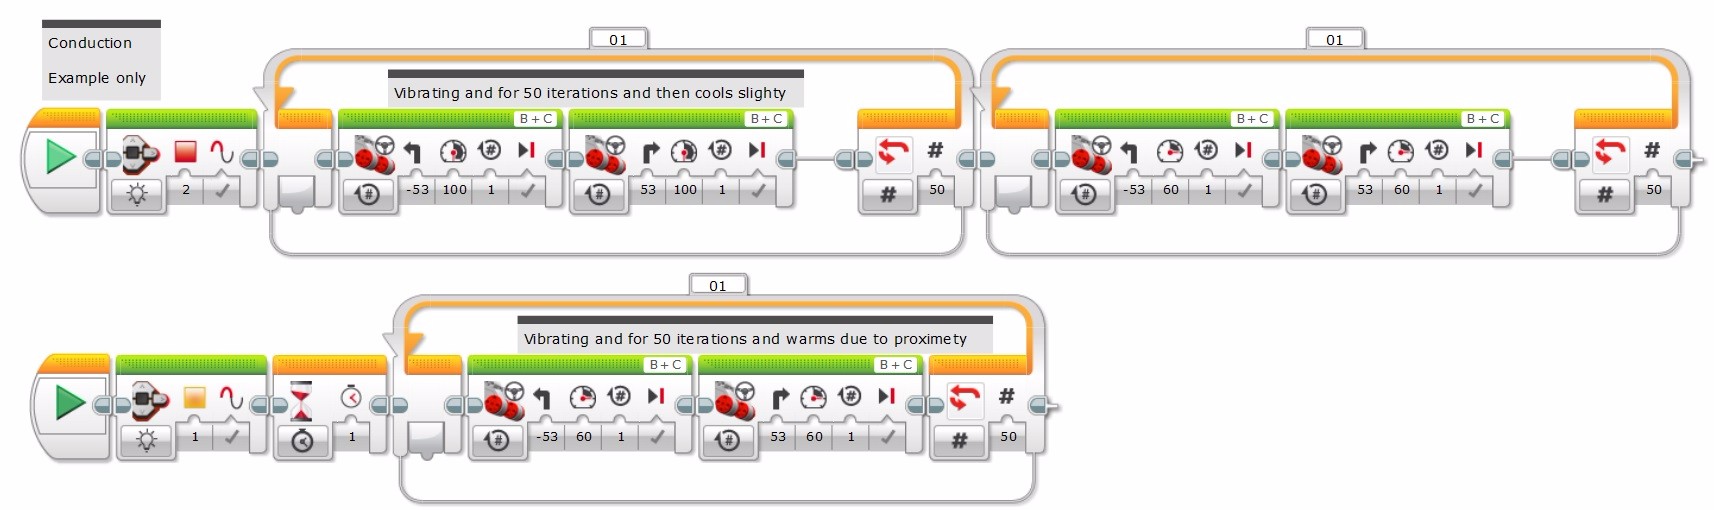
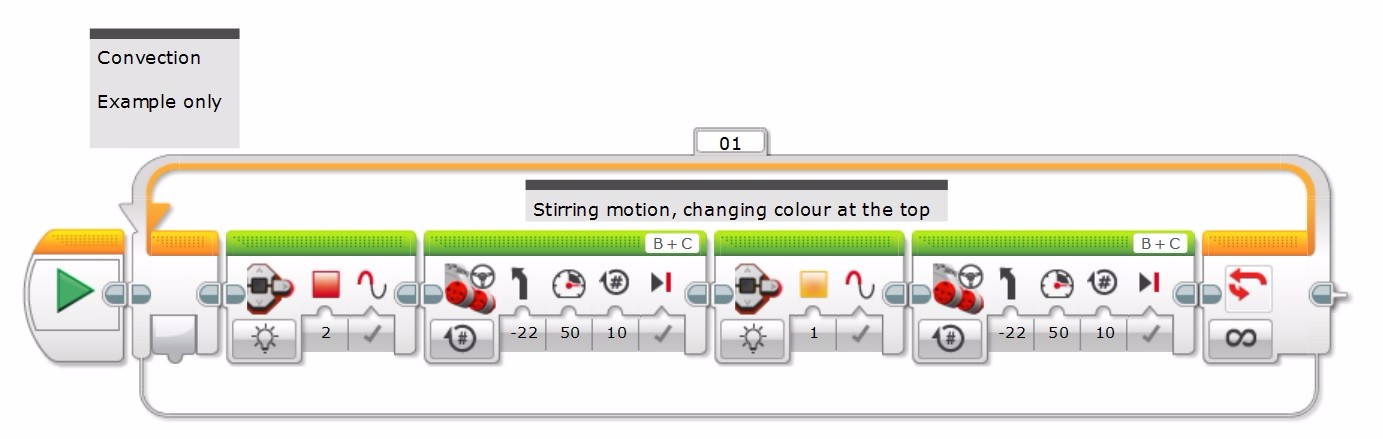
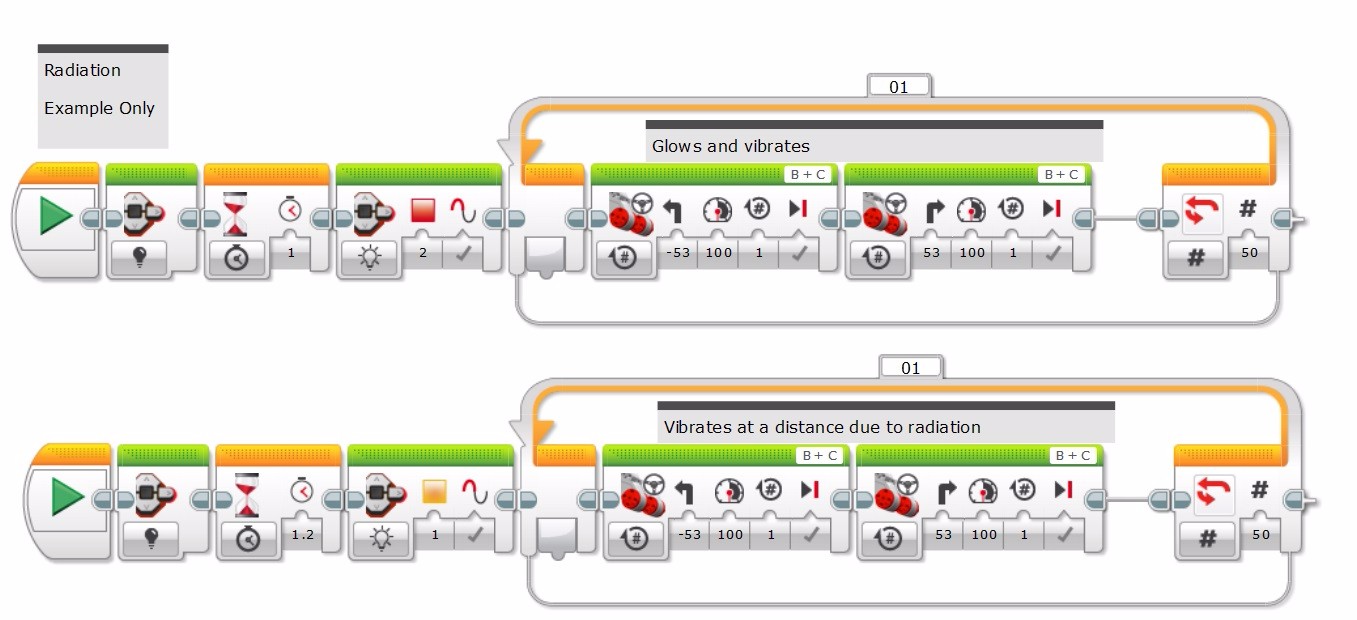
Student Worksheet
Print this activity sheet for students to complete
Extension Activity
Try and demonstrate an entire stove and pot set up, showing the three heat transfer types in one demonstration. Use construction paper and other props to enhance the presentation.
5. Consolidate
Question Sheet
Print these questions for students to complete
Answer Key
Discussion Questions
Discuss as a class
- The Steering Parameter Value was set to 50 to perform a single motor turn, and the Steering Parameter Value was set to 100 or -100 to perform a point turn.
- The Wait Block makes your program wait for something before continuing to the next block in the sequence. You can wait for a certain amount of time for a sensor to reach a certain value, or for a sensor value to change.
- Move Tank or Move Steering Blocks work best because they keep both motors running in the same direction, with one motor running slightly slower.
Ontario - Educational Standards
Science – Heat in the Environment