
Loading…
Loading…
In this lesson, students will take their understanding of robot vision a step further by exploring how AprilTags can provide precise spatial information.

Level: Intermediate
(Note: This lesson introduces the Vision Portal and is designed for intermediate in that specific topic. However, it assumes prior experience with FTC Sim. Students and teachers should have already completed the standard introductory lessons and be familiar with using the platform and programming robot movement.)
In this lesson, students will take their understanding of robot vision a step further by exploring how AprilTags can provide precise spatial information. Using the Vision Portal, students will learn how to access data such as the distance between the robot and a tag, as well as the angle at which the tag is viewed. This information allows the robot to make smarter decisions about movement and positioning. Through hands-on coding challenges, students will begin to program their robot to respond not just to the presence of a tag, but to its location and orientation, unlocking more advanced autonomous behaviours.
This lesson plan is structured using the 5E framework, a widely recognized instructional model consisting of five phases: Engage, Explore, Explain, Elaborate, and Evaluate. The 5E framework systematically engages students in inquiry-based learning, encouraging active exploration and comprehension of complex topics.
In the lesson, students will:
Learn how to extract and interpret distance and angle data from AprilTags using the Vision Portal.
Use mathematical reasoning and spatial awareness to guide robot movement based on tag positioning.
Create and apply functions to organize their code and make it more efficient, reusable, and easier to understand.
Post-it notes or a brainstorming collaborative app like Microsoft Whiteboard, FigJam or Apple Freeform.
Devices for your students (Windows computers, Mac computers, ChromeBook)
Google Chrome or Microsoft Edge (Chromium version) Web Browser
Access to the FTC Simulator website (https://ftcsim.org)
Students account created for each of your students
Projector or interactive whiteboard
To spark curiosity and introduce students to how robots interpret their surroundings, begin the lesson by showing the video “How Robots See the World” available at this link: https://youtu.be/gEy91PGGLR0. This engaging video explains how various types of sensors, including cameras, LiDAR, ultrasonic sensors, and radar, enable robots to perceive distance, shape, and movement. It provides a clear comparison of how each sensor works and why vision-based systems are powerful in robotics. This sets the stage for students to explore how their own robot uses a camera and AprilTags to calculate distance and angle, enabling smarter navigation and decision-making. The video also helps students understand the strengths and limitations of camera-based vision compared to other technologies, providing them with a broader perspective on how robots perceive the world.
After watching the video, invite students to participate in a brainstorming session focused on how robots can use distance and angle information to make smarter decisions. Provide post-it notes or use a collaborative digital tool like Microsoft Whiteboard, FigJam, or Apple Freeform. Ask students to write down one idea per post-it note that answers the question: “How could knowing the distance or angle to a target help a robot in the real world?” Designate a space on the classroom wall or digital board for students to place their ideas. If a similar idea is already posted, they can stack their note on top. If it’s a new idea, they should find an open spot to display it.
Here are some of the ideas that they may come up with:
A delivery robot adjusting its path to avoid obstacles and reach a doorstep accurately.
A warehouse robot aligning itself with shelves to pick or place items precisely.
A drone landing safely by calculating its angle and distance to a landing pad.
A robot arm positioning itself correctly to grab or place objects.
A robot navigating tight spaces by adjusting its angle to fit through.
A self-driving car maintaining safe distance from other vehicles.
A robot guiding a person by staying at a consistent distance and angle.
A robot in a rescue mission locating and approaching a person safely.
A robot camera adjusting its view to keep a moving object centred.
Facilitate a discussion by raising thought-provoking questions, including:
How can knowing the distance between a robot and an object help the robot make better decisions? (e.g., it can slow down before reaching a target, stop at the right spot, or avoid collisions.)
Why might it be useful for a robot to know the angle at which it sees an object? (e.g., it can turn to face the object directly, align itself for grabbing or scanning, or adjust its path.)
What kinds of tasks require a robot to be precise in both distance and angle? (e.g., picking up objects, docking with a station, or navigating narrow spaces.)
How does using AprilTag data for positioning compare to using other sensors like LiDAR or ultrasonic sensors? (e.g., AprilTags can give exact ID and location, while other sensors may only detect distance or shape.)
What challenges might a robot face when trying to measure distance or angle using a camera? (e.g., poor lighting, blurry images, or blocked views.)
In what real-world situations could this kind of vision-based positioning be especially helpful? (e.g., warehouse automation, drone landings, robotic surgery, or space exploration.)
Can you think of any creative or unexpected ways robots could use distance and angle data from visual markers like AprilTags? (e.g., guiding people through a building, adjusting camera angles for filming, or helping robots play sports.)
Encourage students to start their hands-on learning experience with the FTC Simulator platform by navigating to the provided link, https://ftcsim.org/. Have them log in using their unique username and password. Once logged in, they will need to use the following link to load the work surface they will need for the lesson: https://ftcsim.org/puzzle/cihnekxklct/
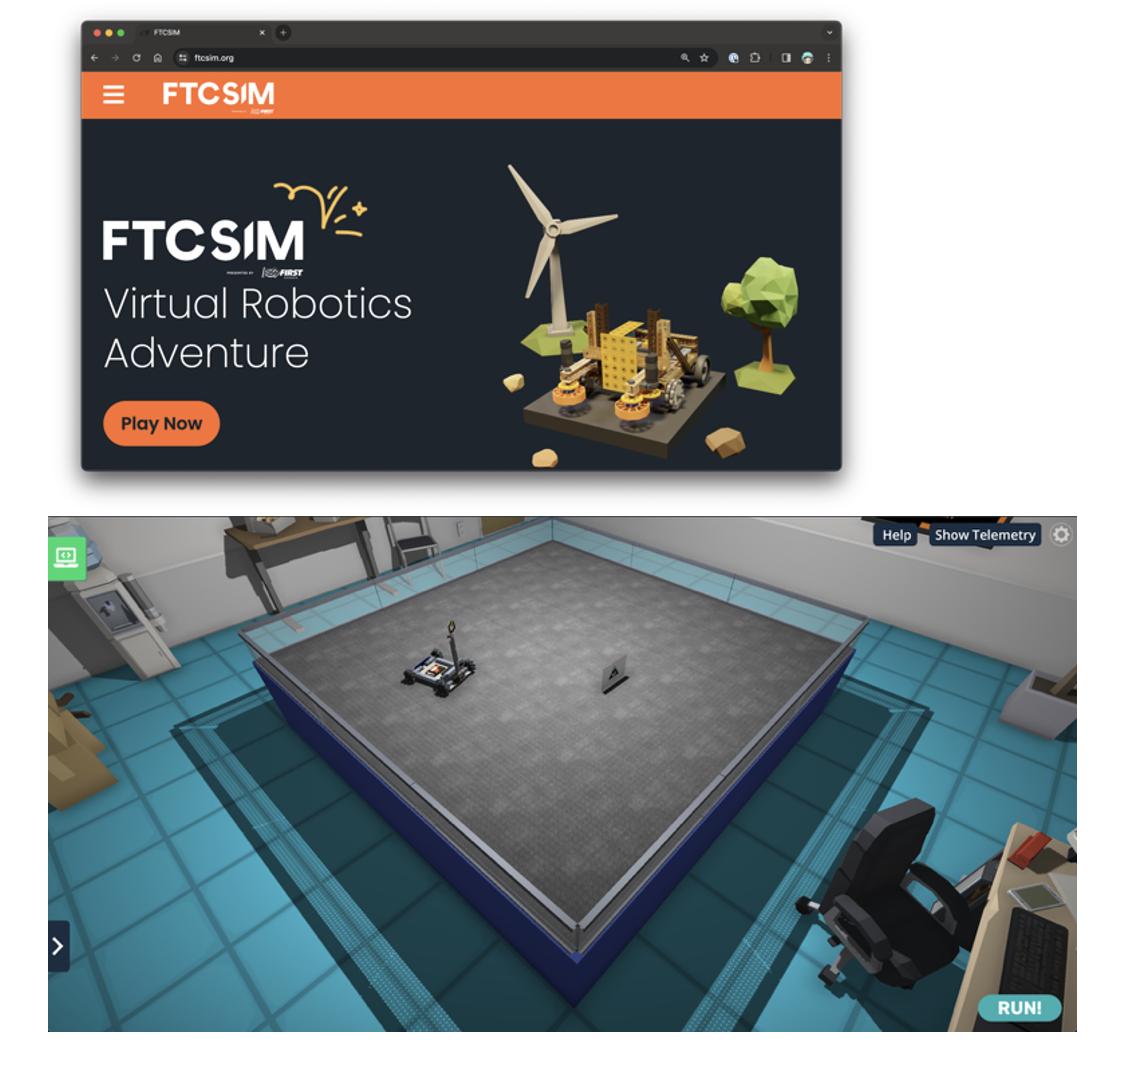
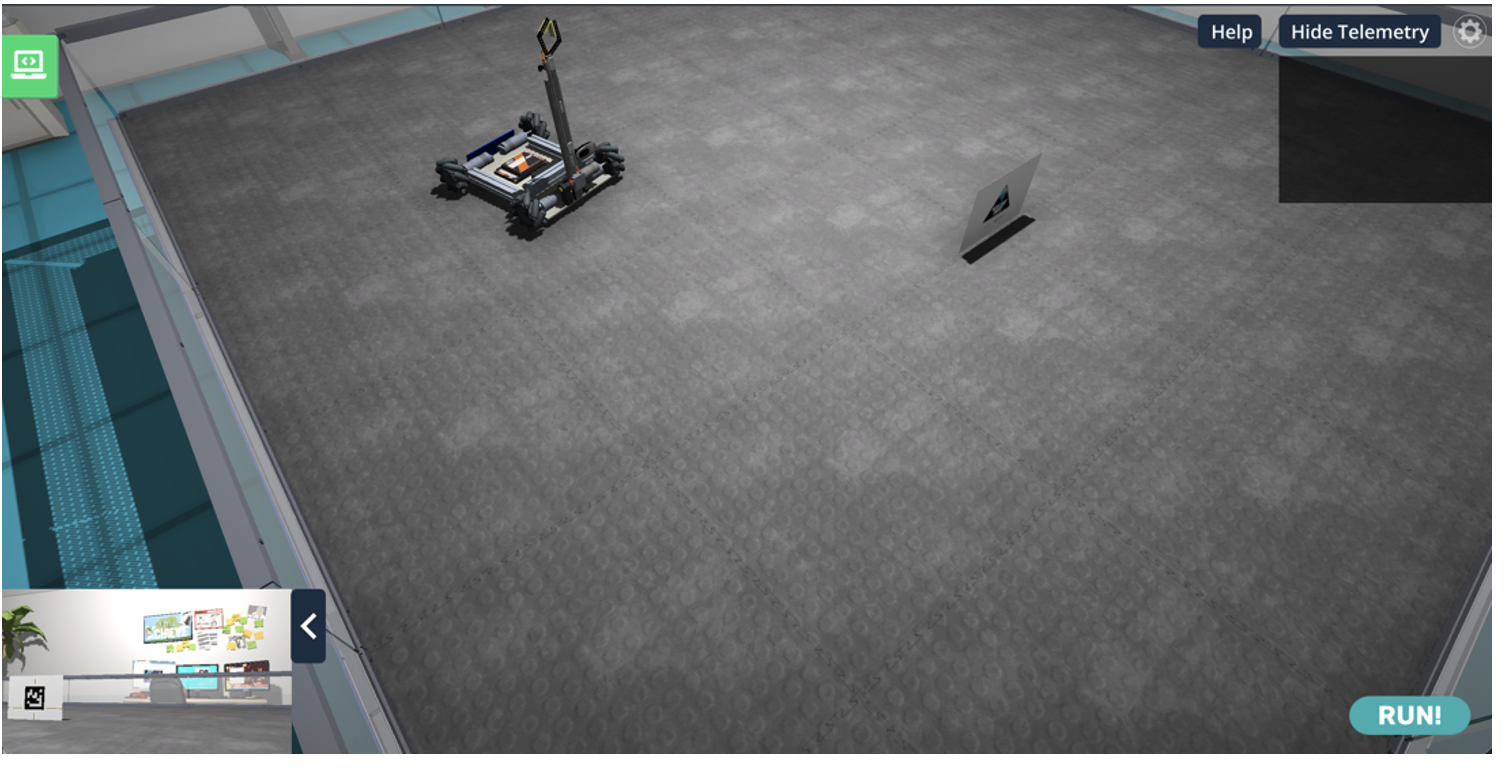
In this FTC Sim world, zoom in on the robot to clearly show students the installed camera and omni wheels. Emphasize that the robot is not positioned directly in front of the AprilTag, but is slightly angled to the side.
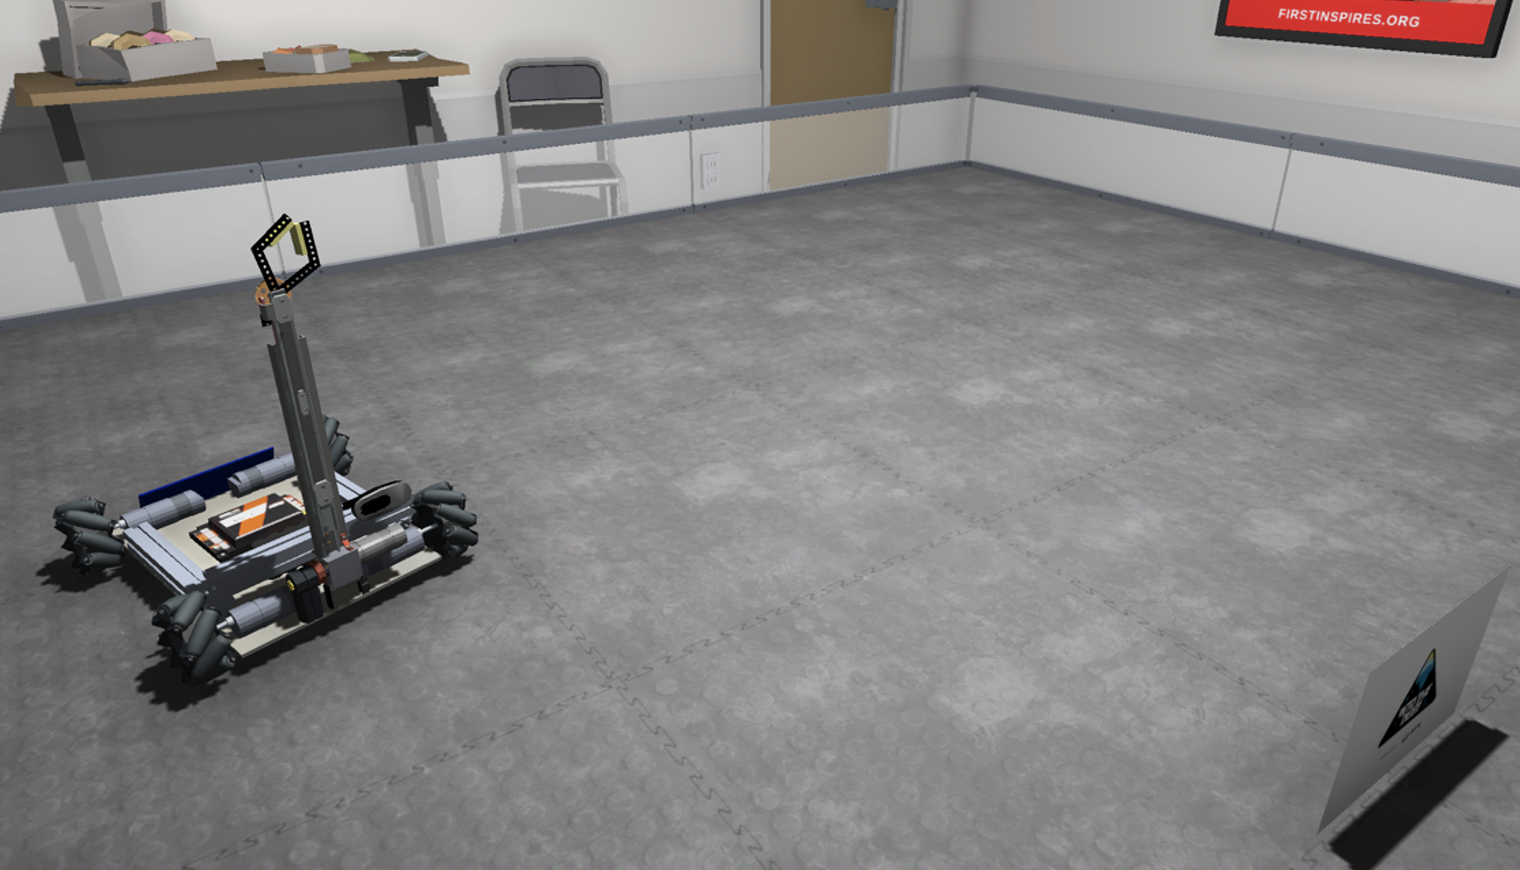
Start a discussion by asking, “What kinds of movements would the robot need to make to position itself directly in front of the AprilTag?” (e.g., It might need to rotate slightly clockwise, slide to the left, and then move forward.)
Explain to students that because the robot uses omni wheels, every movement requires controlling four separate motors. This means writing a lot of code each time the robot needs to move, since each wheel must be programmed individually. Then ask: “Have you learned a way to make your code simpler and easier to reuse in the introductory lessons?” (e.g., Yes, we learned how to use functions to group blocks of code together. This lets us create a movement once and use it again whenever we need it, without rewriting everything.)
Show students how they can use what they learned in the first lesson about omni wheel movements to create functions for each type of movement. These functions will help simplify their code and make it easier to reuse. Encourage them to create a separate function for each of the following actions:
Move forward in a straight line
Move backward in a straight line
Turn left
Turn right
Slide to the right
Slide to the left
This approach allows students to call a single function whenever they want the robot to perform one of these movements, instead of rewriting the motor code each time.
Here is an example of what their code might look like.
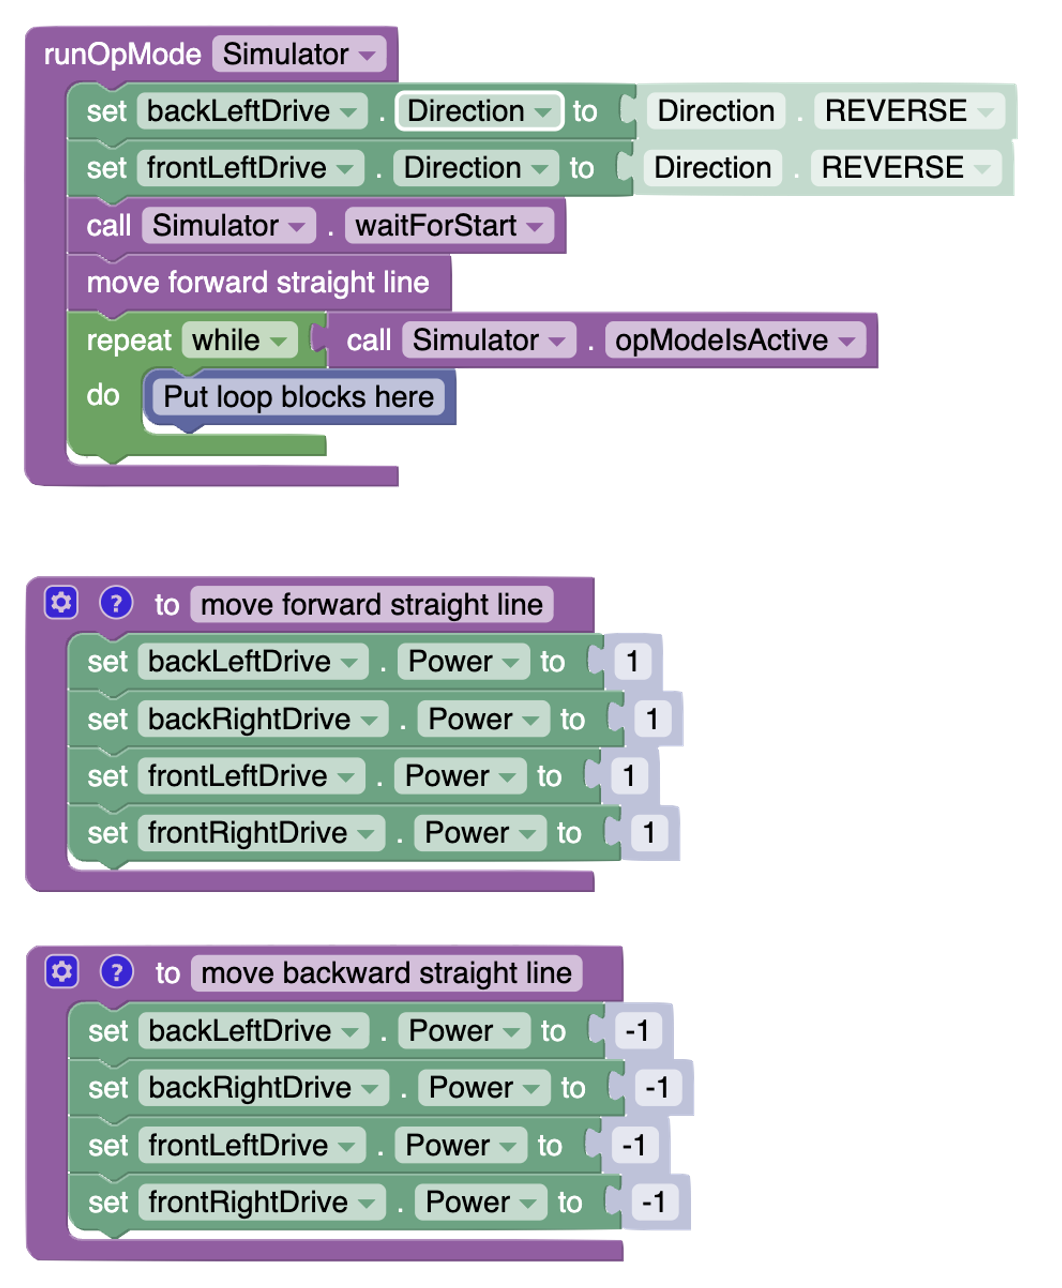
Remind students that they can create functions by going to the Miscellaneous section. They can give the function a name that makes sense (e.g., move forward in a straight line). They should create a function for each type of move. You may need to provide them with this chart from lesson 1.
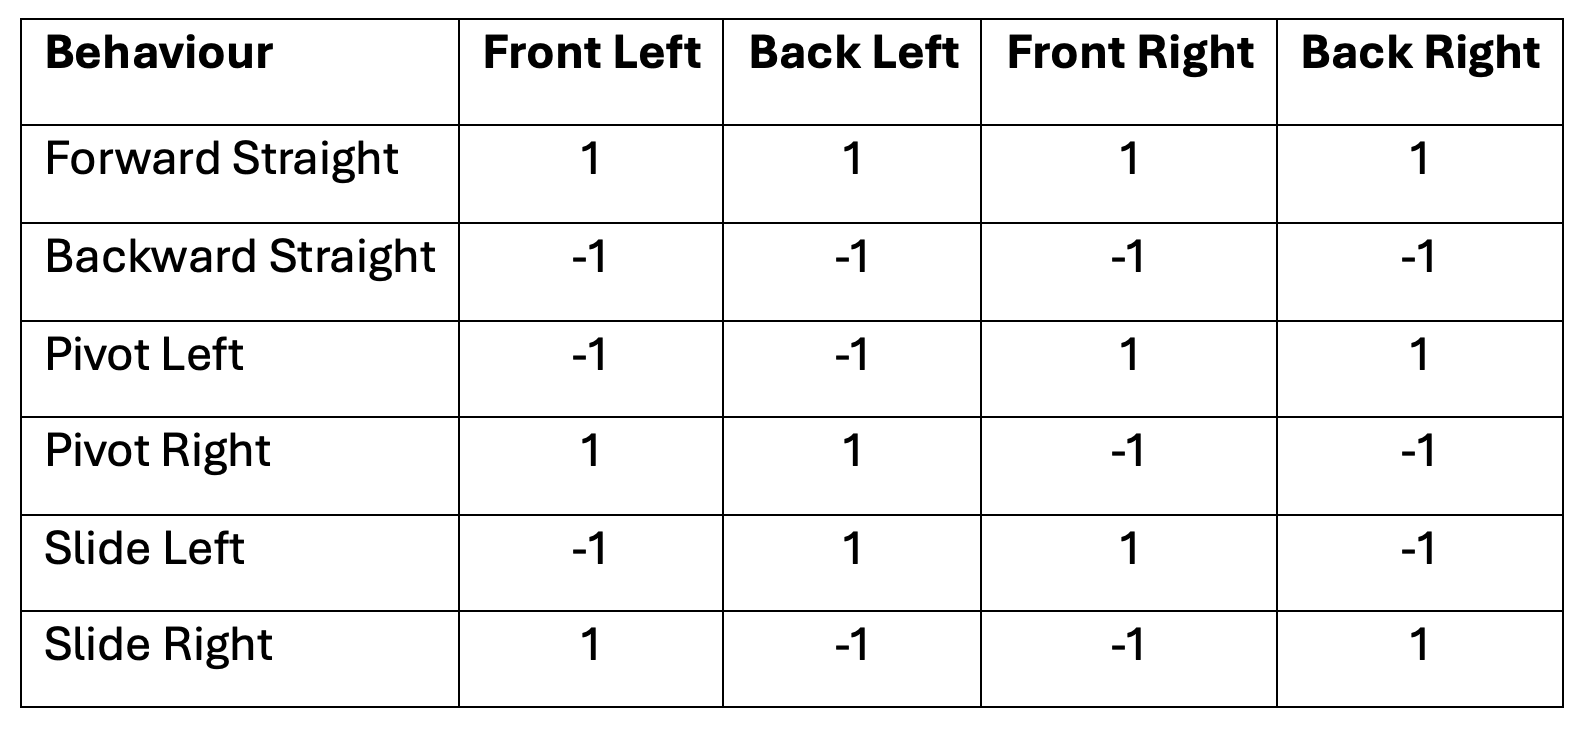
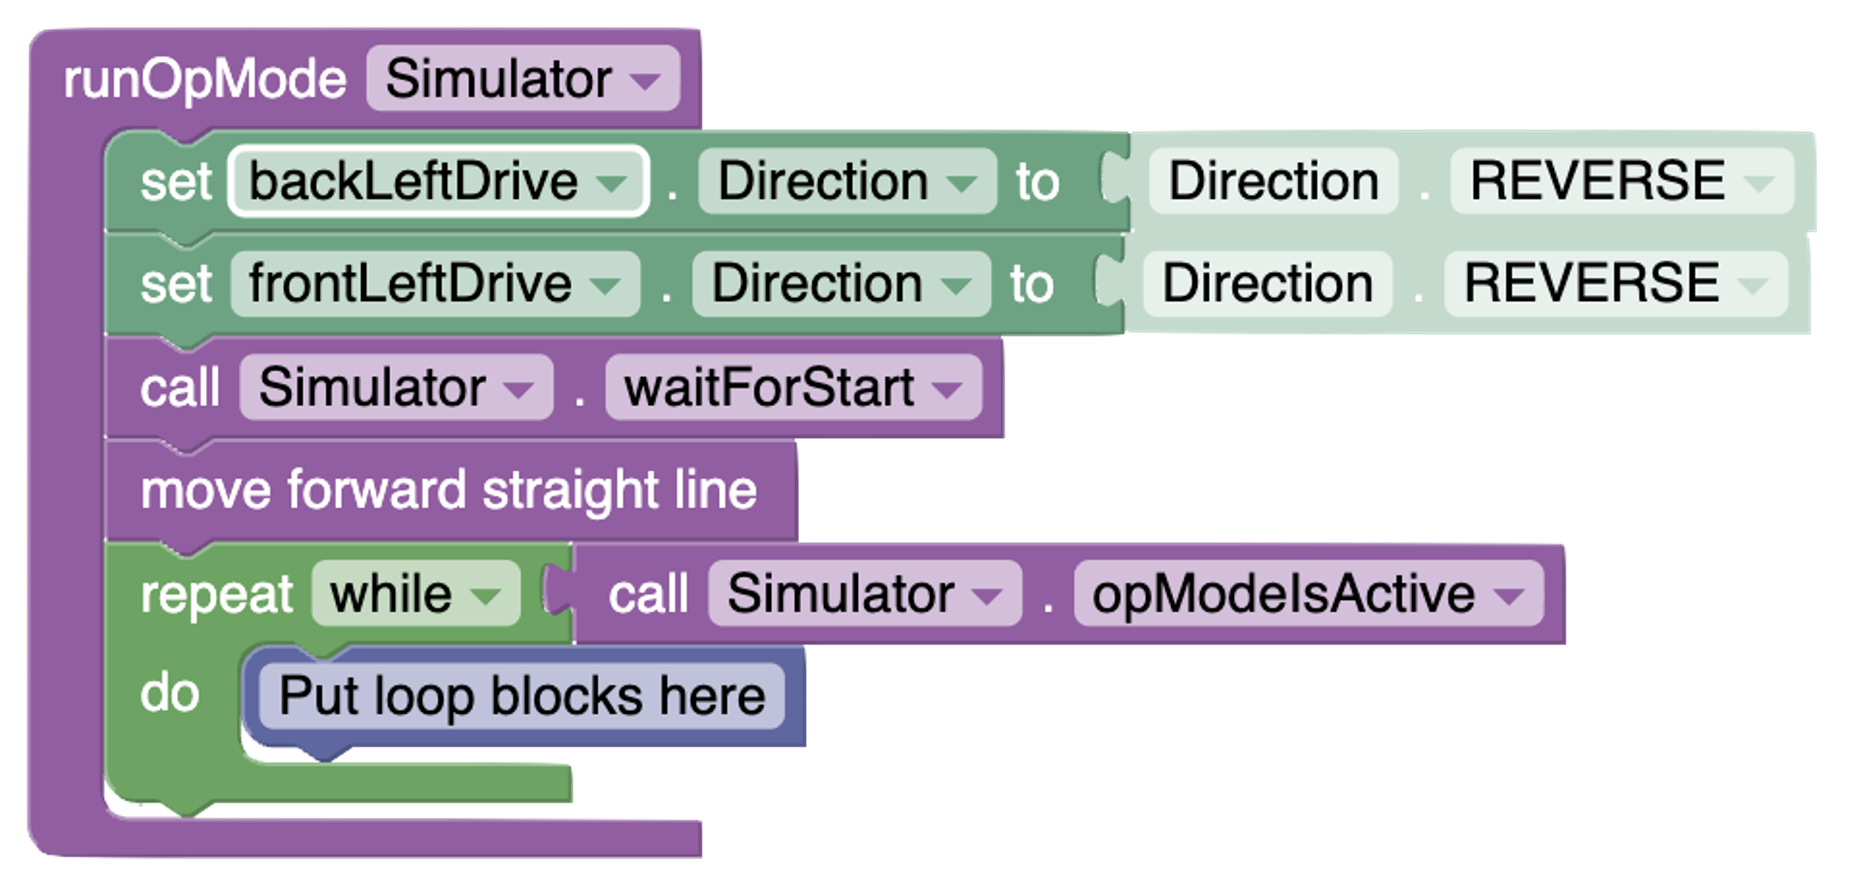
Remind students that just creating the functions doesn’t make the code run these functions. The functions need to be called from the main code just after the Simulator.waitForStart.
Next, your students need to create the initialization to enable the Vision Portal and AprilTag recognition. They will use the same blocks they were using in lesson 1. They need to add them to the initialization section of the code, before the call to Simulator.waitForStart(). These blocks are located in the “Vision” section.
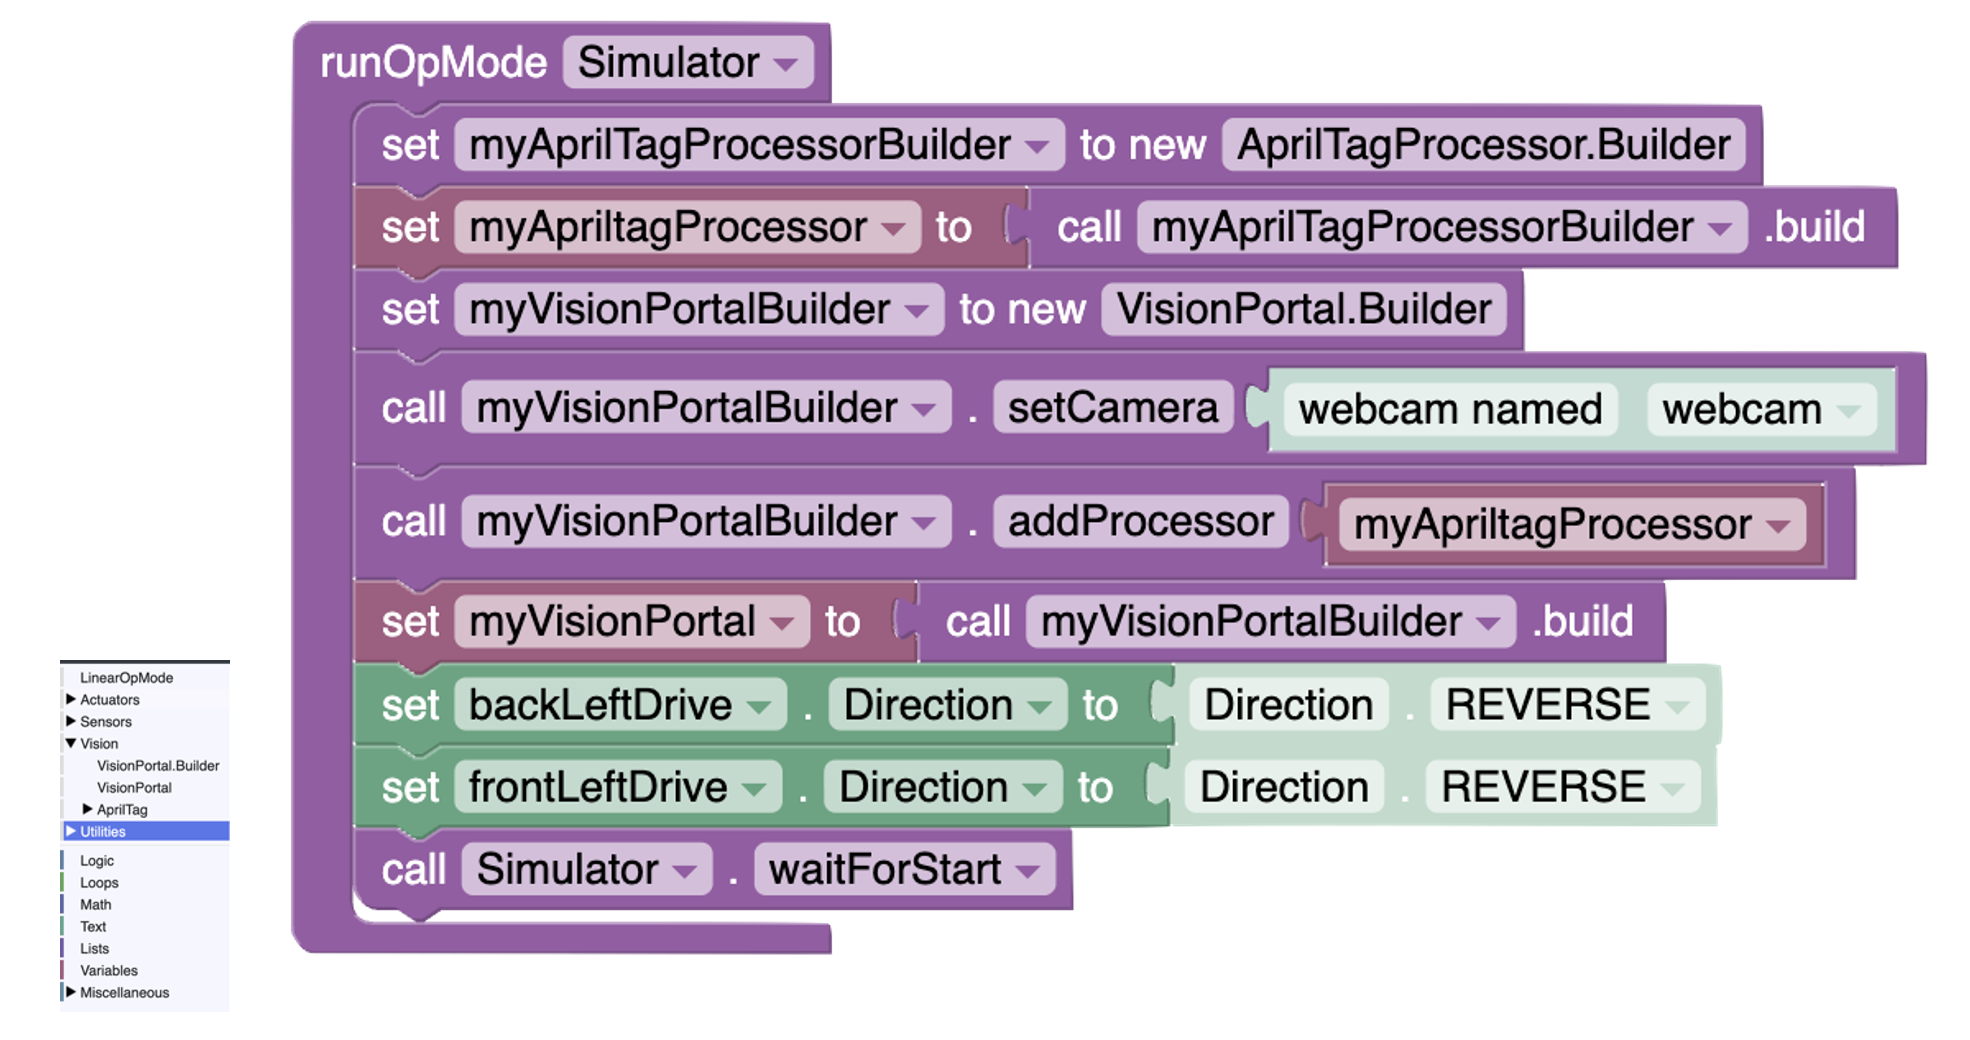
Depending on the students’ grade level and coding experience, you may choose to walk them through what each line of the code does. If this feels too advanced for your group, you can simply provide the full initialization block and focus the lesson on how the robot recognizes AprilTags in the next step. This allows students to engage with the core concept without getting overwhelmed by setup details.
Students should now test the code by pressing “Run”. Ask students to click the small arrow in the bottom left corner of the screen. This opens the robot’s camera view. They should see the robot moving and the AprilTag change position in the field of the camera.
Students now need to create a variable that will store a list of all the AprilTags the robot can see through its camera. In this simulation, the robot should only detect one tag at a time, since the other tags are positioned behind the tower and out of view. The variable will be named AllDetections, and it will help the robot keep track of which AprilTag is currently visible.
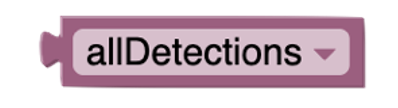
Students should now assign a value to the allDetections variable by using the AprilTagProcessor to get the list of detected tags. To do this, they need to add blocks that call the AprilTagProcessor and retrieve the current detections. The blocks they add to their code should look similar to the example shown.
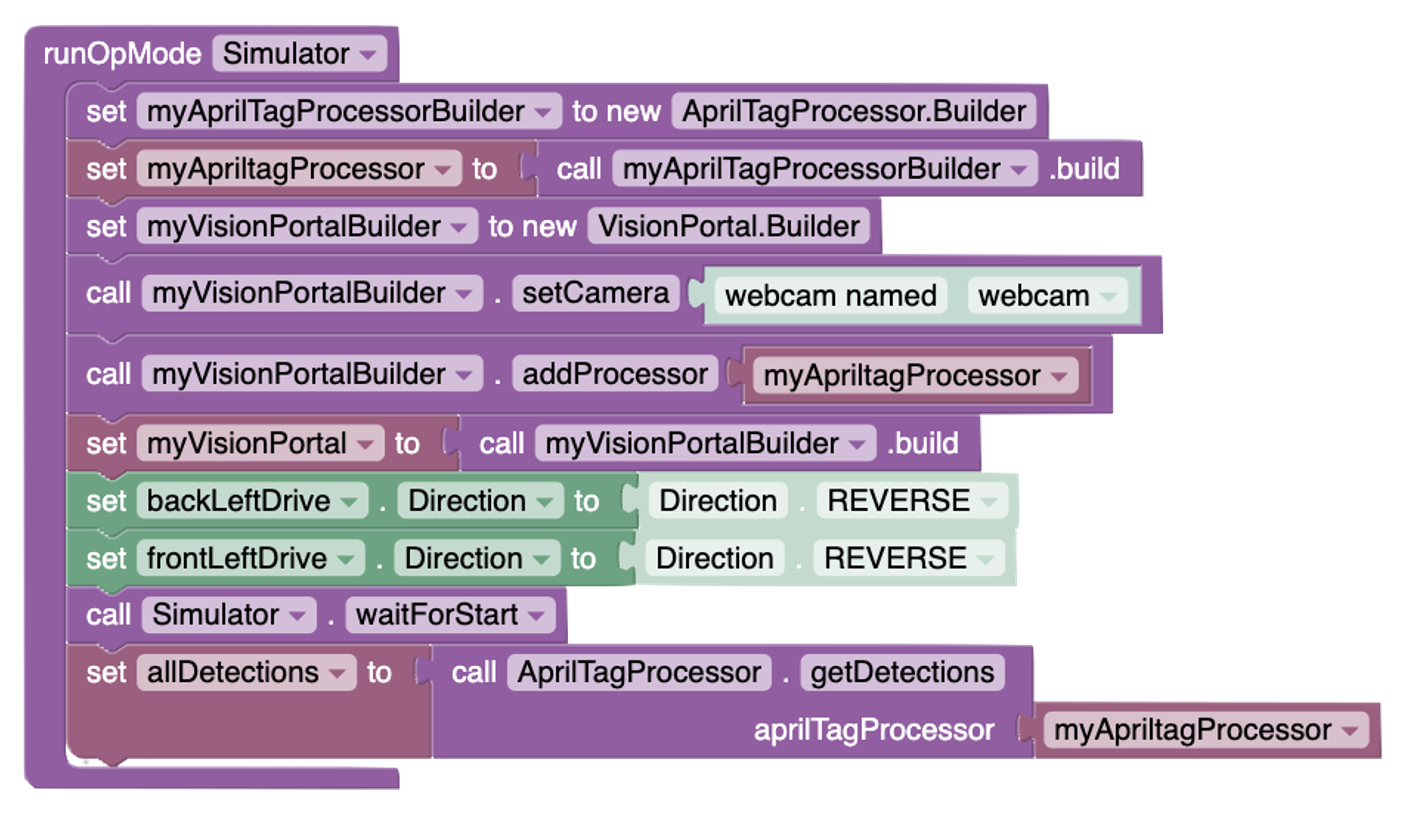
Students can now add a conditional statement to check how many AprilTags the robot can see by looking at the length of the AllDetections variable. If the length is greater than zero, it means at least one AprilTag has been detected. Students should then use the Telemetry display to show a message confirming that an AprilTag has been detected, just as in the provided example. Students might need to click on “Show Telemetry” to view the information being displayed by the robot.
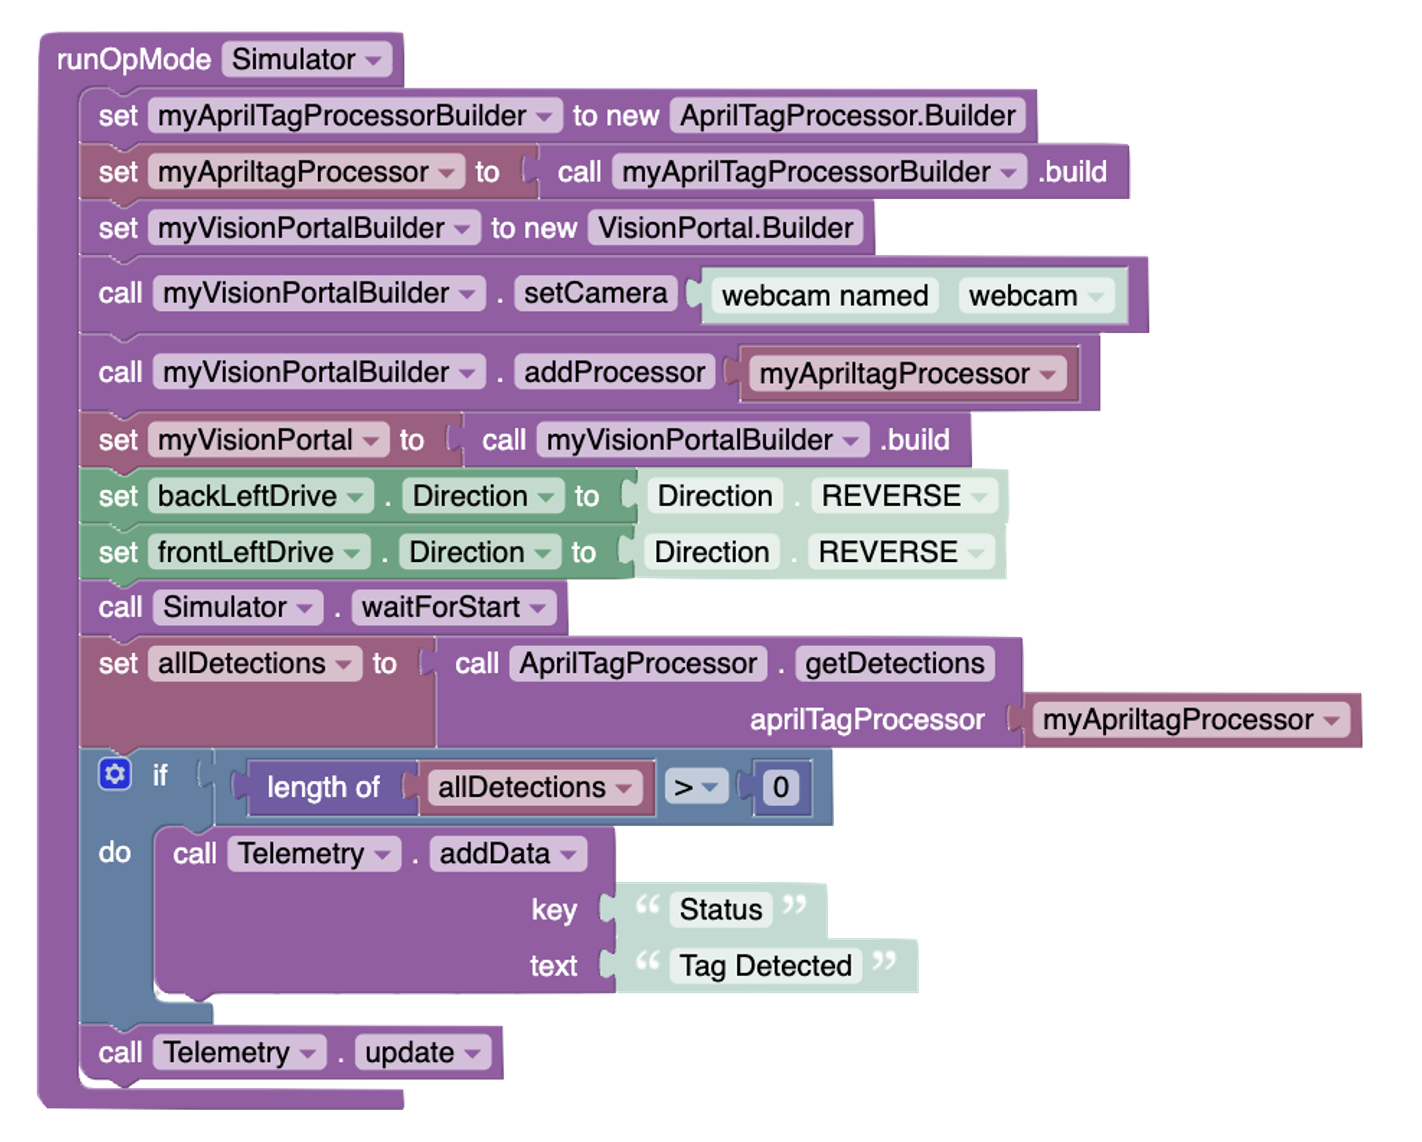
The next step is for students to show which AprilTag ID the robot is seeing. To do this, they should create a new variable called detection. They should also simplify the code by removing the conditional to check if an ID is detected. The new code should look like this:
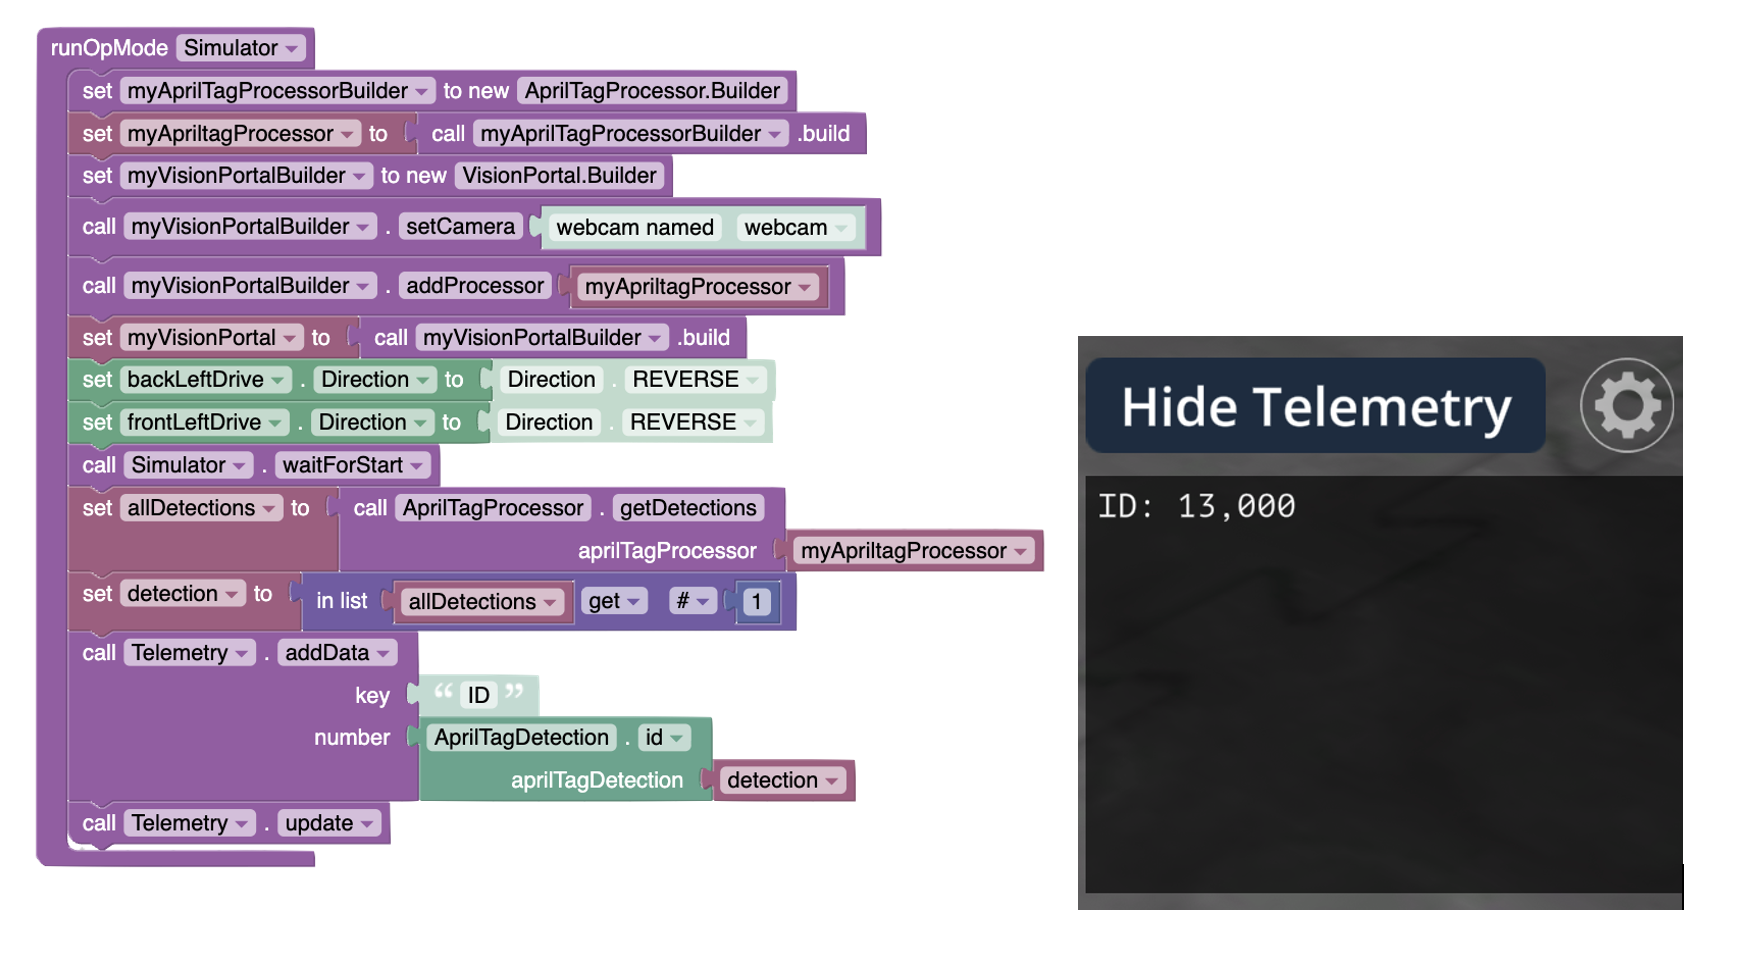
From the Telemetry, students should find that the ID for this AprilTag is 13. Now, students will start to explore other information they can get from the AprilTag detection, such as ftcPose.x, ftcPose.y, ftcPose.z, ftcPose.yaw, ftcPose.pitch, ftcPose.roll, ftcPose.range, ftcPose.bearing, and ftcPose.elevation.
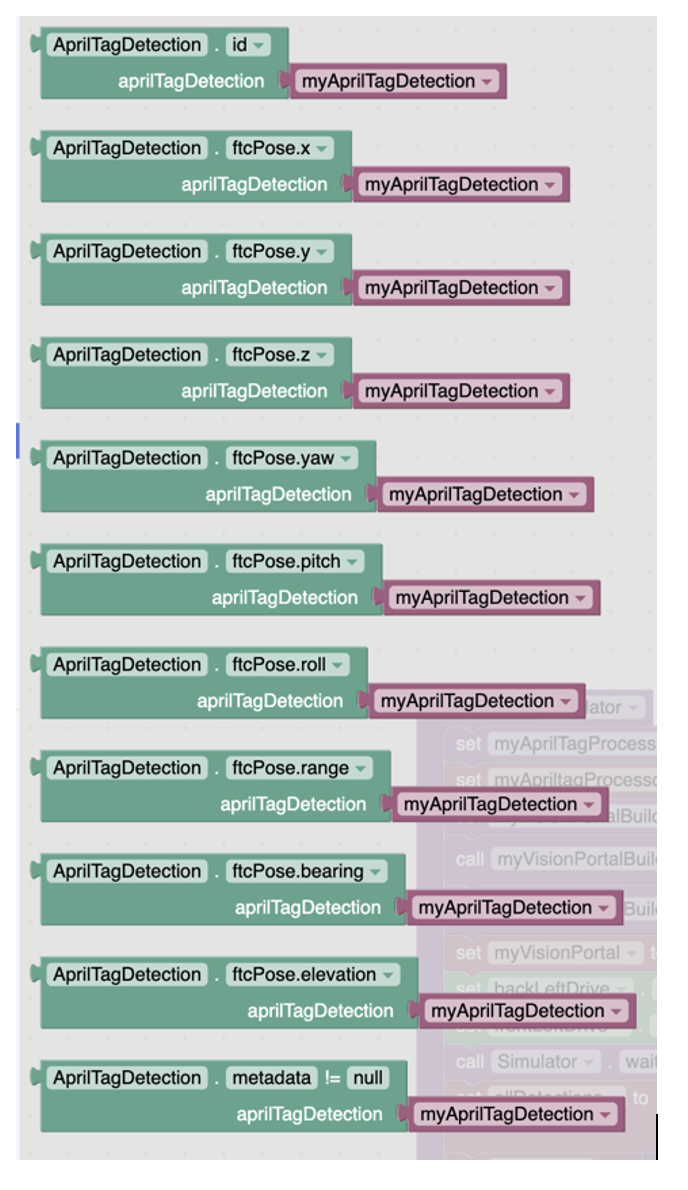
Here is how they can display the information regarding the position on the x-axis:
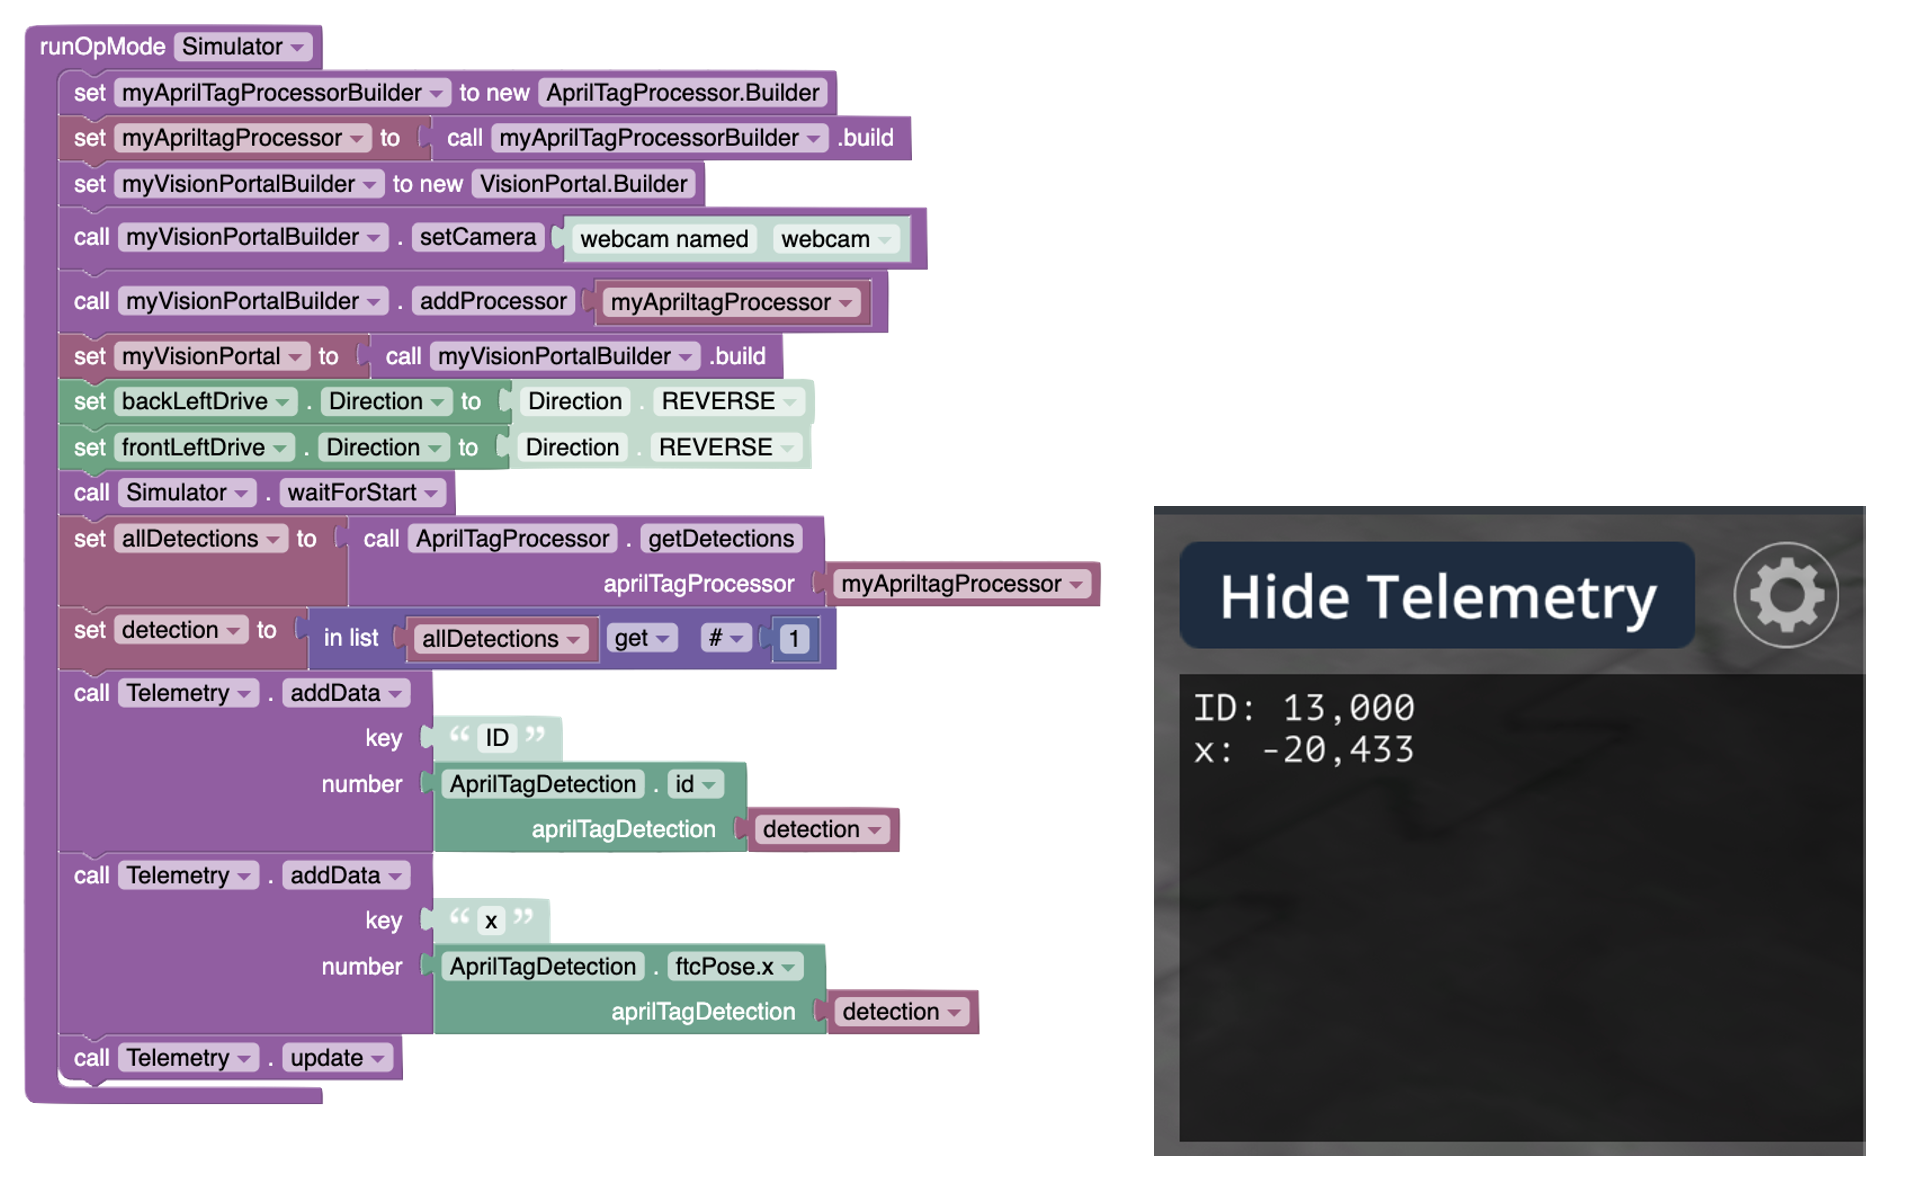
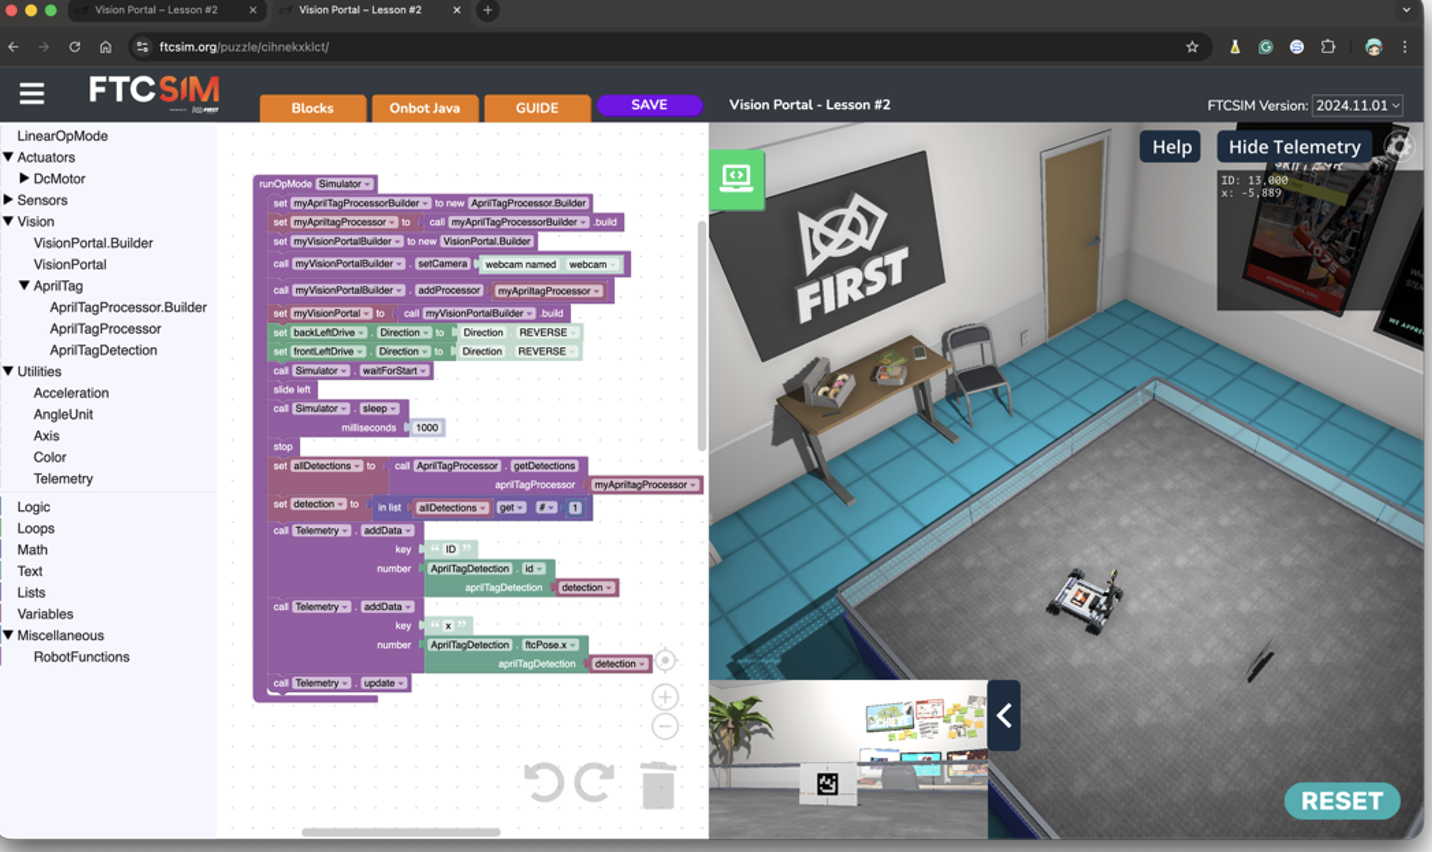
Students should now try to move the robot to the left and observe how it affects the value of x. The “slide left” block is added just after the Simulator.waitForStart and before the aprilTagProcessor starts the detection. Make sure there is a “slide left” function created. There should also be a “stop” function. Students should observe that the value approaches zero. They could change the duration in milliseconds of the slide to try to get as close as possible to zero.
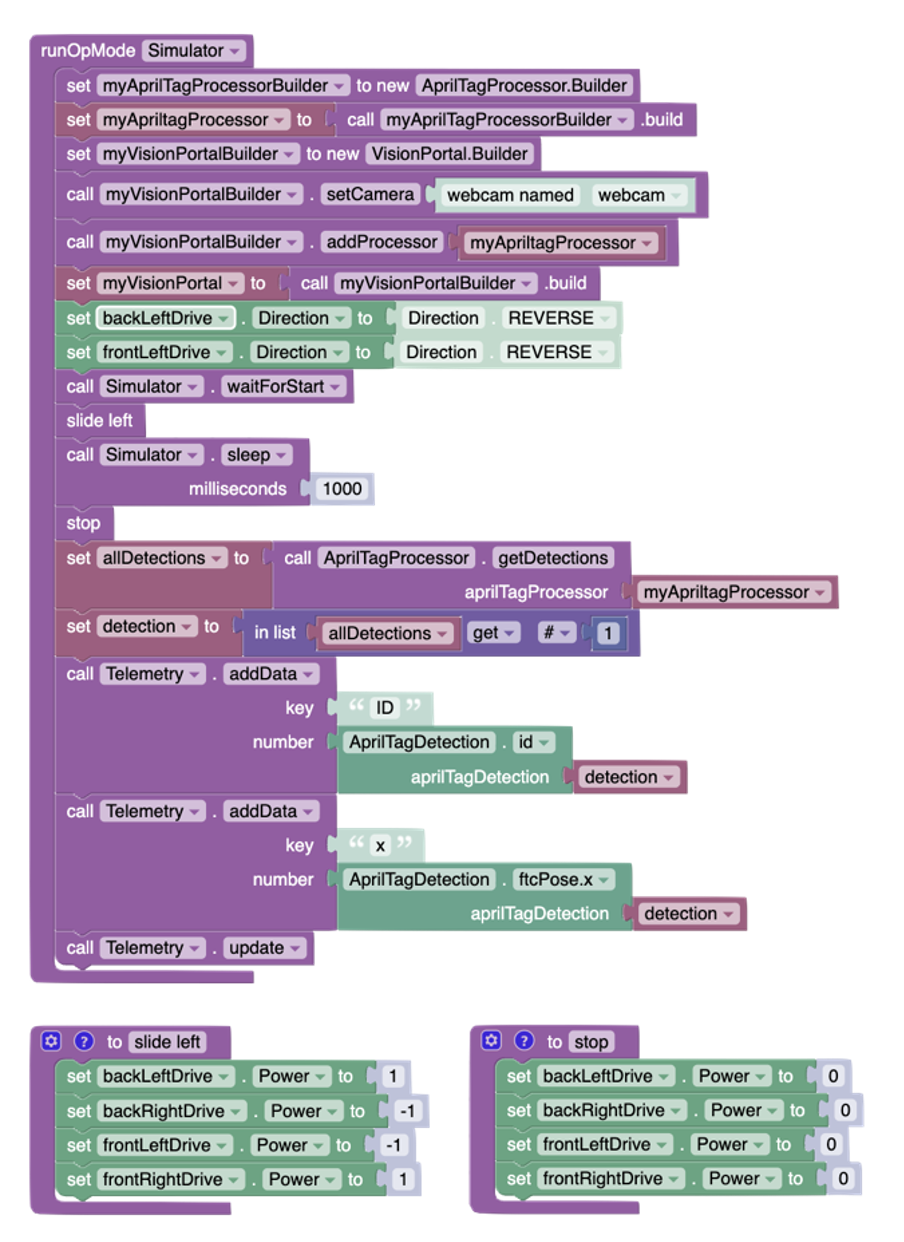
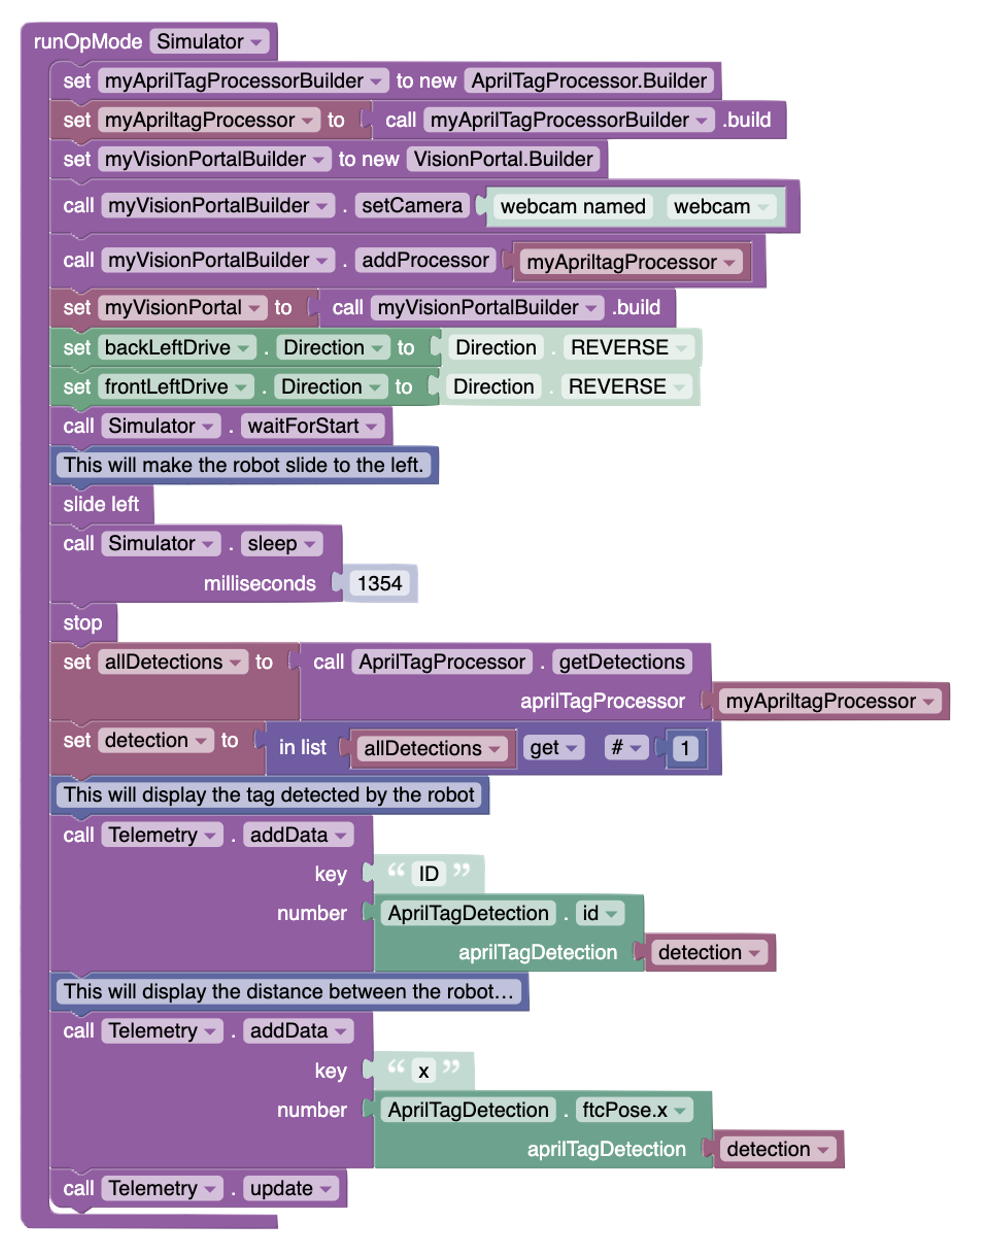
Invite students to add comments to their code to explain the various coding blocks they have used. The comment blocks are blue and can be found in the “Miscellaneous” section. Explain that software engineers work in teams and need to document their code with comments to ensure that their colleagues can understand what their code means. Here is an example of part of the code with comments.
Get students to communicate their solutions to the challenges by asking probing questions such as:
What does the robot need to know before it can move accurately toward the AprilTag?
How does the robot use the camera to figure out where the AprilTag is?
What do the values for ftcPose.x, ftcPose.y, and ftcPose.z tell you about the tag’s position?
What happens to the x value when the robot slides left? Why?
How can you use the range value to decide when the robot should stop moving forward?
Why is it helpful to create functions for each type of movement?
How does using functions make your code easier to read and reuse?
How did you decide how long the robot should slide or turn to get closer to the tag?
What strategies did you use to test and adjust your code?
Encourage students to modify the moves and update the information they receive from the AprilTag. For example, they could move closer and further apart to see how it affects the y-axis distance.
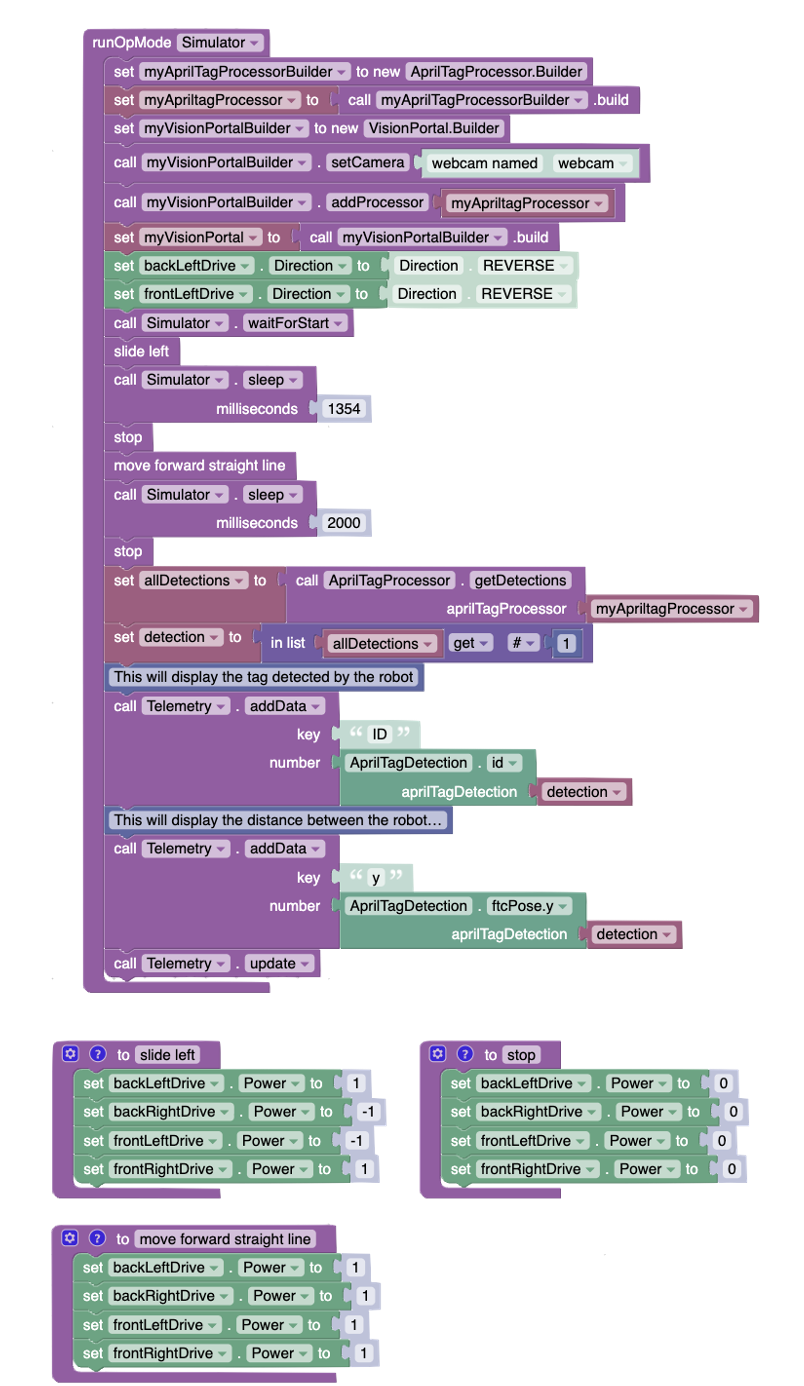
After experimenting, they should come to the following conclusion about the various properties of the detection:
Relational Data
range: The straight-line distance from your camera to the center of the tag, usually in inches or cm. This is perfect for controlling forward/backward movement.
bearing: The angle to the tag, measured to the left or right of where your robot is currently facing. A positive value means the tag is to the right; a negative value means it's to the left. This is perfect for controlling strafing.
elevation: The angle to the tag, measured up or down from the camera's level. This is useful if you need to aim an arm or lift.
3D Coordinates
These values give you the tag's position on a 3D grid.
x: The side-to-side (horizontal) distance to the tag.
y: The up-and-down (vertical) distance to the tag.
z: The forward distance to the tag.
3D Orientation
These values describe how the tag itself is tilted or rotated in space.
yaw: The tag's rotation left or right, like turning your head. This is the most useful one for aligning your robot squarely in front of a tag.
pitch: The tag's rotation up or down, like nodding your head.
roll: The tag's rotation side-to-side, like tilting your head.
Assessment for this lesson should be conducted through active observation and conversation with students as they engage in coding and problem-solving. Evaluating the effectiveness of the lesson involves watching how students interact with the FTC Simulator, how they apply the Vision Portal and AprilTag recognition concepts, and how they use the various properties.
Engage students in meaningful dialogue about their thought processes, challenges, and strategies. This will help you gain insight into their understanding of how camera vision and AI influence robot decision-making. These interactions also provide opportunities to offer targeted feedback and adjust instruction to support learning outcomes.
Here is a list of “look-fors” to guide your observations and your assessment:
Engagement and CuriosityAre students actively exploring how the robot responds to AprilTag positioning? Are they experimenting with movement and observing changes in distance and angle values?
Understanding of AprilTag Spatial Data
Can students explain what values like ftcPose.x, ftcPose.range, and ftcPose.bearing represent? Do they understand how these values relate to the robot’s position and orientation?
Use of Functions for Movement
Are students creating and using functions to simplify their movement code? Do they understand how functions improve efficiency and readability?
Problem-Solving and Debugging
Are students adjusting their code based on what they observe in the Telemetry? Are they testing different movement durations or directions to improve tag alignment?
Use of Telemetry for Feedback
Are students using the Telemetry display to monitor AprilTag data and make decisions based on what they see? Are they interpreting the values correctly?
Application of Mathematical Reasoning
Are students using spatial reasoning and math skills to guide the robot’s movement toward the tag? Can they describe how changes in movement affect tag data?
Code Documentation and Communication
Are students adding meaningful comments to their code to explain what each part does? Can they clearly communicate their coding choices and logic?
Reaction to Failure and Iteration
How do students respond when the robot doesn’t detect a tag or behaves unexpectedly? Are they persistent, reflective, and willing to revise their code?
This approach ensures that assessment is not just about the final result, but about the process of learning, experimentation, and thoughtful application of new concepts.
C3.1 solve problems and create computational representations of mathematical situations by writing and executing code, including code that involves conditional statements and other control structures
C3.2 read and alter existing code, including code that involves conditional statements and other control structures, and describe how changes to the code affect the outcomes
C3.1 solve problems and create computational representations of mathematical situations by writing and executing efficient code, including code that involves conditional statements and other control structures
C3.2 read and alter existing code, including code that involves conditional statements and other control structures, and describe how changes to the code affect the outcomes and the efficiency of the code
C3.1 solve problems and create computational representations of mathematical situations by writing and executing efficient code, including code that involves events influenced by a defined count and/or subprogram and other control structures
C3.2 read and alter existing code, including code that involves events influenced by a defined count and/or subprogram and other control structures, and describe how changes to the code affect the outcomes and the efficiency of the code
C2.1 use coding to demonstrate an understanding of algebraic concepts including variables, parameters, equations, and inequalities
C2.2 create code by decomposing situations into computational steps in order to represent mathematical concepts and relationships, and to solve problems
C2.3 read code to predict its outcome, and alter code to adjust constraints, parameters, and outcomes to represent a similar or new mathematical situation
C2.1 use variables, constants, expressions, and assignment statements to store and manipulate numbers and text in a program
C2.3 write programs that include single and nested conditional statements
C2.4 write programs that include sequential, selection, and repeating events
C2.5 write programs that include the use of Boolean operators, comparison operators, text operators, and arithmetic operators
C2.6 interpret program errors and implement strategies to resolve them
C2.7 write clear internal documentation and use coding standards to improve code readability