
Loading…
Loading…
Embark on a puzzle-solving adventure in the FTC Simulator, where coding meets strategic thinking and customized functions.
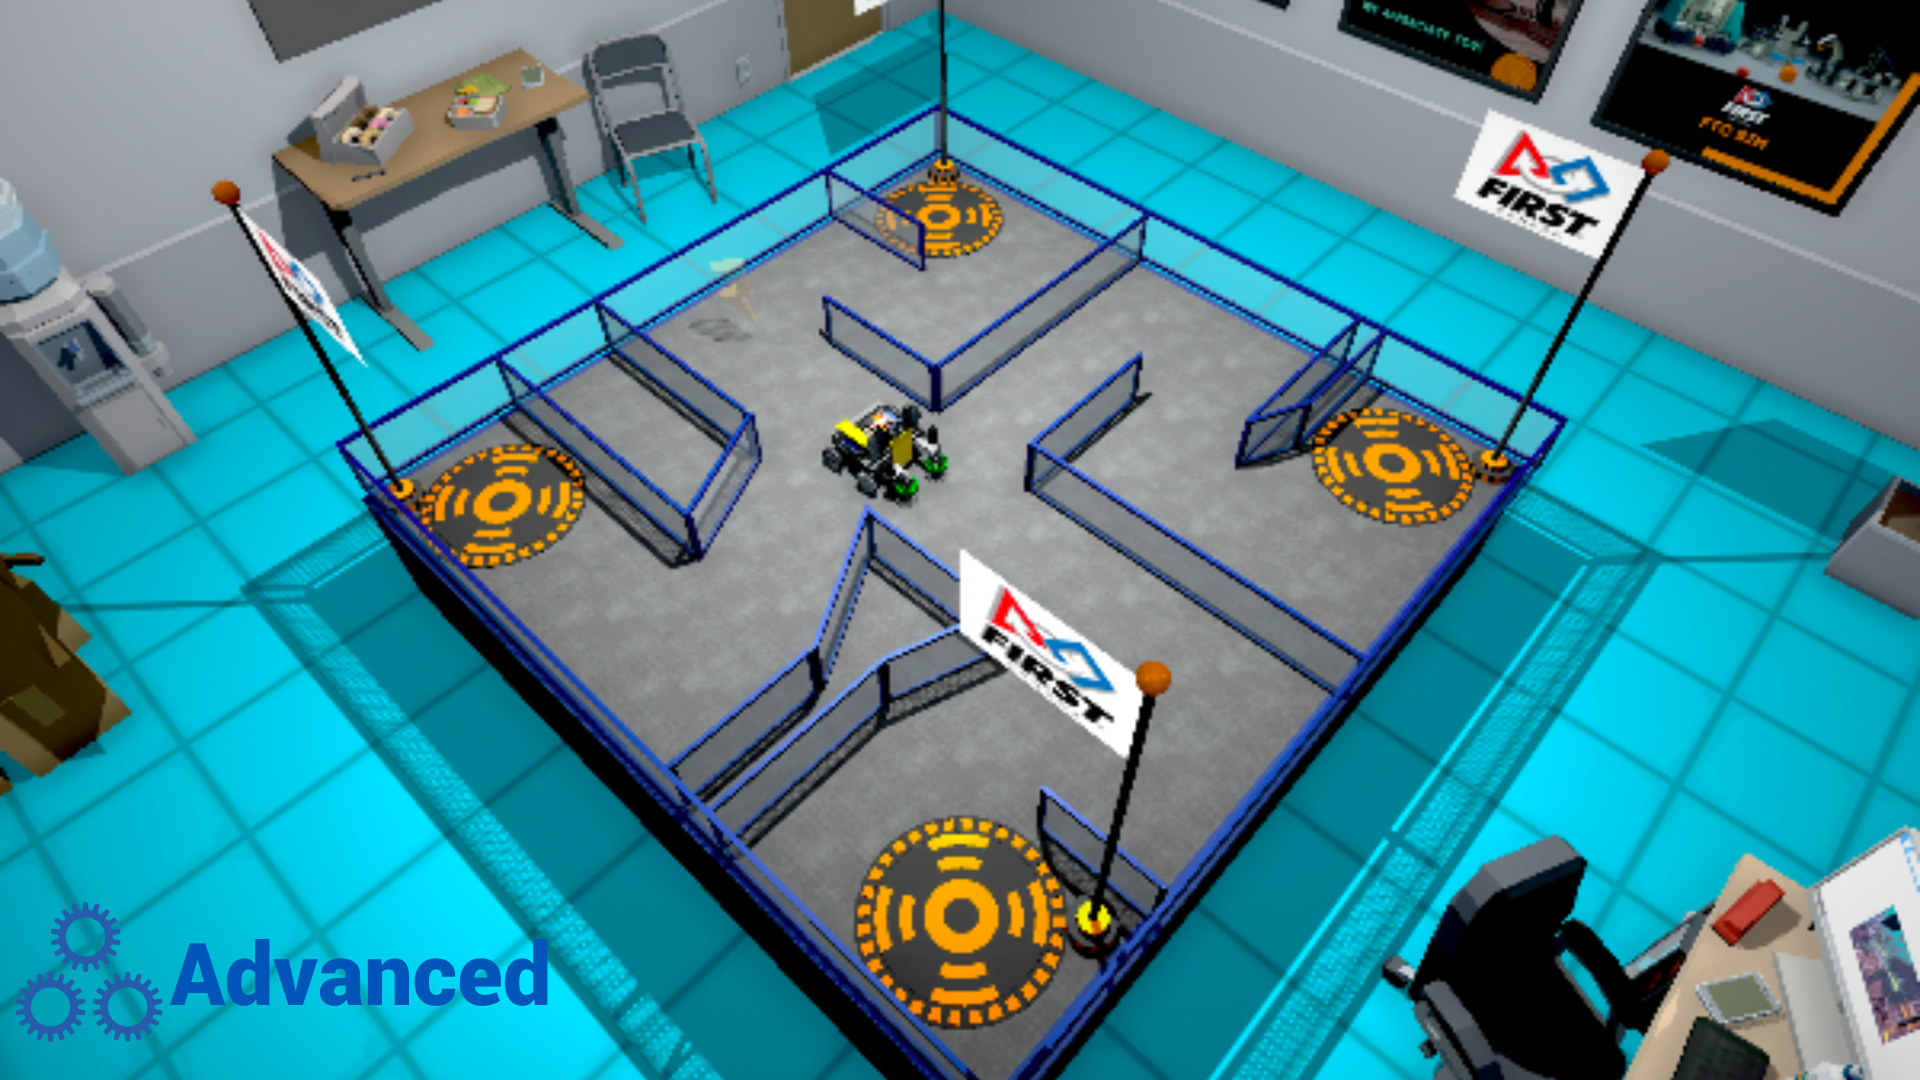
Level: Advanced
Embark on a puzzle-solving adventure in the FTC Simulator, where coding meets strategic thinking and customized functions. This lesson introduces students to the challenge of precisely navigating through obstacles and using functions to streamline their code for efficiency and adaptability. Through hands-on exercises, they will learn to implement these functions to solve puzzles, enhancing their problem-solving skills and deepening their understanding of advanced programming concepts. This approach fosters creativity and equips students with the tools for sophisticated robotics programming, blending logical reasoning with the practical application of robotics principles.
This lesson plan is structured using the 5E framework, a widely recognized instructional model consisting of five phases: Engage, Explore, Explain, Elaborate, and Evaluate. The 5E framework systematically engages students in inquiry-based learning, encouraging active exploration and comprehension of complex topics.
In the lesson, students will:
Grasp the concept of using customized functions in programming to simplify complex tasks and enhance code reusability.
Apply these functions within the FTC Simulator to navigate and solve puzzles, demonstrating strategic thinking and precision.
Develop advanced problem-solving strategies by employing functions to overcome obstacles and challenges in virtual robotics environments efficiently.
Post-it notes or a brainstorming collaborative app like Microsoft Whiteboard, Google Jamboard or Apple Freeform.
Devices for your students (Windows computers, Mac computers, ChromeBook)
Google Chrome or Microsoft Edge (Chromium version) Web Browser
Access to the FTC Simulator website (https://ftcsim.org)
Students account created for each of your students
Projector or interactive whiteboard
To captivate your students’ attention and ignite their curiosity about robots that overcome obstacles, use your projector or interactive whiteboard to share an engaging video featuring a robot inspired by the ancient serpent Ouroboros that eats its own and that can overcome any obstacle, which can be found at this link: https://youtu.be/TNSo14slkbs?si=5iu256VwTdKQVVgV.
With its advanced sensors and agile mobility, this robot effortlessly traverses through diverse terrain, autonomously detecting and maneuvering around obstacles encountered along its path.
Following the video presentation, provide post-it notes to your students and encourage them to engage in a brainstorming session exploring various obstacles that robots may have to overcome and ways they can overcome them. Their ideas can include physical obstacles in various contexts and sensors that are designed to detect them. Instruct students to jot down one idea per post-it note. Allocate a designated area on your classroom wall for students to affix their ideas. Once they have generated several ideas, have them gather at the sharing space to attach their post-it notes. If an idea has already been posted on the wall, they can place it atop the existing one, while if the concept still needs to be represented, they should find an available spot to display it.
Here are some of the ideas that they may come up with:
Obstacles:
Uneven terrain: In outdoor environments such as forests or rocky landscapes.
Steps or stairs: Commonly found in buildings, homes, or urban settings.
Narrow passages: Encountered in tight spaces like corridors, hallways, or between furniture.
Doors: In indoor environments, robots may need to open or navigate through closed doors.
Obstacles of different heights: Such as ramps, curbs, or platforms, often found in urban landscapes or construction sites.
Cluttered environments: Including objects like debris, furniture, or misplaced items, common in homes or cluttered workspaces.
Water or puddles: Present in outdoor areas, parks, or wet environments.
Low-hanging branches or overhead obstructions: In outdoor settings like parks, forests, or even indoor spaces with low ceilings.
Moving obstacles: Such as people, animals, or vehicles, encountered in dynamic environments like streets or crowded areas.
Gates or fences: Typically found in residential areas, farms, or industrial sites.
Ways to overcome obstacles:
Specialized wheels or tracks to traverse uneven terrain.
Use extendable arms or lifting mechanisms to overcome steps or stairs.
Sensors to detect and navigate around narrow passages or obstacles.
Robotic arms equipped with grippers to open doors or manipulate objects obstructing the path.
Adjustable suspension systems to navigate obstacles of different heights.
Cameras and computer vision algorithms to detect and avoid cluttered environments.
Waterproof seals or coatings to protect against water damage.
LIDAR sensors to detect and avoid overhead obstructions.
Facilitate a discussion by raising thought-provoking questions, including:
What do robots do if they can’t get past an obstacle? (e.g., If a robot can’t get past something, it might go back and try a different way or ask for help from another robot or a human. It’s like when you’re doing a puzzle and can’t find where a piece goes, you might try a different piece or ask someone for a hint.)
Why is it useful for robots to remember the obstacles they have encountered? (e.g., Remembering obstacles helps robots get smarter about where they’re going. It’s like when you remember there’s a hole in the ground on your way to school, so you go around it the next day. Robots can learn from their experiences too.)
How can robots use tools to overcome obstacles? (e.g., Robots can have special tools, like a scoop or a hook, to move things out of their way or to grab onto something to pull themselves up. It’s kind of like using a shovel to dig a hole or a ladder to climb over a fence.)
Why do robots need sensors to move around? (e.g., Sensors help robots see where they’re going and avoid bumping into things, kind of like how we use our eyes to look around and not walk into walls.)
How can robots work together to get past something blocking their way? (e.g., Robots can talk to each other using signals, so one robot can tell another robot about an obstacle, and then they can figure out together how to get around it, just like if you and your friend came across a big puddle and had to find a way to jump over it or go around it.)
Explain that self-driving robots and vehicles often must overcome obstacles as they navigate complicated terrain. Mention that the upcoming lesson will focus on coding robots in FTC Sim, using diverse methods to tackle roadblocks and successfully reach their target destinations.
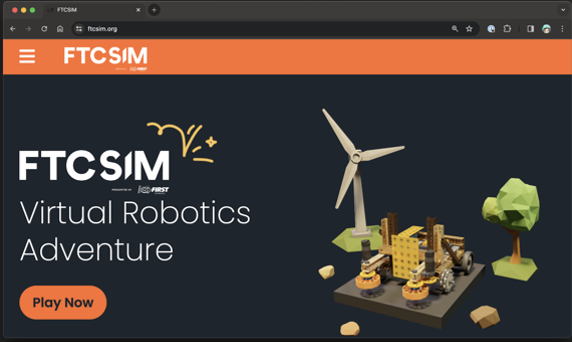
Please encourage students to start their hands-on learning experience with the FTC Simulator platform by navigating to the provided link, https://ftcsim.org/. Have them log in using their unique username and password. Once logged in, direct them to the “Courses” section and guide them to choose the course titled “FTC Puzzles.” Let students know that in this course, they will gain the skills to code and control self-driving robots effectively, focusing on overcoming obstacles.
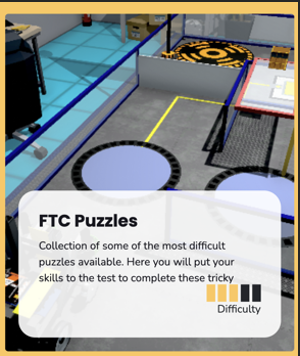
Within the FTC Puzzles section, guide students to access the puzzle titled “1-Road Block”
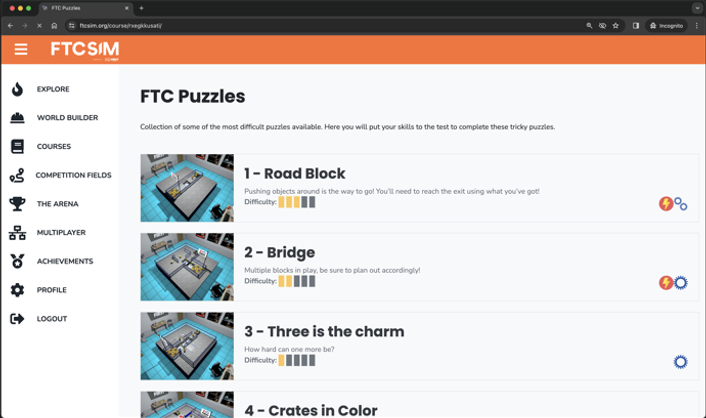

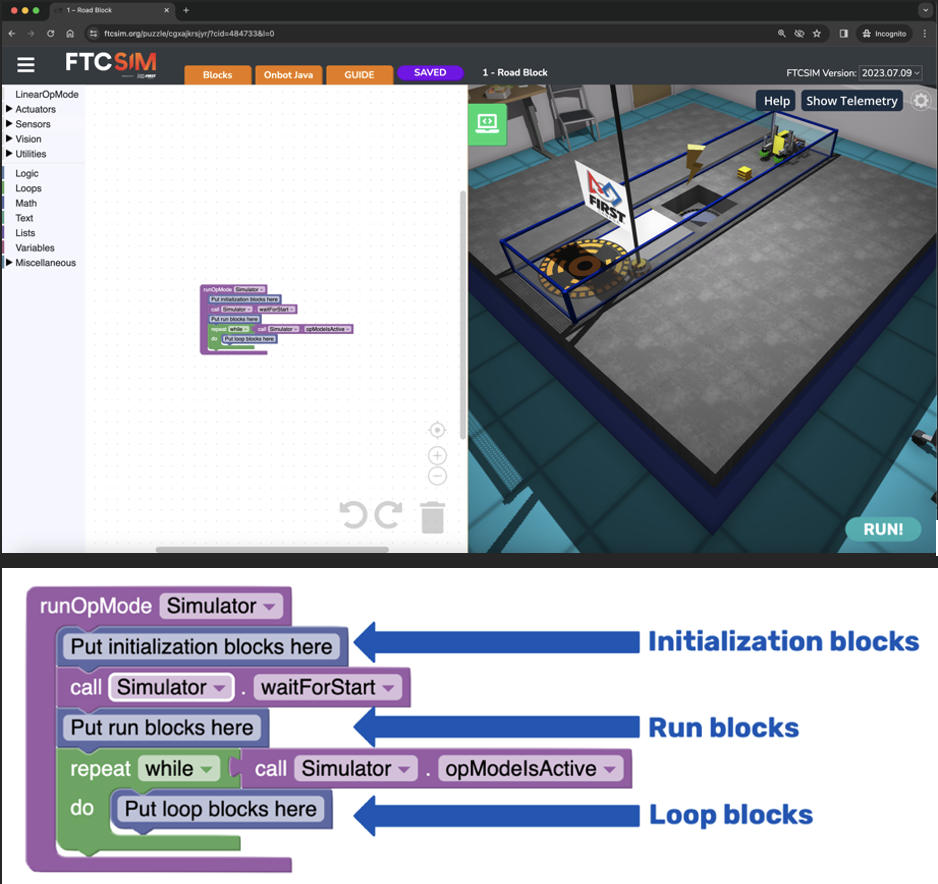
Invite students to start the code for the roadblock puzzle. Explain that the robot needs to drop the block in the pit to activate the bridge. Add that the robot must push the block and then wait for the bridge to close before moving forward.
To access the coding panel, click on the green computer icon on the screen’s left side. You’ll notice that there’s already a sample code present. Remind your students of the basic structure of the code, as seen in the first lesson:
Initialization Blocks: This section contains information the robot needs before starting its tasks.
Run Blocks: Most of the code you write will be placed in this section, where the robot’s main actions are defined.
Loop Blocks: These blocks are used for tasks that must be repeated multiple times. However, for this lesson, we’ll only work with initialization and run blocks. The loop section can be discarded to maintain a cleaner code structure.
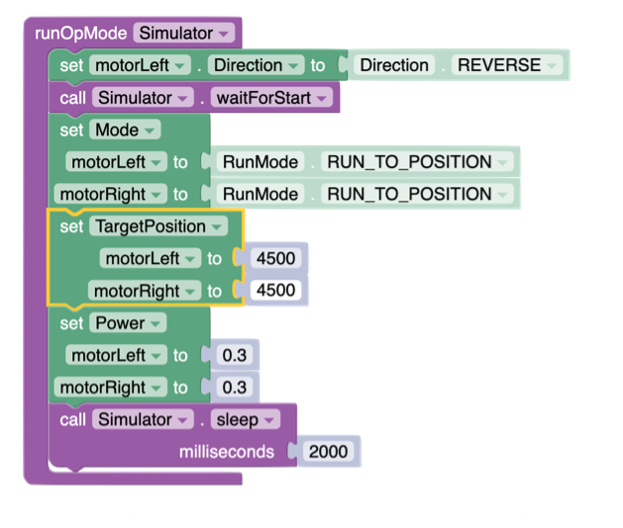
Explain that in the first part of the puzzle, the robot needs to move the exact distance to push the block in the pit without falling in the pit. The encoders will be used to ensure precise movement. A distance of 4500 ticks should work.
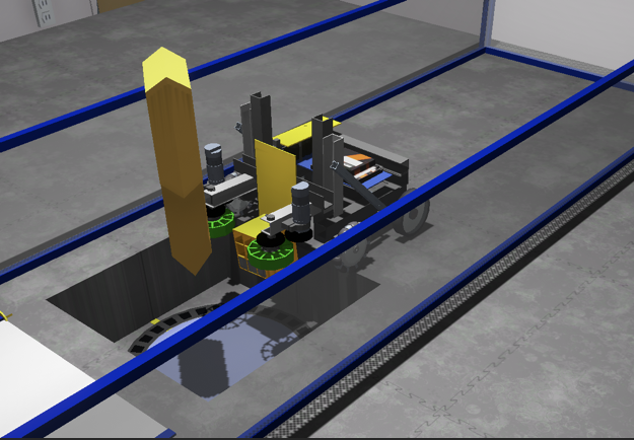
The bridge should automatically close, removing the obstacle.
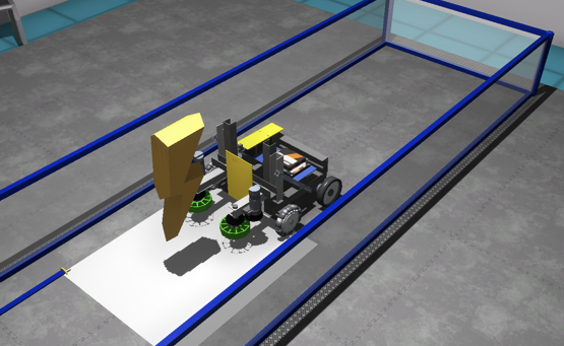
It’s now time to move forward toward the final pad to raise the flag.
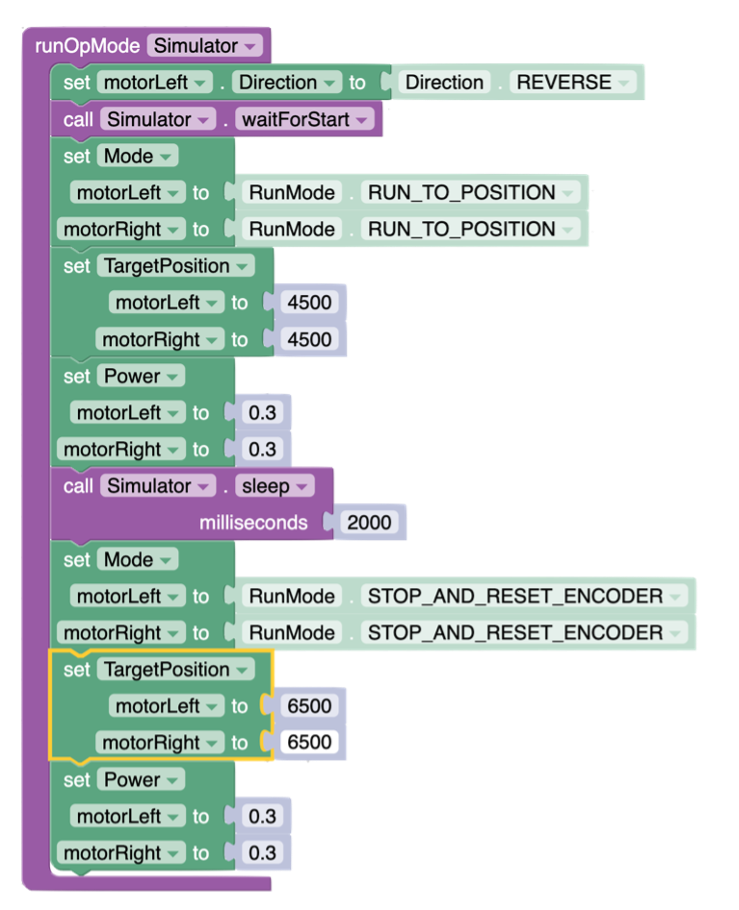
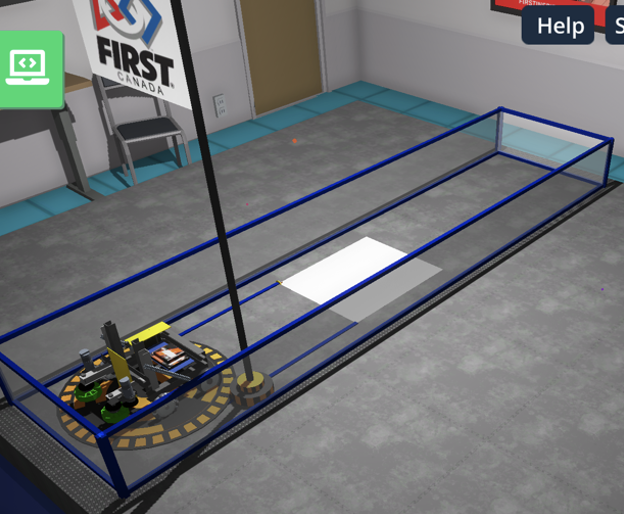
Encourage students to change the pause in between the two movements to make sure the bridge has the time to fully close before the robot drive on top of it.
Encourage your students to navigate to the next puzzle in the “Puzzles” section: 2—Bridge

Explain that in this puzzle, they will need to move the robot to reach the first yellow block and push it into the first pit. Then, the robot must manoeuvre to grab the second block and drop it in the second pit. Then, the robot must drive to the final pad to raise the flag.
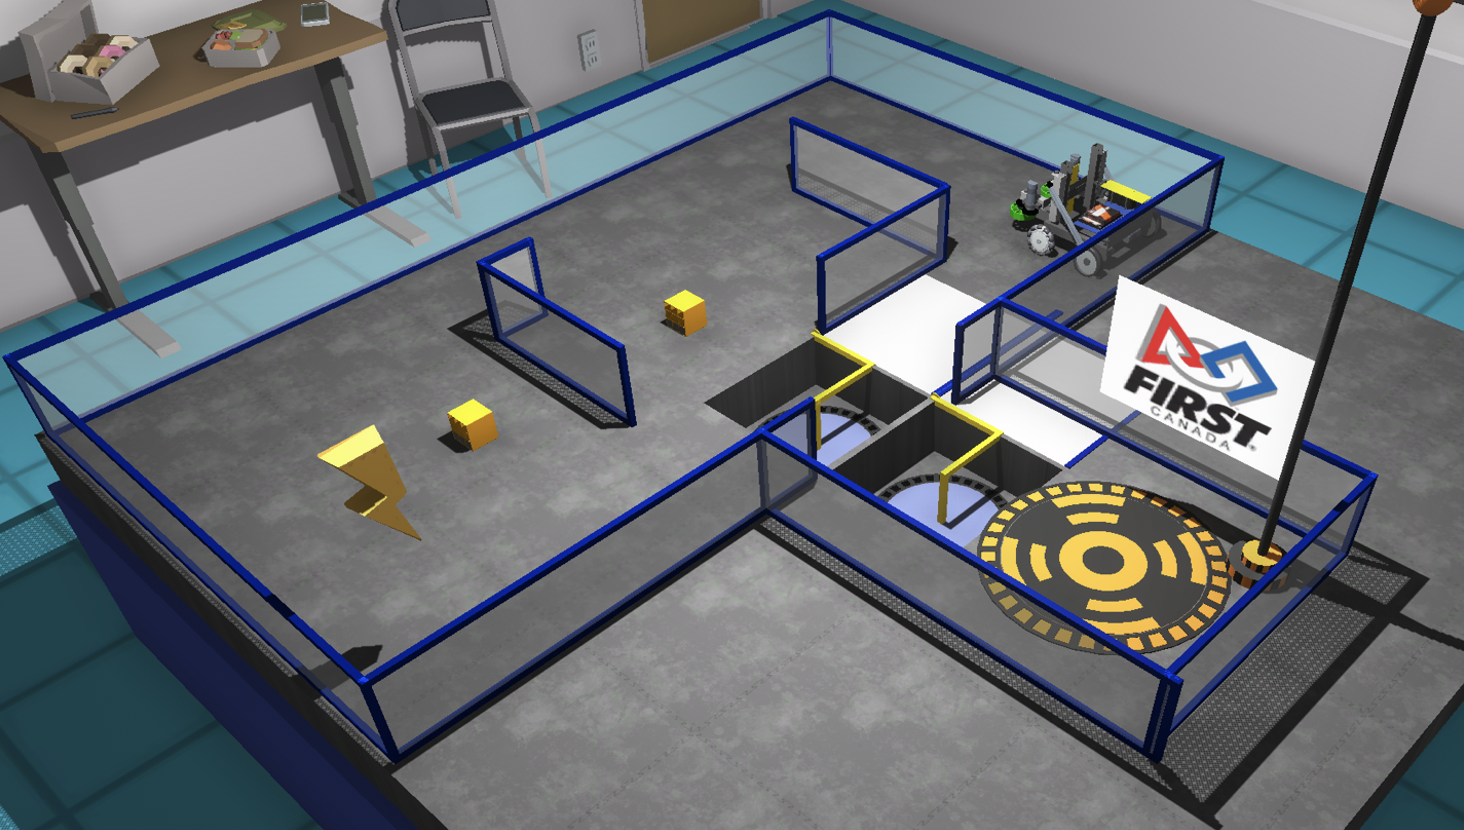
Have students brainstorm the pseudocode to bring the robot to that position. Explain that the pseudocode is a simplified, informal way of programming that outlines an algorithm without using the syntax of a specific coding language.
Move in a straight line
Turn left 90°
Move in a straight line
Turn left 90°
Move in a straight line while pushing the first block in the first pit
Move backward in a straight line
Turn right 90°
Move in a straight line
Turn left 90°
Move in a straight line while pushing the second block
Turn left 90°
Move in a straight line while pushing the second block
Turn right 90°
Move in a straight line while pushing the second block in the second pit
Move in a straight line all the way to the pad
Have students do some pattern recognition here. They should realize that turning left 90° degrees and turning right 90° are used more than once. Instead of solving the puzzle immediately, students should create functions for these turns.
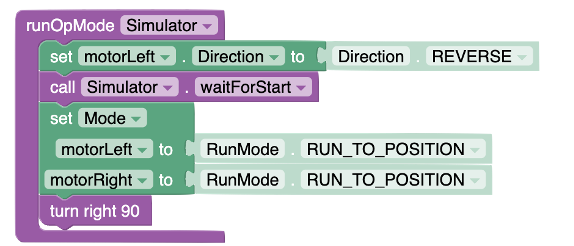
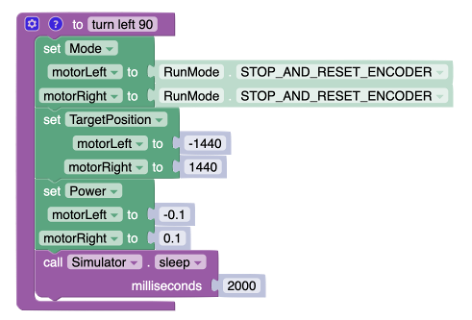
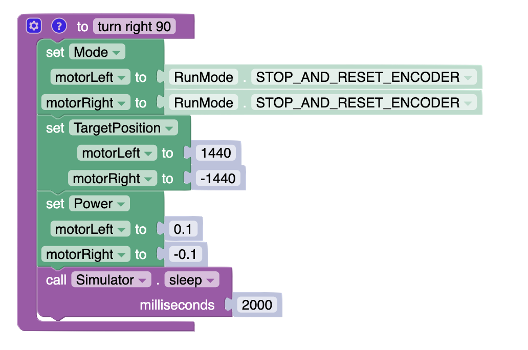
Now that the robot has functions to turn left and right 90 degrees, students should work on two functions to move forward and backward. Because the robot will not always move the same distance, students must learn to create a function that includes an input. Adding input is available by clicking on the gear icon. In this case, the input added will be “ticks”.
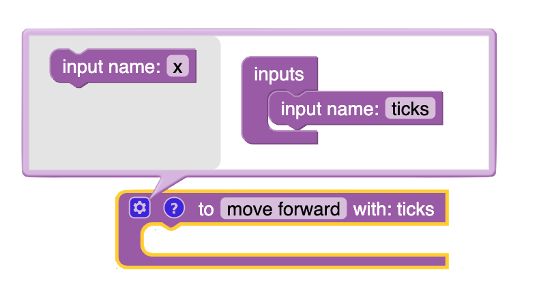
When using this function in the main code, a value can be added as an input:
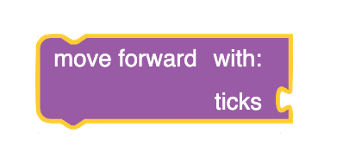
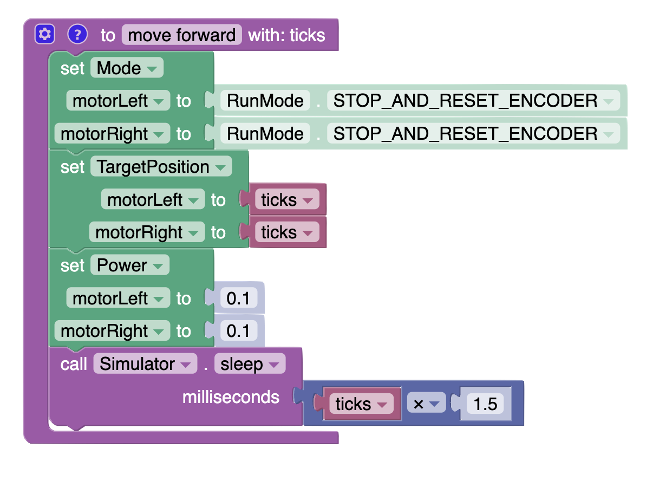
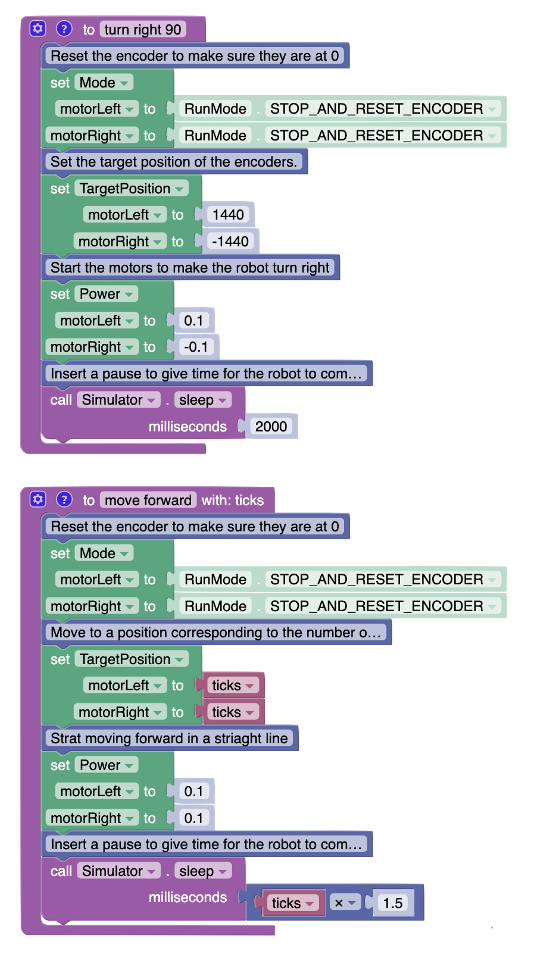
Code to move forward can now be added to the function. Students must use the “ticks” variable from the “Variables” menu to set the position. The pause will vary depending on the speed and the distance. In this example, the robot is moving at a speed of 10%, and it’s estimated that the pause should be about 1.5 times the number of ticks. Students will need to adjust this value if they use a different speed.
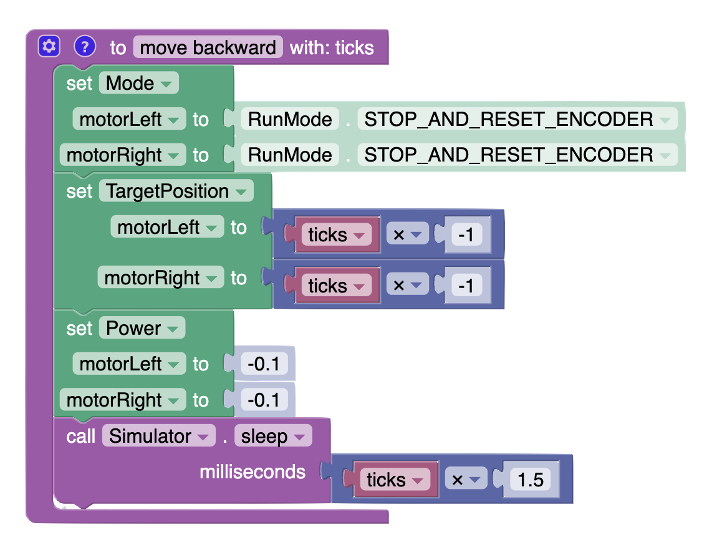
A similar code can be created for moving backward.
With the “move forward” and “move backward” functions created, the following code should make the robot move forward and then return to its original position.
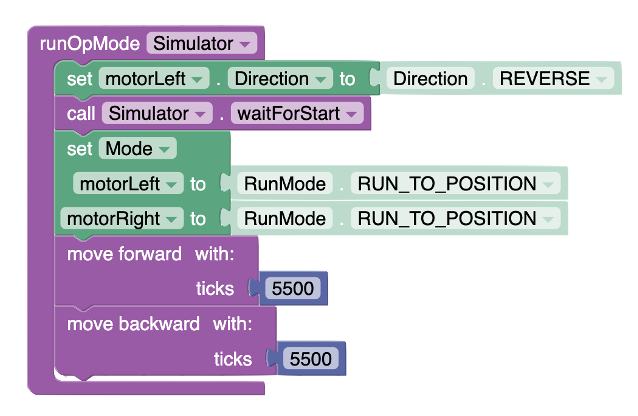
Students should now have all the functions they need to complete the puzzle. Their main code should be simply a sequence of calls to these functions. This sample code is a good start. It should drag the first block in the pit and then bring the robot in position to grab the second block. Students should see how easy it is to code when all the functions are created. It should match the student’s pseudocode.
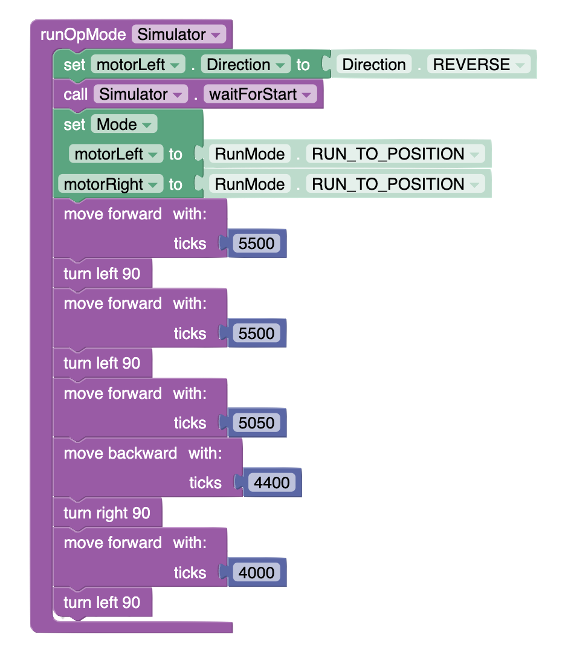
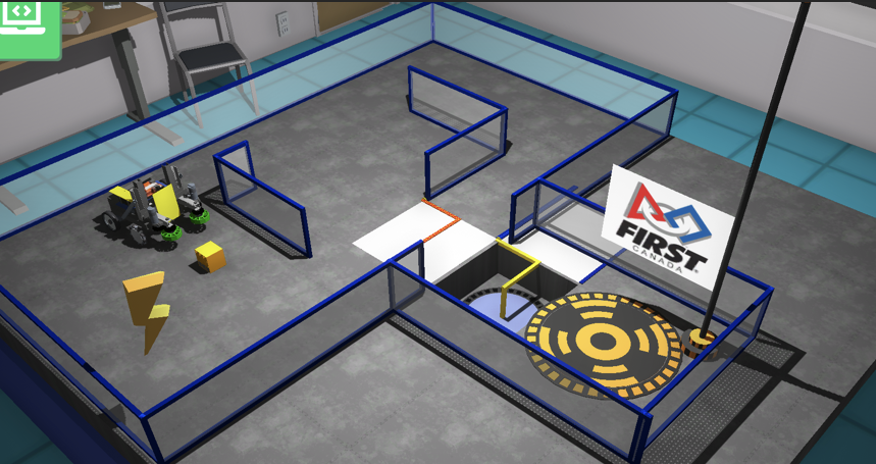
Invite students to add comments to their code to explain the various coding blocks they have used. The comment blocks are blue and available in the “Miscellaneous” section. Explain that software engineers work as teams and need to document their code with comments to ensure their colleagues can follow what their code means. Here is an example of the functions created in the code for the second puzzle (Puzzle 2—Bridge) with comments added to it.
Get students to communicate their solutions to the first two puzzles by asking probing questions such as:
How did you use the "move forward" and "move backward" functions to navigate the robot in the puzzle? (e.g., We used the functions by calling them in the main code and providing the appropriate input, which is the distance in ticks we wanted the robot to move.)
Can you explain the purpose of using functions in your code? How did they help you solve the puzzle? (e.g., Functions helped us organize our code and avoid repetition. By creating functions for common actions like turning and moving, we can call these functions whenever needed, making our main code cleaner and easier to understand.)
Describe how you adjusted the pause time in your code. Why is it important to adjust the pause time when using encoders? (e.g., We adjusted the pause time based on the speed and distance the robot needed to travel. It’s important to adjust the pause time to ensure the robot has enough time to complete its movement, especially when using encoders to achieve precise control over distance.)
How did you ensure that the robot pushed the block into the pit without falling in itself? (e.g., We carefully calculated the distance the robot needed to move forward using encoders to ensure it reached the block without falling into the pit. We also adjusted the speed and pause time to control the movement.)
Explain the process of creating and using functions with inputs in your code. How did this help you in the puzzle? (e.g., We created functions with inputs by adding a variable (ticks) to represent the distance the robot needed to move. This allowed us to reuse the same function for different distances, making our code more flexible and adaptable to different situations in the puzzle.)
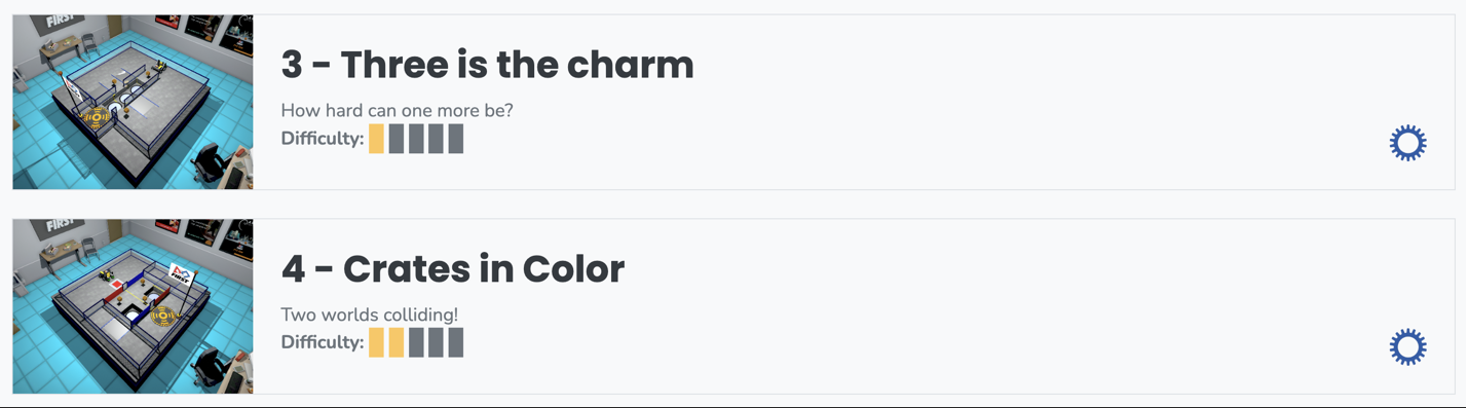
Encourage students to apply their newly acquired skills to tackle FTC Puzzles #3 and #4. In these challenges, they must create functions to come up with a solution to solve each puzzle quickly. Puzzle #3 is very similar to puzzle #2, but there are 3 yellow blocks instead of 2 to move in the pits to reach the final pad and raise the flag. Puzzle #4 combines the skills learned in lesson 2 (Perceiving the Path: Using Sensors to Guide Robot Decisions) with the skills learned in this lesson. Students must use the colour sensor to decide which side to use to access the flag.
Assessment of the lesson should be done through observations and conversations with students while they are coding. Evaluating the lesson’s effectiveness should encompass observing students as they engage in coding and engaging in meaningful dialogues with them about their thought processes, challenges, and strategies. This approach allows for a deeper understanding of their comprehension and application of the concepts taught, including how they troubleshoot problems and refine their code to achieve desired movements and navigation with the virtual robot. Through these interactions, educators can gauge each student’s grasp of the material, provide targeted feedback, and adjust instruction as needed to support learning outcomes.
Here is a list of “look-fors” to guide your observations and your assessment:
Engagement and Participation: Observe whether students are actively engaged with the task, experimenting with the code, and participating in discussions or asking questions.
Problem-Solving Skills: Note students’ ability to identify problems in their code, debug errors, and apply logical reasoning to overcome challenges.
Application of Instructions: Check if students are correctly applying the instructions and guidelines provided for the lesson, such as using the correct blocks or code syntax for movement, navigation, and use of sensors.
Creativity and Innovation: Look for creative approaches or innovative solutions students might be applying in their coding strategies, beyond the basic requirements of the lesson.
Motor Control Understanding: Observe students’ comprehension of how motor controls affect the robot’s movement, including speed, direction, and the execution of turns or specific maneuvers.
Use of Rotary Encoders: Assess students’ proficiency in using rotary encoders to achieve precise movement control, including setting target positions, adjusting speed, and resetting encoders for subsequent movements.
Use of Functions: Evaluate students’ ability to effectively implement functions to segment code, promote code reuse, and enhance code readability, demonstrating an understanding of modular programming principles.
Inputs Handling: Monitor how students handle inputs within their code, ensuring they correctly use variables or parameters to make their code adaptable to different scenarios and configurations.
Reaction to Failure: Pay attention to how students react to failure or unexpected outcomes, looking for resilience, persistence, and a willingness to experiment and learn from mistakes.