
Loading…
Loading…
Explore the world of self-driving robots with hands-on experience using the FTC Simulator in this lesson. Students will engage in practical learning to delve into the fascinating topic of autonomous robotics. Through coding and simulation exercises, they will gain a comprehensive understanding of the algorithms and techniques behind autonomous robots, preparing them to tackle real-world challenges in the field of robotics with confidence and expertise.
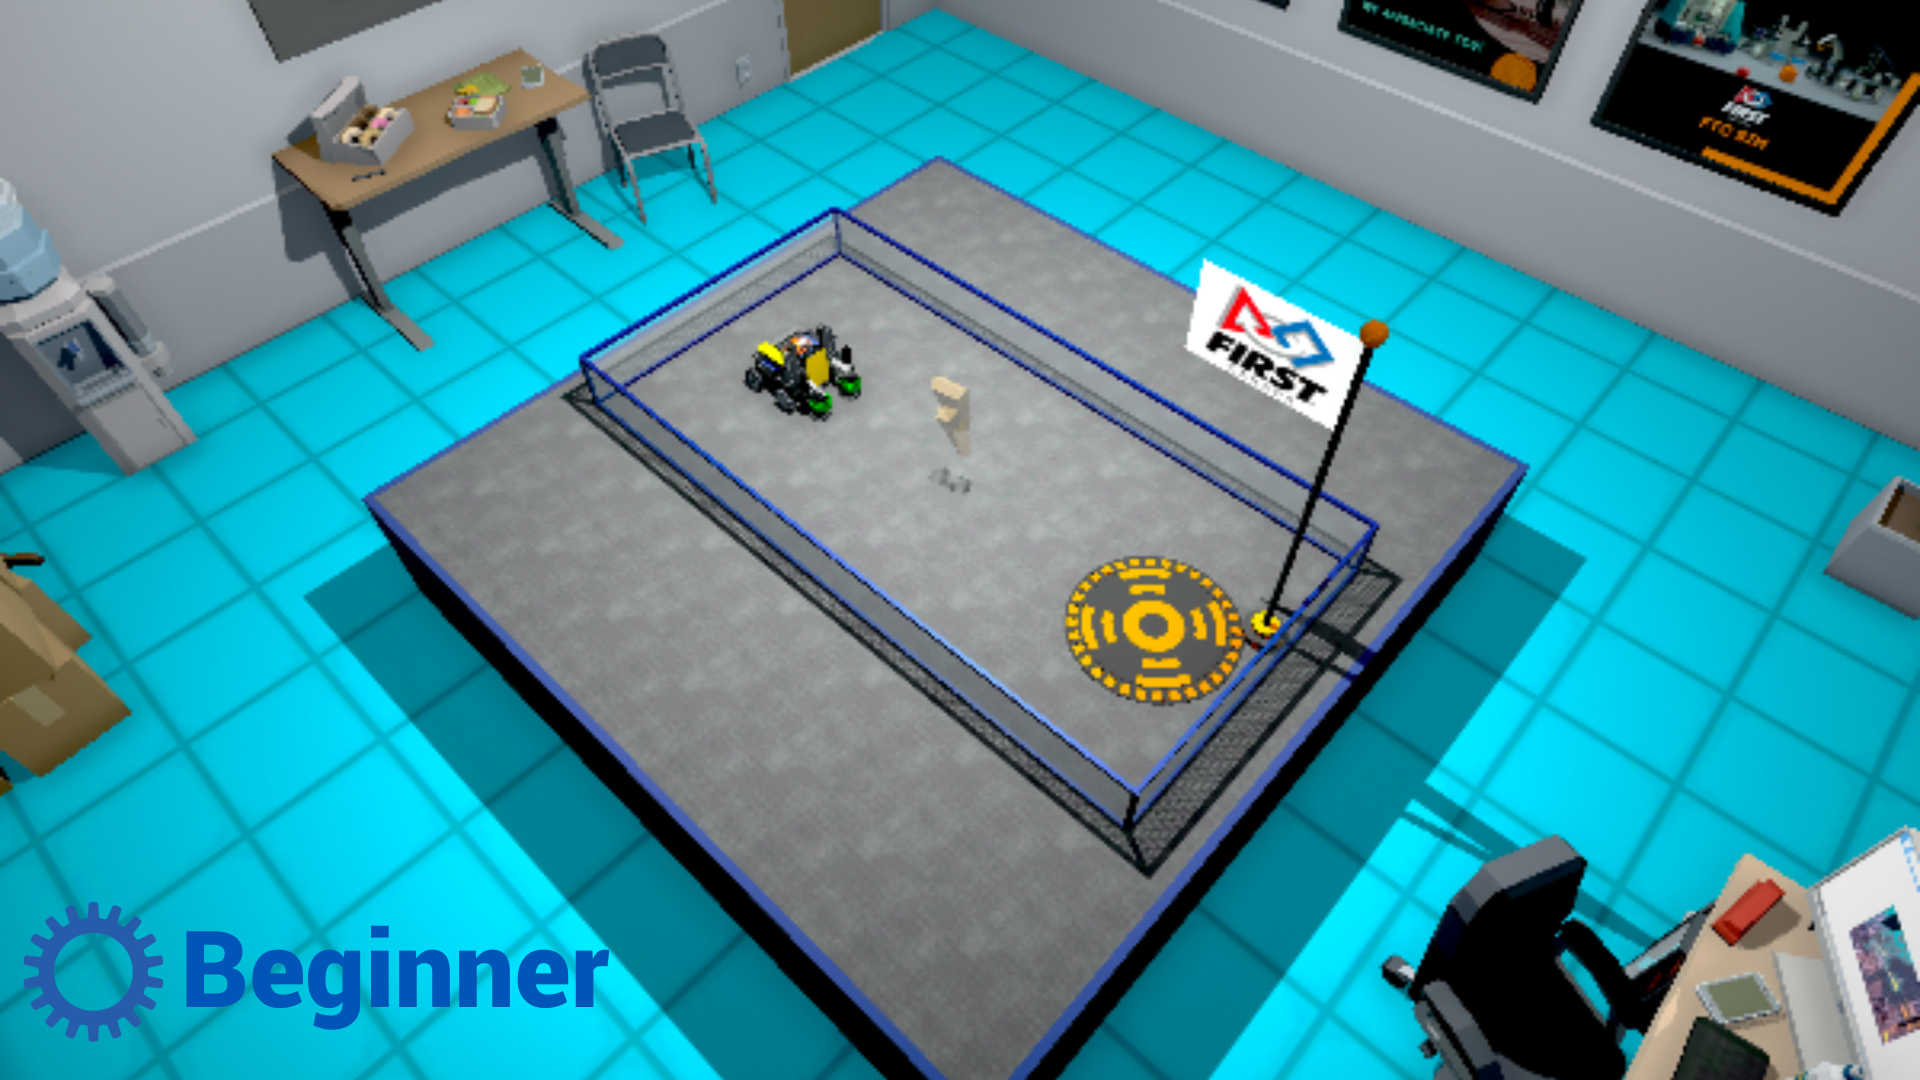
Level: Beginner
Explore the world of self-driving robots with hands-on experience using the FTC Simulator in this lesson. Students will engage in practical learning to delve into the fascinating topic of autonomous robotics. Through coding and simulation exercises, they will gain a comprehensive understanding of the algorithms and techniques behind autonomous robots, preparing them to tackle real-world challenges in the field of robotics with confidence and expertise.
This lesson plan is structured using the 5E framework, a widely recognized instructional model consisting of five phases: Engage, Explore, Explain, Elaborate, and Evaluate. The 5E framework systematically engages students in inquiry-based learning, encouraging active exploration and comprehension of complex topics.
In the lesson, students will:
Gain proficiency in coding and programming self-driving robots within the FTC Simulator, focusing on essential elements like robot movement and navigation.
Explore the principles of autonomous decision-making and algorithm development, allowing them to design efficient and reliable self-driving robot behaviors.
Apply their acquired knowledge and skills to practical scenarios, simulating real-world challenges to test and refine their self-driving robot designs within the virtual environment.
Post-it notes or a brainstorming collaborative app like Microsoft Whiteboard, Google Jamboard or Apple Freeform.
Devices for your students (Windows computers, Mac computers, ChromeBook)
Google Chrome or Microsoft Edge (Chromium version) Web Browser
Access to the FTC Simulator website (https://ftcsim.org)
Students account created for each of your students
Projector or interactive whiteboard
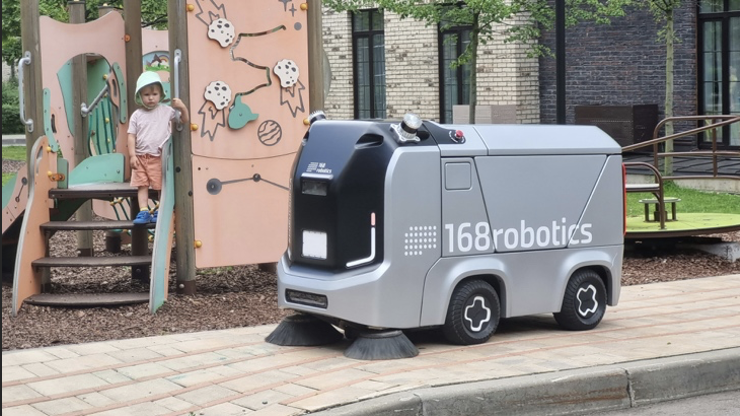
To captivate your students' attention and ignite their curiosity about self-driving robots, use your projector or interactive whiteboard to share an engaging video featuring the Nuro Self-Driving Vehicle, which can be found at this link: https://youtu.be/MzsSO1RVPME?si=OiTKTIvoPNaZ2fV1. Nuro exemplifies cutting-edge advancements in autonomous technology, providing a real-world example that can inspire meaningful discussions and learning experiences in your classroom.
Following the video presentation, provide post-it notes to your students and encourage them to engage in a brainstorming session regarding potential future applications of autonomous self-driving robots. Instruct students to jot down one idea per post-it note. Allocate a designated area on your classroom wall for students to affix their ideas. Once they have generated several ideas, have them gather at the sharing space to attach their post-it notes. If an idea has already been posted on the wall, they can place it atop the existing one, while if the concept still needs to be represented, they should find an available spot to display it.
Here are some of the ideas that they may come up with:
Home delivery of groceries and packages.
Self-driving taxis and rideshare services.
Automated farming and crop management.
Autonomous security patrols in public spaces.
Mobile vending machines for food and beverages.
Robot-assisted disaster relief and search missions.
Autonomous trash collection and recycling.
Self-driving courier services for documents and parcels.
Robot-guided tours in museums and historical sites.
Automated inventory management in warehouses.
Self-driving public transportation systems.
Autonomous street sweeping and maintenance.
Self-driving school buses for safer student transportation.
Delivery of essential supplies in disaster-stricken areas.
Autonomous robots for planetary exploration, such as Mars rovers.
Facilitate a discussion by raising thought-provoking questions, including:
What advantages can you identify in the context of autonomous self-driving robots? (e.g., they can make tasks like deliveries easier and faster and help reduce mistakes, which can save time and money.)
What potential drawbacks do you associate with autonomous self-driving robots? (e.g., they might make some jobs disappear, and sometimes they could make mistakes or invade privacy.)
How might the implementation of autonomous self-driving robots impact various industries and daily life? (e.g., they might make transportation and deliveries more convenient, and we might see more robots helping out in hospitals or even in our homes.)
Can you foresee any ethical or safety concerns related to the use of autonomous self-driving robots? (e.g., sometimes robots might have to make tough decisions, and if they break or get hacked, it could be dangerous.)
In what areas or applications do you believe autonomous self-driving robots could be most beneficial? (e.g., they could be great for jobs that are dangerous for people, like handling dangerous chemicals, exploring space, or assisting people with disabilities.)
What potential societal and economic implications could arise from the integration of autonomous self-driving robots into our communities? (e.g., some jobs might disappear, but new jobs might appear in fields like robotics and computer programming.)
Can you envision any innovative or unexpected uses for autonomous self-driving robots beyond the ones we discussed? (e.g., maybe they could help protect the environment by monitoring wildlife or cleaning up trash in oceans.)
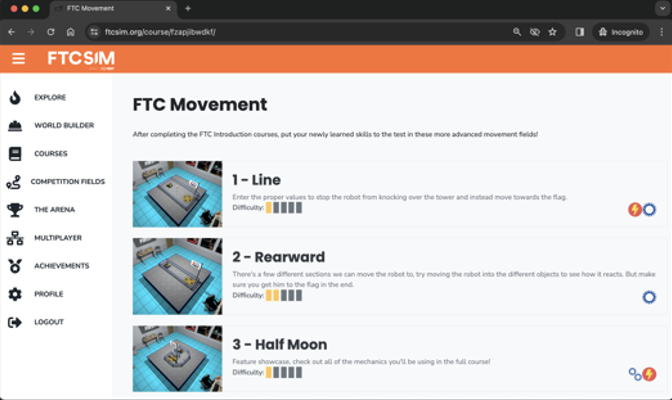
Please encourage students to start their hands-on learning experience with the FTC Simulator platform by navigating to the provided link, https://ftcsim.org/. Have them log in using their unique username and password. Once logged in, direct them to the "Courses" section and guide them to choose the course titled "FTC Movement." Let students know that in this course, they will gain the skills to control their robot's movement on a flat surface, using the two motors or wheels installed on the robot's left and right sides
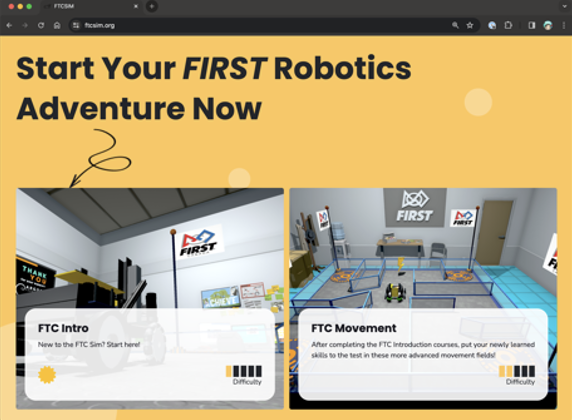
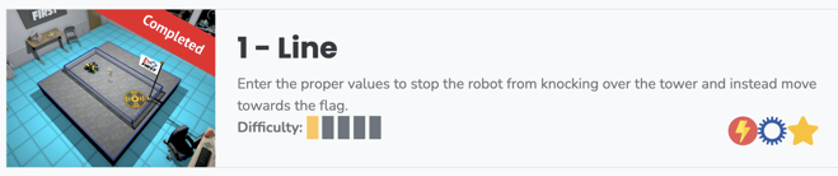
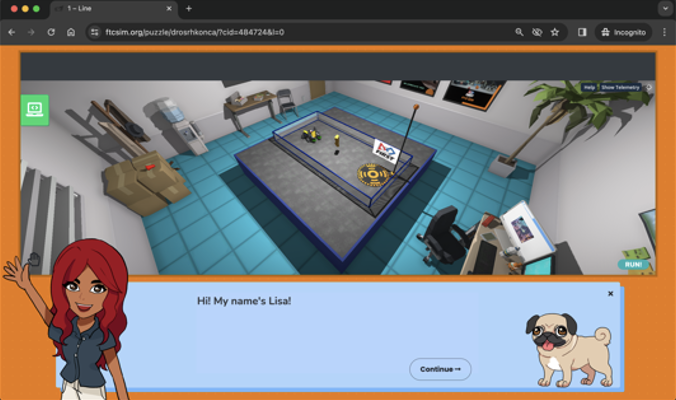
Within the FTC Movement section, guide students to access the initial puzzle titled "1-Line." After they open this puzzle, motivate them to engage with the narrative involving Lisa and her dog, Dozer. Please encourage students to explore the interface and complete the orientation, which familiarizes them with the platform's layout and features.
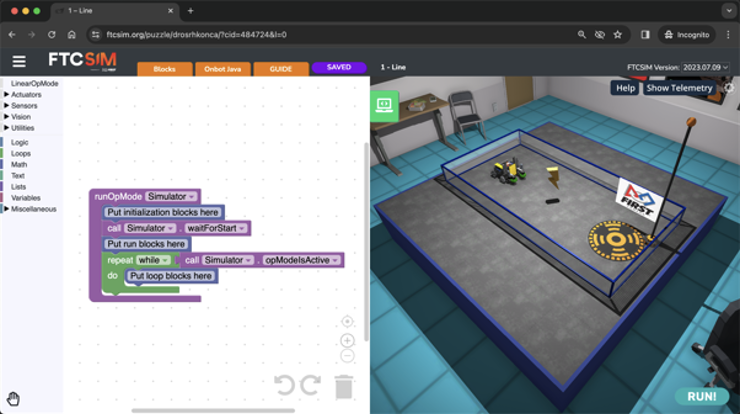
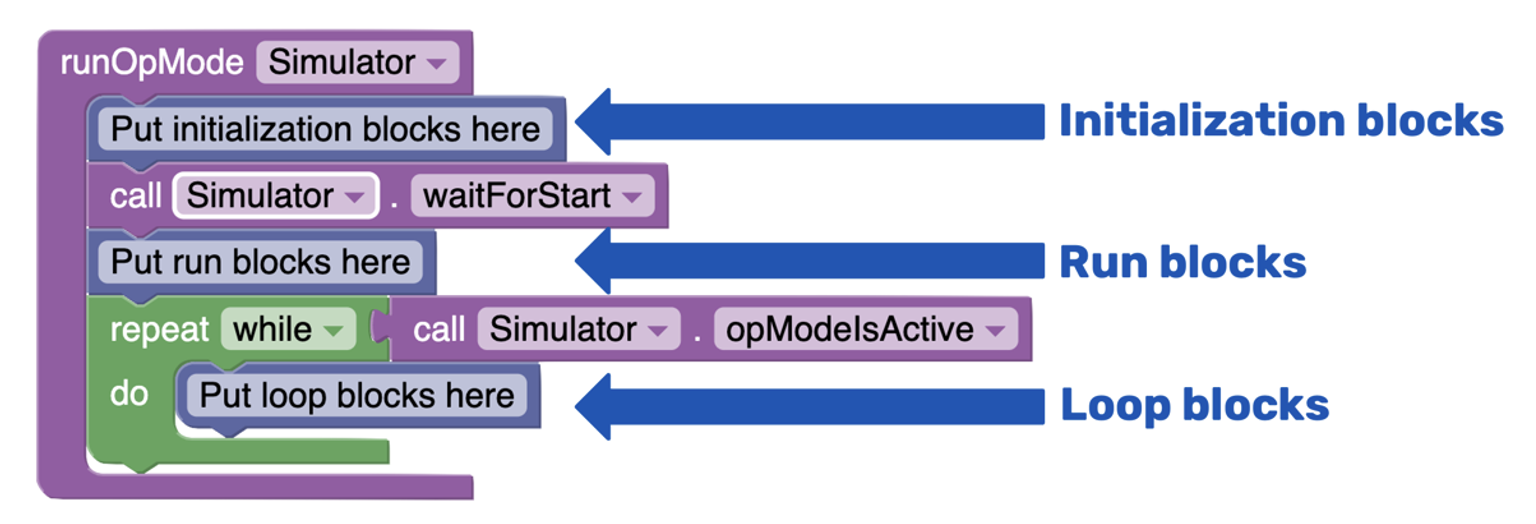
To access the coding panel, click on the green computer icon on the screen's left side. You'll notice that there's already a sample code present. It's essential to inform your students that this code is divided into three primary sections, each marked by blue comment blocks:
· Initialization Blocks: This section contains information the robot needs before starting its tasks.
· Run Blocks: Most of the code you write will be placed in this section, where the robot's main actions are defined.
· Loop Blocks: These blocks are used for tasks that must be repeated multiple times. However, for this lesson, we'll only work with initialization and run blocks. The loop section can be discarded to maintain a cleaner code structure.
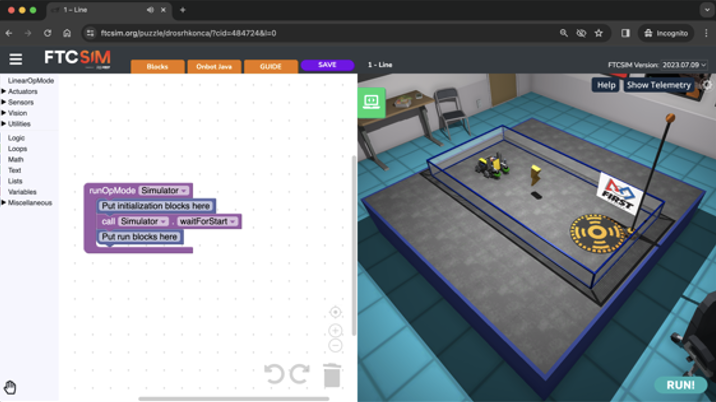
Zoom in on the robot to highlight the two wheels responsible for controlling its motion. Initiate a discussion with the students by asking, "How can we ensure the robot moves in a straight line?" Prompt the students to share their insights, with the expected response being that the robot will travel in a straight line when both wheels move at the same speed.
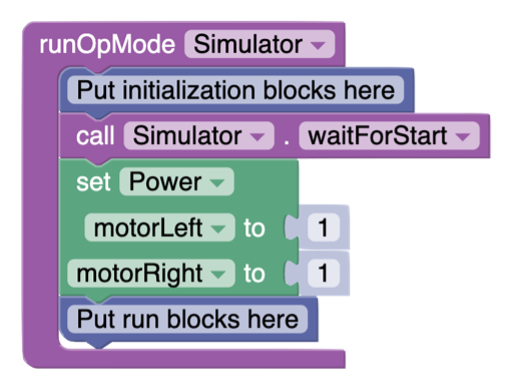
In the context of robotics, explain the term actuator: an actuator is a component or device that converts electrical or other types of energy into physical motion. Actuators play a pivotal role in enabling robots to perform various tasks by facilitating controlled movements, such as the rotation of robot joints, the manipulation of robotic arms, or the propulsion of wheels or legs based on the given commands or inputs.
Demonstrate how to place a block in the code to control the left and the right motor by going on Actuators --> DC Motor --> Dual and taking the first block. It should be dragged in the run blocks section.
When the student clicks on "run," they may be surprised by the result. Despite both wheels spinning at the same speed (with 1 representing full speed), the robot doesn't move in a straight line but rotates in place. To comprehend this phenomenon, students should visualize the motor placement on the robot. Observing a real robot or referring to the image below, they'll notice that the motors are actually oriented in opposite directions. This implies that even though we set both motors to the same speed, one motor will move forward while the other moves backward.
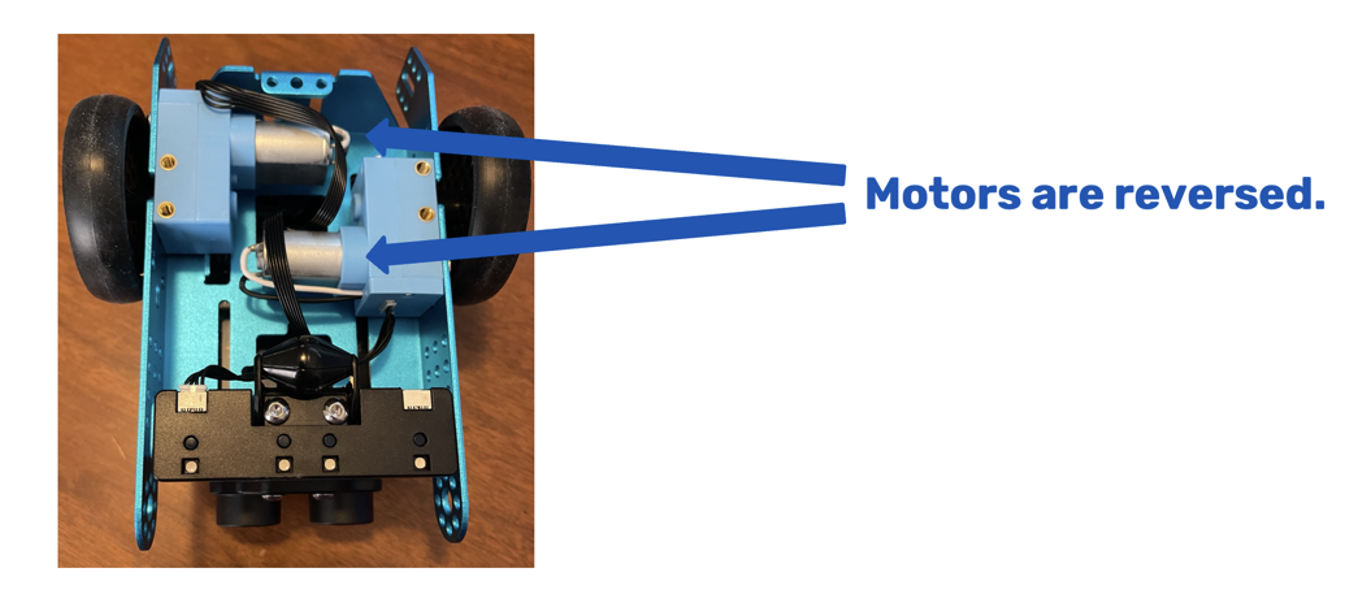
Explain that one way to solve the problem would be to remember to always put the first motor in reverse with a negative number.
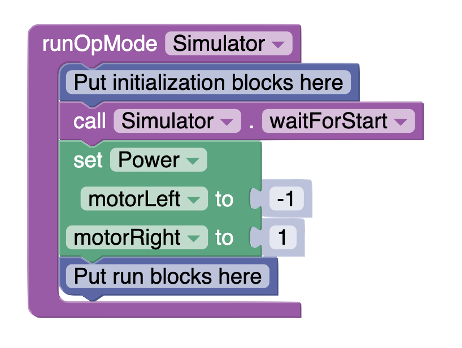
Add that this could be more efficient because students would always have to remember to do that. it’s more efficient to declare that the left motor is reversed in the initialization section.
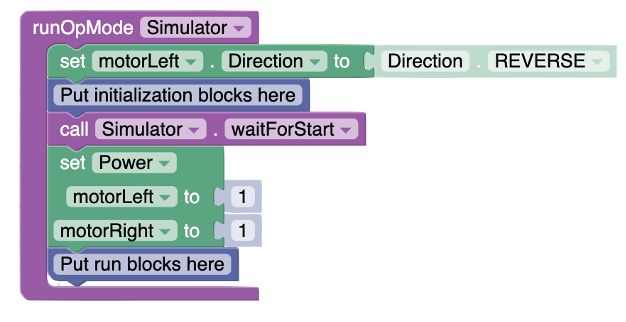
Add this point, students should know where the initialization section and the run blocks are so that they can remove the two blank comment blocks.
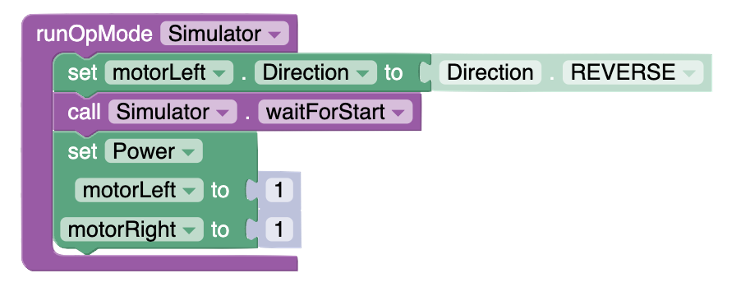
This command should guide the robot onto the pad and signal to the students that the puzzle is now complete. Nevertheless, it's essential to clarify that a truly autonomous robot would not persist in pushing against the wall once it reaches its target; instead, it would halt before making contact with the wall. To achieve this behaviour, the robot will need to move for a predetermined duration and then come to a stop. Ask students to click “Keep working” to improve their solution.
Demonstrate how to add a pause in the instruction with the sleep block available from the LinearOpMode and how to stop with a dual motor block set at a speed of 0 on both wheels. The following code should provide a very clean solution for the first puzzle, with the robot finishing right in the middle of the target pad.
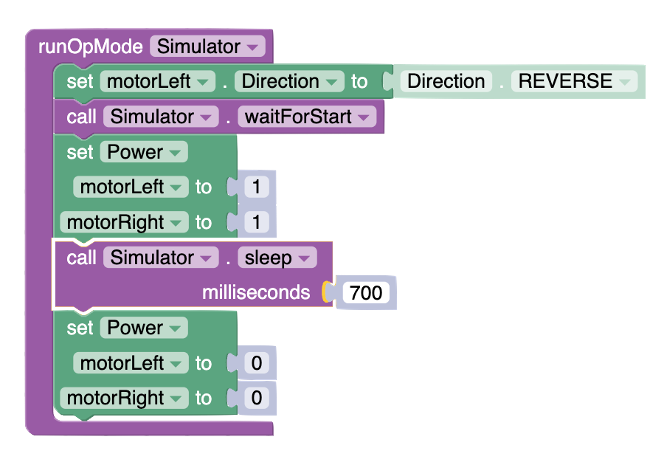
Motivate students to determine their preferred duration for the sleep block. As demonstrated in the example provided earlier, a time of 700 milliseconds is required to achieve precise positioning. However, it is recommended that they discover the optimal value through experimentation and trial and error. Explain that the time is expressed in milliseconds, which means 500 is the equivalent of half a second.
Once students get perfect positioning, please encourage them to re-attempt the first puzzle at different speeds. Explain that the number was either 1 (full speed) or 0 (stopped), but they can choose any number between zero and 1. As an example, 0.5 corresponds to 50% of the speed.

Here is an example of a code working at half the speed (0.5) with a wait time of 1.5 seconds or 1500 milliseconds:
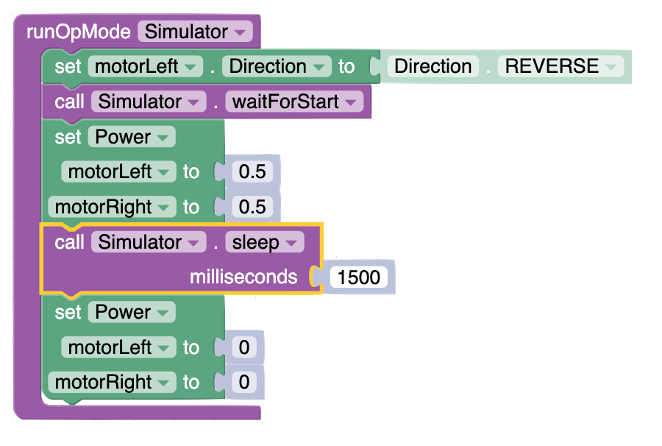
Once they’ve succeeded in reaching the middle of the target at various speeds by adjusting the time, they are ready to move to the second puzzle.
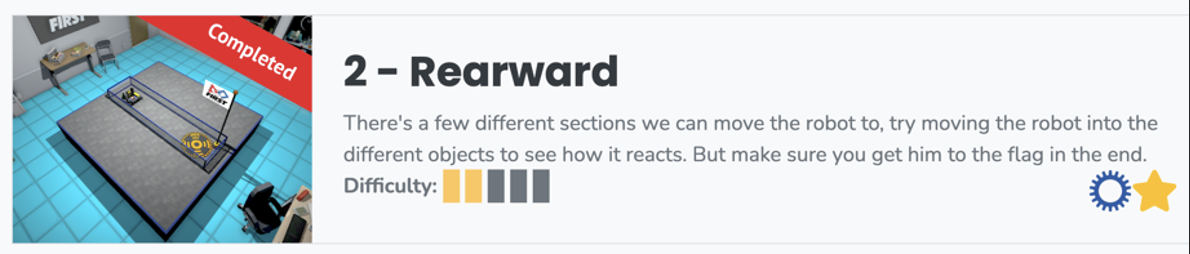
Ask students what the differences and similarities are between the first and the second puzzle. Students should realize that the robot will move in a straight line in both cases. However, the path is much narrower in the second puzzle, and the robot faces the wrong way.
Ask students to brainstorm some ideas on how this puzzle could be solved. Students will generally have two main ideas:
The first is to make the robot go backward by using negative values on the two motors. The following solution should work for the second puzzle:
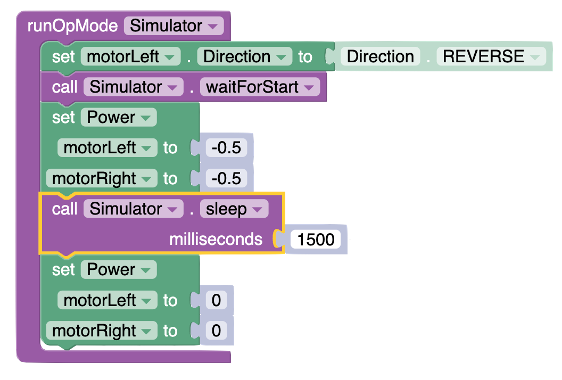
In this code, the robot moves backward at a speed of 50% for 1.5 seconds.
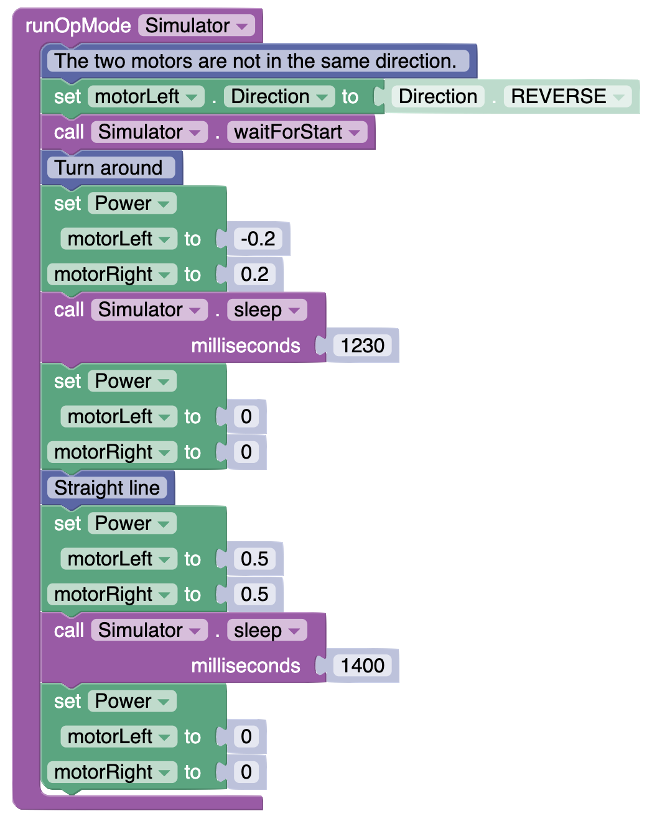
The other solution that may be suggested by students is to turn around and then move in a straight line. In this case, the robot will need to have its wheels go in the opposite direction for a specific time, and then the wheels go in the same direction at the same speed to go in a straight line. Here is a sample solution that works:
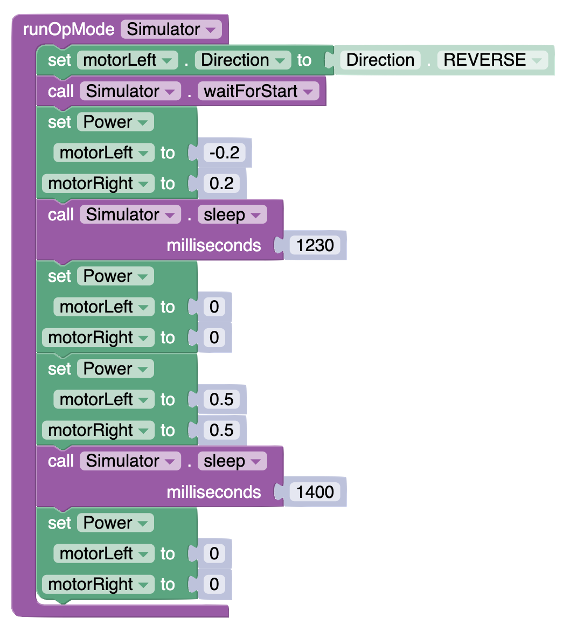
Invite students to add comments to their code to explain the various coding blocks they have used. The comment blocks are blue and available in the “Miscellaneous” section. Explain that software engineers work as teams and need to document their code with comments to ensure their colleagues can follow what their code means. Here is an example of the second version of the code for the second puzzle with comments added to it.
Get students to communicate their solutions to the first two puzzles by asking probing questions such as:
Can you explain the problem you were trying to solve in these puzzles?
What were the key challenges or obstacles you encountered in each puzzle?
How did you begin to approach solving the first puzzle? And the second?
Did you use any specific strategies or steps to guide you through the solution?
Were there any differences in how you approached each puzzle?
Can you walk me through your code? How does each part of your code contribute to solving the puzzle?
How did you decide on the values or commands you used in your code?
Did you make any changes to your initial plan as you were coding? If so, what prompted those changes?
How many attempts did it take before you solved the puzzles? What did you learn from the attempts that didn’t work?
What was one mistake you made, and how did you fix it?
How did solving the first puzzle help you with the second one?
How would you apply what you learned from these puzzles to a real-world problem?
How did understanding motor control and speed influence your approach to the puzzles?
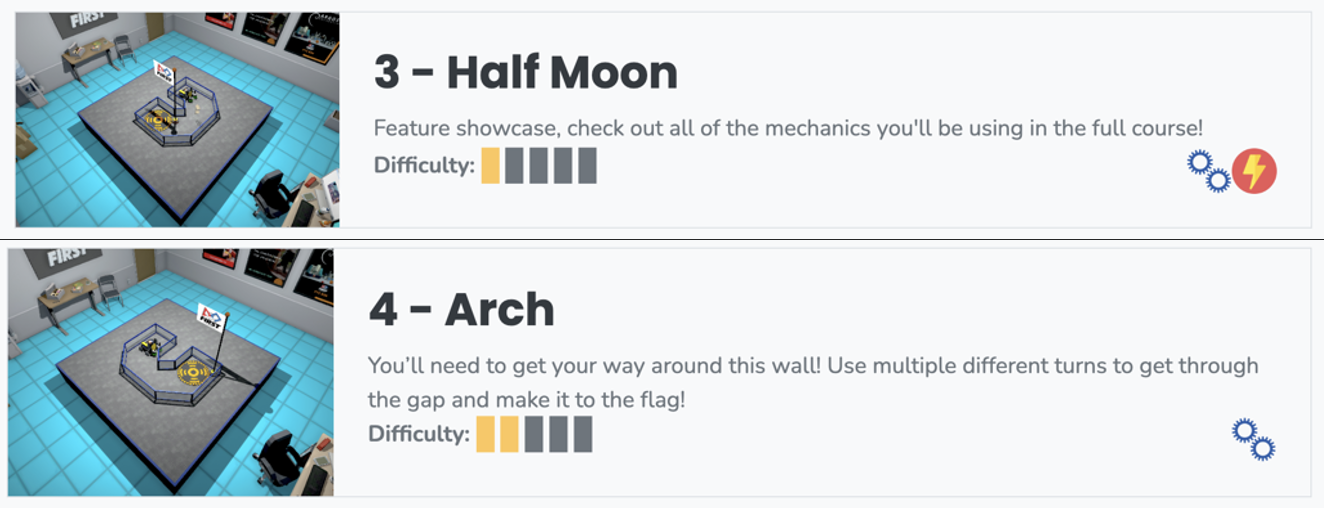
Encourage students to apply their newly acquired skills to tackle puzzles #3 and #4. In these challenges, they'll need to deepen their understanding of motor operation, transitioning from straight motion to mastering turns. While puzzle #2 introduced the concept of pivoting before moving forward, puzzles #3 and #4 require the robot to execute a curving movement without pivoting on itself. This curving motion demands differential speed control, with one wheel moving slower and the other faster. Encourage students to explain their strategy for adjusting the two motors to achieve a left or right curve. Highlight the real-world analogy that cars don't pivot on the spot; they curve, emphasizing that pivoting is typically achieved with a two-wheel design and a caster wheel for support or through the use of omnidirectional wheels.
Assessment of the lesson should be done through observations and conversations with students while they are coding. Evaluating the lesson's effectiveness should encompass observing students as they engage in coding and engaging in meaningful dialogues with them about their thought processes, challenges, and strategies. This approach allows for a deeper understanding of their comprehension and application of the concepts taught, including how they troubleshoot problems and refine their code to achieve desired movements and navigation with the virtual robot. Through these interactions, educators can gauge each student's grasp of the material, provide targeted feedback, and adjust instruction as needed to support learning outcomes.
Here is a list of "look-fors" to guide your observations and your assessment:
Engagement and Participation: Observe whether students are actively engaged with the task, experimenting with the code, and participating in discussions or asking questions.
Problem-Solving Skills: Note students' ability to identify problems in their code, debug errors, and apply logical reasoning to overcome challenges.
Application of Instructions: Check if students are correctly applying the instructions and guidelines provided for the lesson, such as using the correct blocks or code syntax for movement and navigation.
Creativity and Innovation: Look for creative approaches or innovative solutions students might be applying in their coding strategies, beyond the basic requirements of the lesson.
Motor Control Understanding: Observe students' comprehension of how motor controls affect the robot's movement, including speed, direction, and the execution of turns or specific maneuvers.
Reaction to Failure: Pay attention to how students react to failure or unexpected outcomes, looking for resilience, persistence, and a willingness to experiment and learn from mistakes.