
Loading…
Loading…
Explore the world of self-driving robots with hands-on experience using the FTC Simulator in this lesson.
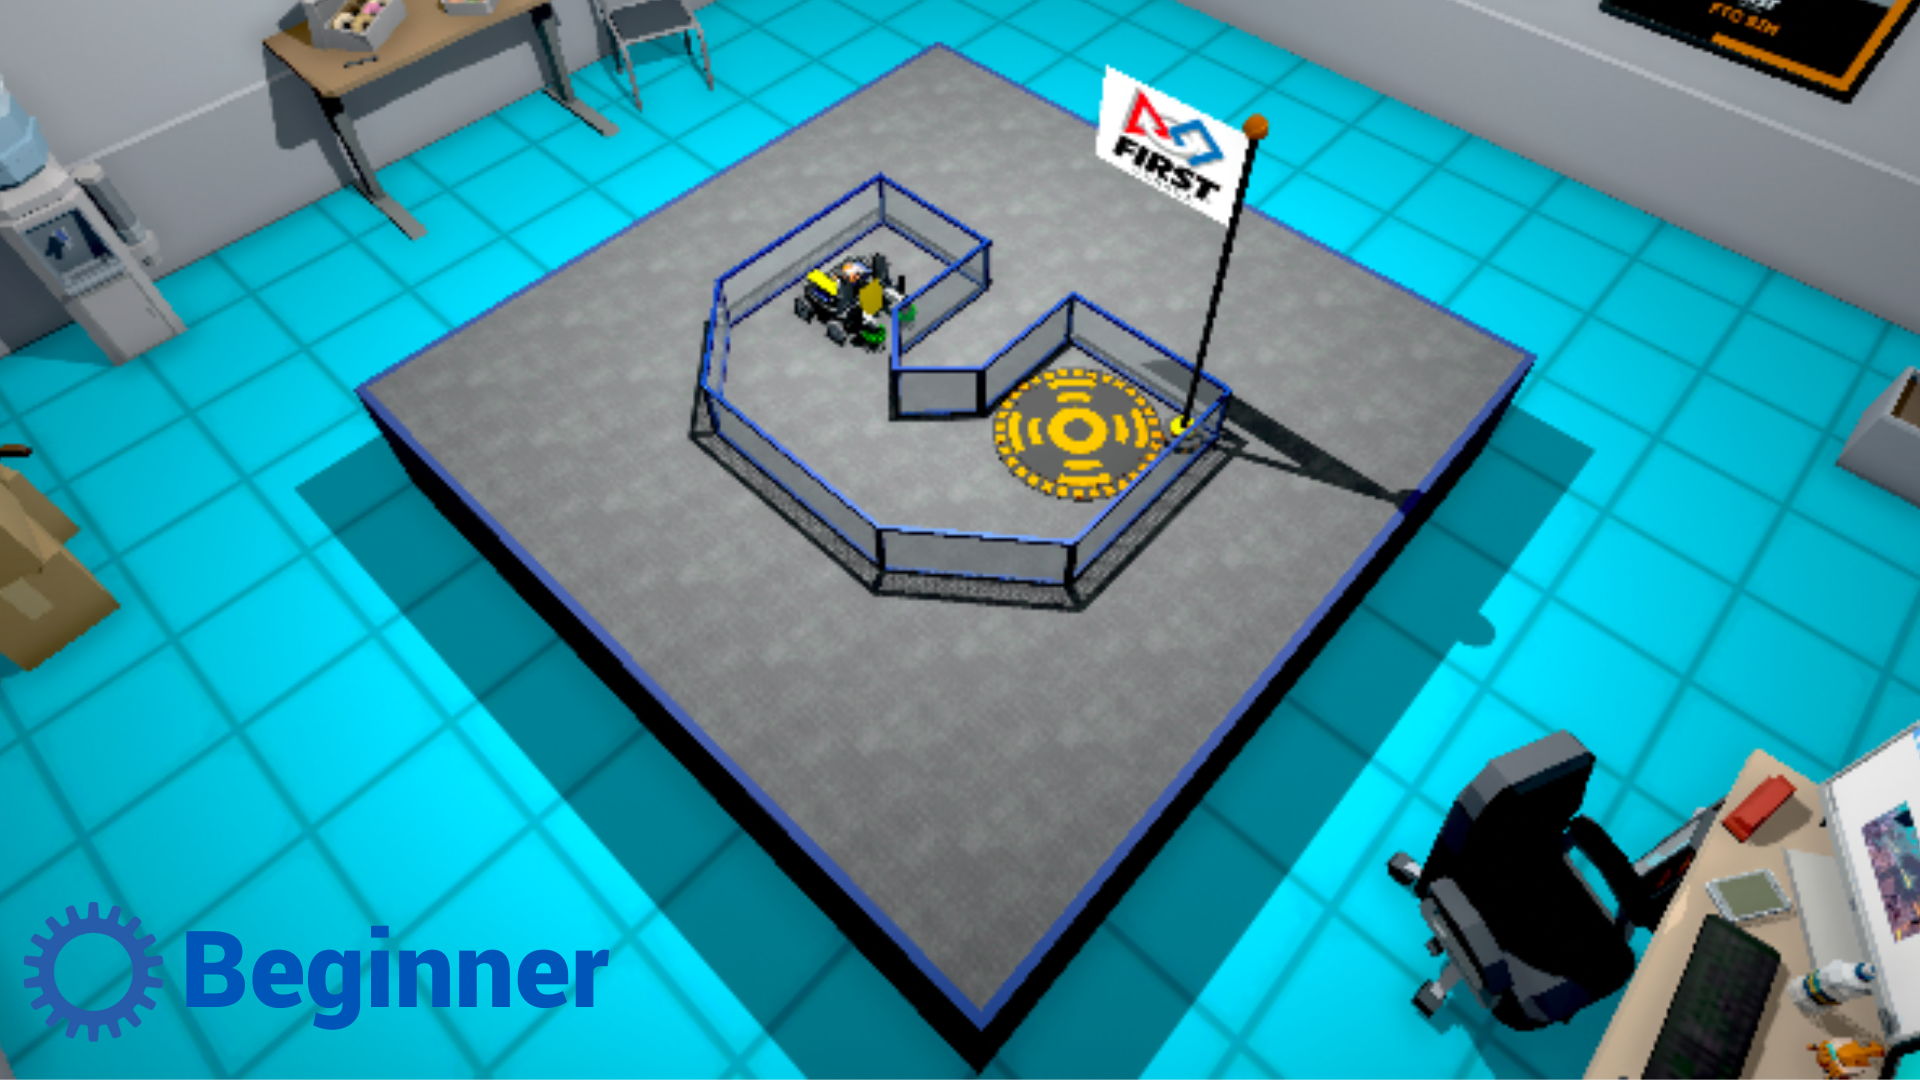
Level: Beginner
Explore the world of self-driving robots with hands-on experience using the FTC Simulator in this lesson. This session shifts focus on the critical role of sensors in autonomous navigation, highlighting how robots use these tools to perceive their surroundings and make informed decisions. Students will be introduced to two key types of sensors: a colour sensor and an ultrasonic (distance) sensor. Through engaging activities, they will learn how to program a colour sensor to recognize and react to different coloured surfaces, an essential skill for path following and decision-making based on visual cues. Additionally, the lesson will cover applying an ultrasonic sensor to detect obstacles and measure distances, enabling robots to avoid collisions and navigate complex environments effectively. By integrating these sensors, students will enhance their robots’ ability to maneuver autonomously with precision, showcasing the intersection of coding, robotics, and sensor technology.
This lesson plan is structured using the 5E framework, a widely recognized instructional model consisting of five phases: Engage, Explore, Explain, Elaborate, and Evaluate. The 5E framework systematically engages students in inquiry-based learning, encouraging active exploration and comprehension of complex topics.
In the lesson, students will:
learn how to integrate and program a colour sensor into their robot’s design using the FTC Simulator, enabling the robot to detect and differentiate between colours for path navigation and decision-making;
understand the functionality and application of an ultrasonic sensor for distance measurement, allowing their robots to avoid obstacles and navigate through predetermined paths with precision autonomously;
develop skills in synthesizing sensor inputs to make informed decisions in real-time, enhancing their robot’s ability to perform complex tasks autonomously and react to dynamic environments.
Post-it notes or a brainstorming collaborative app like Microsoft Whiteboard, Google Jamboard or Apple Freeform.
Devices for your students (Windows computers, Mac computers, ChromeBook)
Google Chrome or Microsoft Edge (Chromium version) Web Browser
Access to the FTC Simulator website (https://ftcsim.org)
Students account created for each of your students
Projector or interactive whiteboard
To captivate your students’ attention and ignite their curiosity about self-driving robots, use your projector or interactive whiteboard to share an engaging video featuring how LIDAR remote sensing is used in self-driving cars, which can be found at this link: https://youtu.be/JC94Y063x58?si=zIidADfpTlrc64LP. LIDAR is like an advanced radar for robots and vehicles, using laser beams to measure distances between objects. This technology creates a 3D map of the surroundings, allowing them to navigate safely without collisions.
Following the video presentation, provide post-it notes to your students and encourage them to engage in a brainstorming session on all the things that a self-driving vehicle needs to recognize when driving on the road. Instruct students to jot down one idea per post-it note. Allocate a designated area on your classroom wall for students to affix their ideas. Once they have generated several ideas, have them gather at the sharing space to attach their post-it notes. If an idea has already been posted on the wall, they can place it atop the existing one, while if the concept still needs to be represented, they should find an available spot to display it.
Here are some of the ideas that they may come up with:
Traffic signals (red, yellow, green lights)
Road signs (stop, yield, speed limit, construction ahead)
Lane markings (including lane changes and merges)
Pedestrians crossing the road
Other vehicles (in front, behind, and on the sides)
Bicyclists and motorcyclists
Animals crossing the road
Traffic cones and temporary roadblocks
Potholes and road quality (to adjust speed accordingly)
Emergency vehicles and their warning lights
Railroad crossings
Bridges and tunnels
Weather conditions (rain, fog, snow, and ice on the road)
Traffic flow and congestion
Roadside obstacles (like fallen trees or debris)
Parking spaces and the ability to park
Speed bumps and speed limits
Roundabouts and intersections
School zones and crosswalks
Changes in elevation or steep grades
Facilitate a discussion by raising thought-provoking questions, including:
Why must a self-driving vehicle recognize and respond to traffic signals and road signs? (e.g., recognizing traffic signals and road signs helps the vehicle follow traffic rules, make safe decisions, and communicate with other drivers on the road.)
How might a self-driving car detect and differentiate between pedestrians and other objects near the road? (e.g., a self-driving car could use cameras and sensors to identify people and recognize their unique movement patterns and shapes.)
Why is it crucial for self-driving vehicles to be aware of other vehicles around them? (e.g., being aware of other vehicles helps avoid collisions and maintain safe distances, promoting smoother traffic flow.)
How can self-driving cars adapt to various weather conditions and still operate safely? (e.g., they can use special sensors and algorithms to detect rain, snow, or fog and adjust their speed and behaviour accordingly.)
What challenges might self-driving cars face when navigating through construction zones or roadblocks? (e.g., construction zones can change road layouts, so self-driving cars must identify cones, signs, and temporary barriers to find the right path.)
How do self-driving cars detect and respond to emergency vehicles like ambulances and police cars? (e.g., they can use sound and light sensors to recognize sirens and flashing lights and yield the right of way to these vehicles.)
What role does the recognition of lane markings play in self-driving vehicle safety? (e.g., lane markings help the car stay within its lane and make safe lane changes, reducing the risk of accidents.)
Why is it crucial for self-driving vehicles to recognize and respond to road hazards like potholes? (e.g., detecting hazards like potholes allows the car to adjust its speed or even steer around them, preventing damage and ensuring a smoother ride.)
How might self-driving cars adapt their behaviour when driving through school zones or near crosswalks? (e.g., they can slow down and be extra cautious to ensure the safety of children and pedestrians in these areas.)
Inform the students that LIDAR and camera recognition rely on complex algorithms and advanced coding expertise. Explain that self-driving robots and vehicles also incorporate sensors that are easier to program, such as colour sensors and ultrasonic (distance) sensors. Clarify that while ultrasonic sensors operate similarly to LIDAR by measuring distances to obstacles, they use ultrasound rather than laser beams. Mention that the upcoming lesson will focus on coding robots in FTC Sim using colour and ultrasonic sensors.
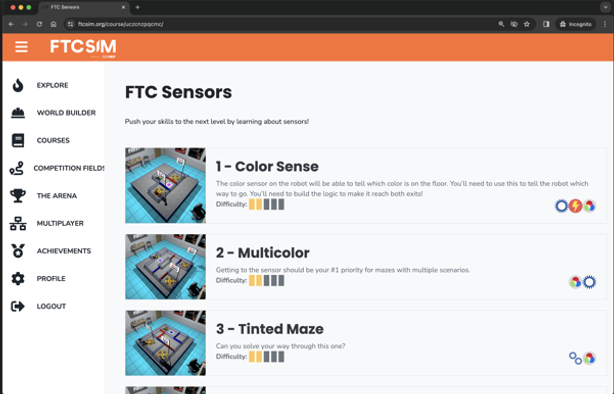
Please encourage students to start their hands-on learning experience with the FTC Simulator platform by navigating to the provided link, https://ftcsim.org/. Have them log in using their unique username and password. Once logged in, direct them to the “Courses” section and guide them to choose the course titled “FTC Sensors.” Let students know that in this course, they will gain the skills to code and control self-driving robots effectively, focusing on using colour and ultrasonic sensors for navigation and decision-making.
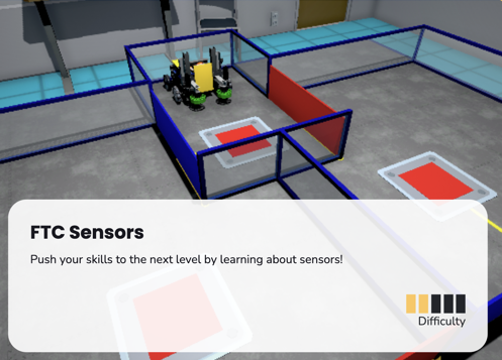
Within the FTC Sensors section, guide students to access the initial puzzle titled, “1-Color Sense.” After they open this puzzle, motivate them to engage with the narrative involving Lisa and her dog, Dozer. They will be introduced to the concept of telemetry. Explain to the students that telemetry in robotics is like a robot’s way of sharing information about itself, such as its location, speed, and condition, with its operator or a computer, just like how a smartwatch tells you about your heart rate or steps.
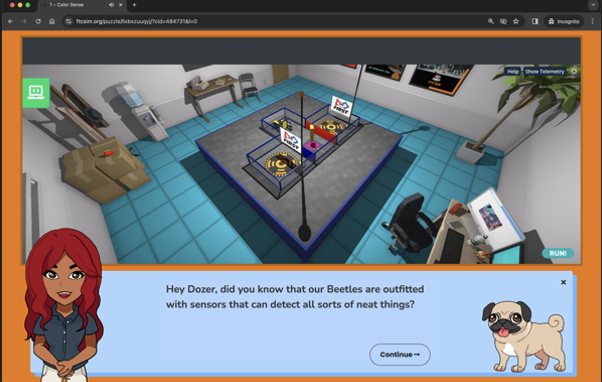

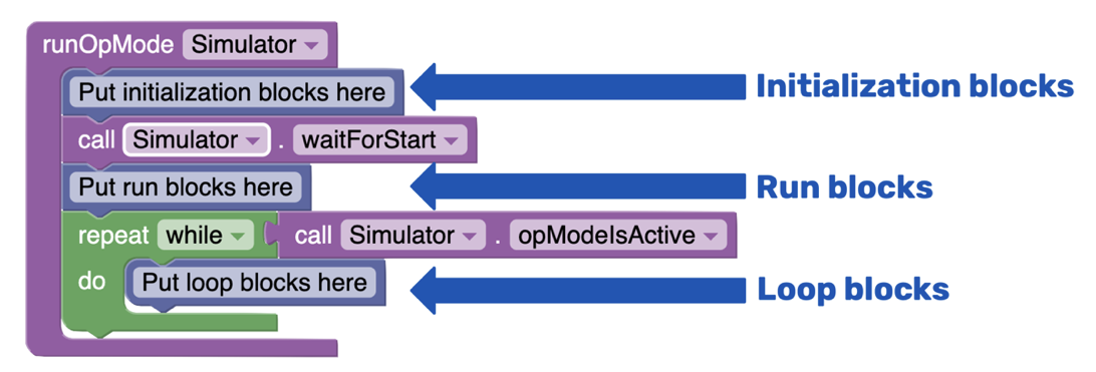
To access the coding panel, click on the green computer icon on the screen’s left side. You’ll notice that there’s already a sample code present. Remind your students of the basic structure of the code, as seen in the first lesson:
Initialization Blocks: This section contains information the robot needs before starting its tasks.
Run Blocks: Most of the code you write will be placed in this section, where the robot’s main actions are defined.
Loop Blocks: These blocks are used for tasks that must be repeated multiple times. The code will be placed in a loop because the robot must constantly check for colour here.
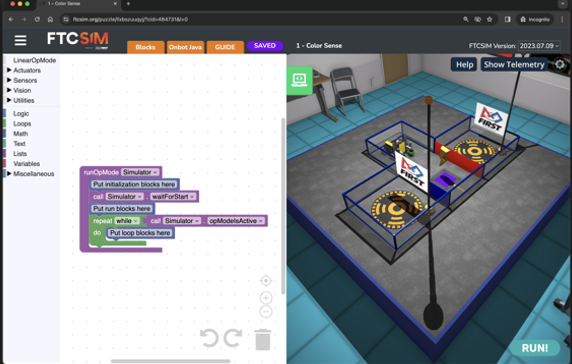
Explain that in this puzzle, the robot’s objective is to travel until it reaches a colour code, where it must interpret the code’s colour to determine its subsequent turn direction. If the code is red, the robot will make a left turn, and if it’s blue, it will execute a right turn. Encourage the students to run the code multiple times initially, even without incorporating any additional instructions, to observe how the simulator randomly selects a colour and activates the corresponding gate.
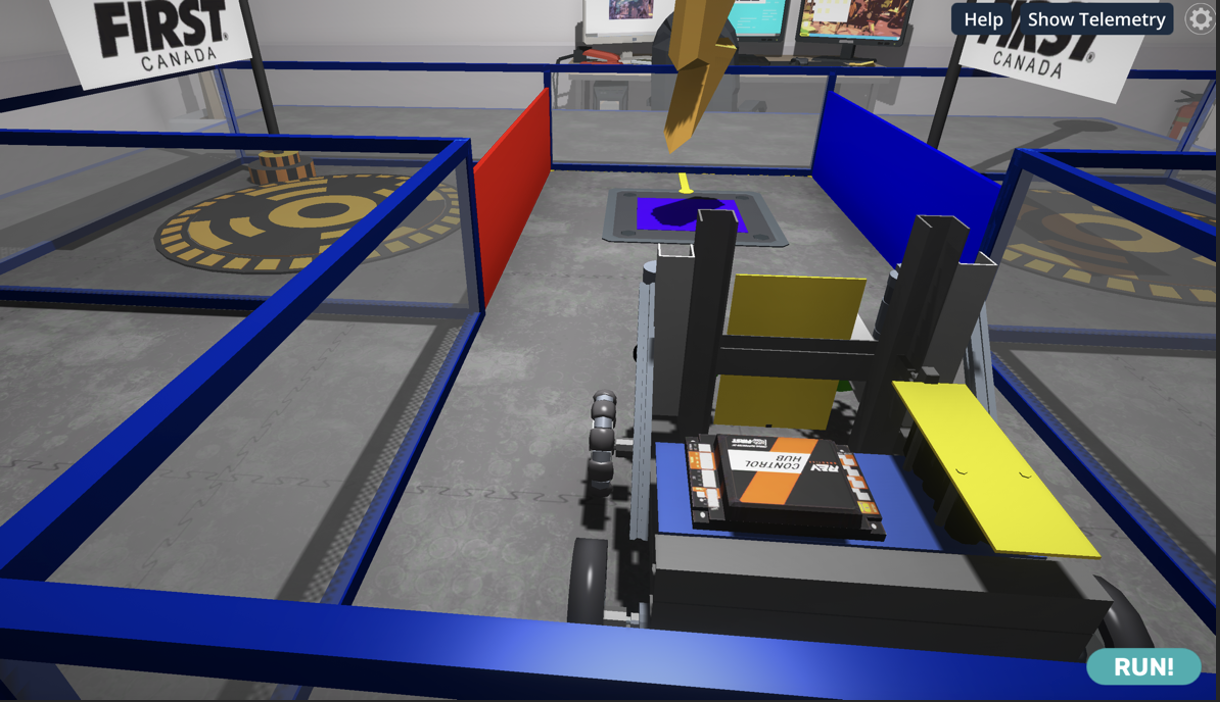
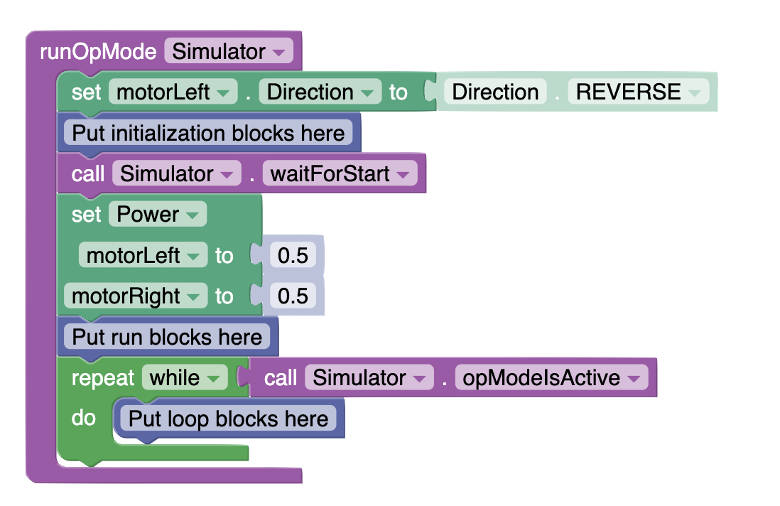
Ask the student to start the code to make the robot move forward, as they’ve learned in the first lesson. Remind them to keep the loop block here.
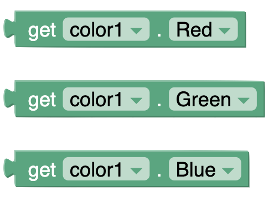
Explain to the students that they will now add telemetry to measure colours as the robot moves using the colour sensor. Explain that the colour sensor can detect the three primary colours of light: red, green, and blue. Add that these may differ from what they learned in the art class when they learned the primary colours of paint or ink are cyan, magenta and yellow. They should see the three primary colours of light when they open the Colour Sensor menu:
Explain that for this puzzle, they need to detect the value for red and blue. Because the robot needs to be constantly looking for the colour code and start turning when it reaches one of the two colours, the reading of the colour from the sensor needs to be put in the loop. Add that they should go to the “utilities” section to grab two “telemetry-addData” blocks. For the key, they can write a label such as “Red Value” or just “Red” that will be displayed in the telemetry panel. Students should then add the red value of the colour sensor as the first number and the blue value of the colour sensor as the second number. Finally, they need to update “telemetry” with each loop. Ask students to run the code a few times and check the colour values in the telemetry panel. They may need to click “Show Telemetry” to display the values.
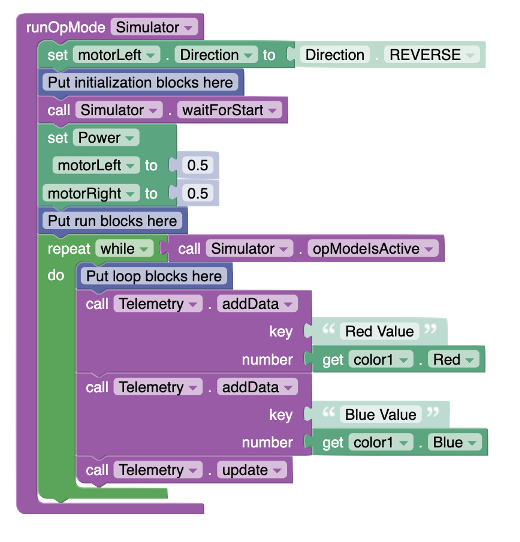
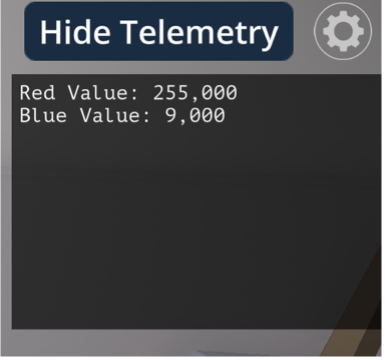
They should realize that when the code is red, they should get a value of 255 for red and around 10 for the blue value. When the code is blue, they should get a value of around 10 for the red and 255 for the blue values.
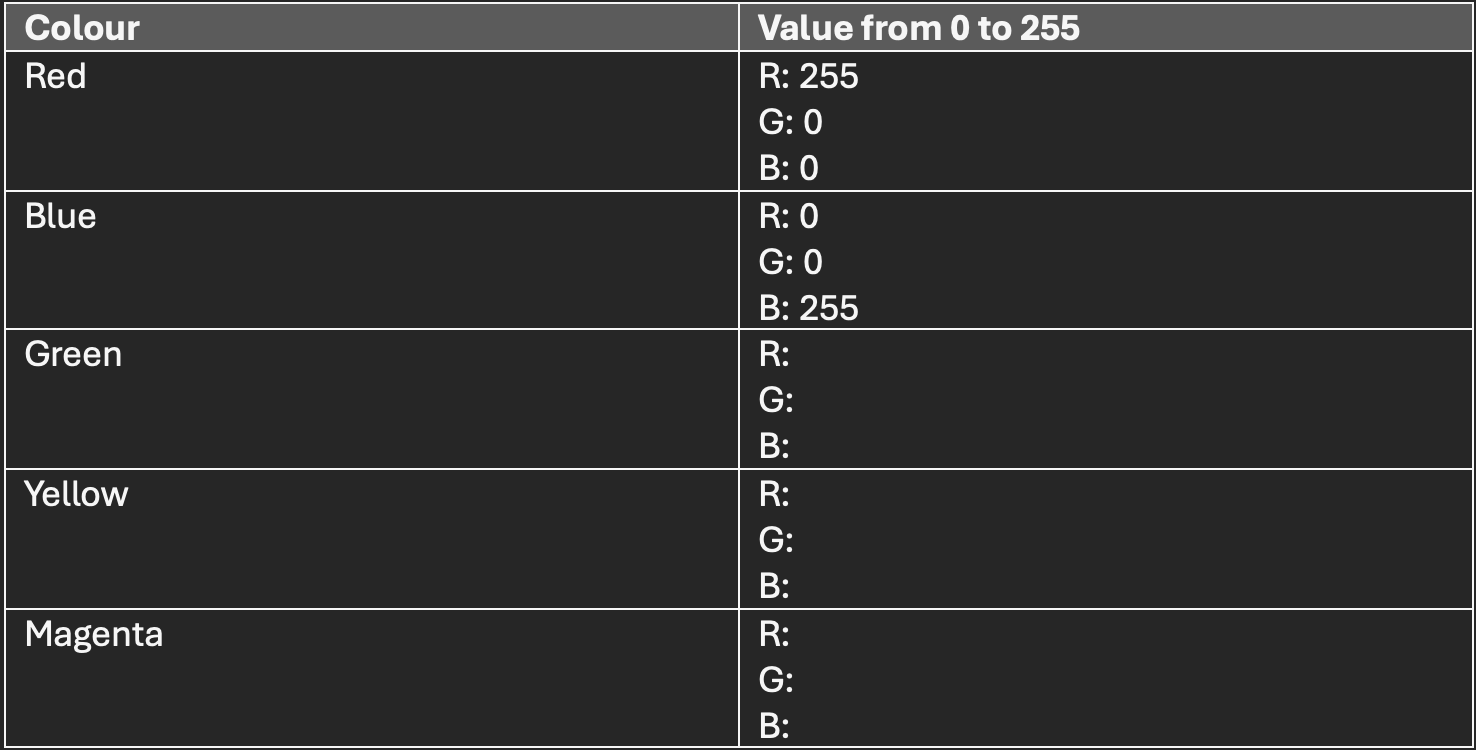
To better understand colour sensors and theory, encourage students to visit the website: https://colordesigner.io/color-mixer. By pressing the (+), students can create their own colour mix by changing the values for Red, Green, Blue (RGB). They can ignore the HSL (Hue, Saturation, Lightness) and focus only on RGB values. Invite students to fill out a table like this one where they find a combination of colours that give each of these colours. They can also create their own colours. They may be surprised by the fact that red and green light together will give yellow light. Indicate that the minimum value is 0 and the maximum value for each colour is 255. If students want to know why it’s 255, explain that 0 to 255 is a total of 256 values, which is 28. Add that values in computer science are often binary (base 2)
Explain that for the next part of the code, there needs to be a conditional statement. Add that a conditional is a statement that executes a block of code only if a specified condition is true. It typically uses “if” (and sometimes “else” and “else if”) statements to control the flow of a program based on Boolean expressions (true or false conditions).
Demonstrate how the conditional statements are used here. The robot must turn left IF the colour sensor detects a maximum red value (255). The robot must turn right IF the colour sensor detects a maximum blue value (255). To code these conditional statements, students will need to get an “if” block and a “comparison” block from the “conditional” section. In the first part of the comparison, they should bring the value from the colour sensor and in the second part, they should bring a value (from the “math” section) and type it in. In this case, they will use the maximum value of 255.
Inside each conditional, they should make the robot turn left (counterclockwise) if red equals 255 or right (clockwise) if blue equals 255. The code with the two conditionals should look like the following example:
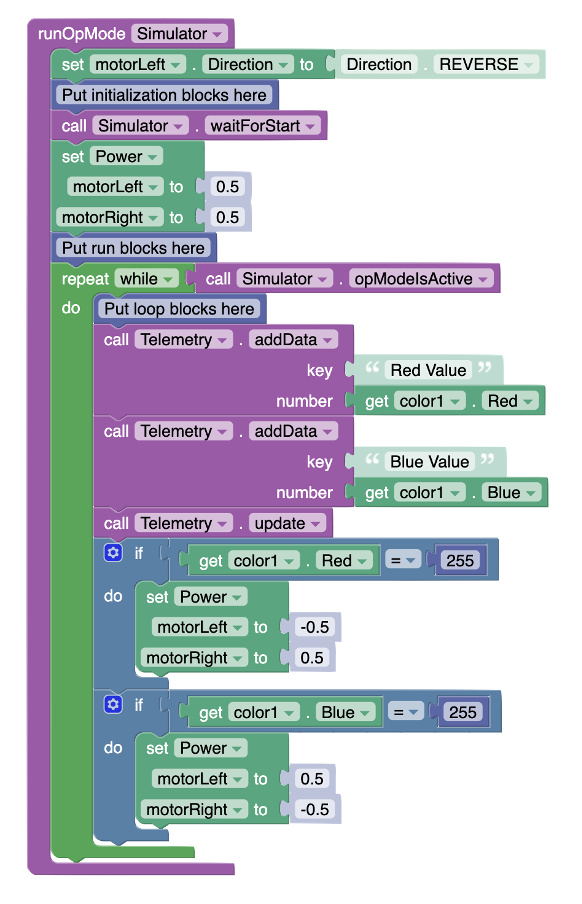
Encourage students to test this code. They should realize that the problem is now the robot does turn in the right direction, but it keeps spinning instead of stopping after 90°. Now that the robot is spinning in the right direction, the same code can be applied no matter what conditions have been triggered. Tell the students that the code will happen outside the loop now. That’s why breaking out of the loop at this point is essential. A “break out of loop” block can be found in the “Loops” section and should be added to both conditionals.
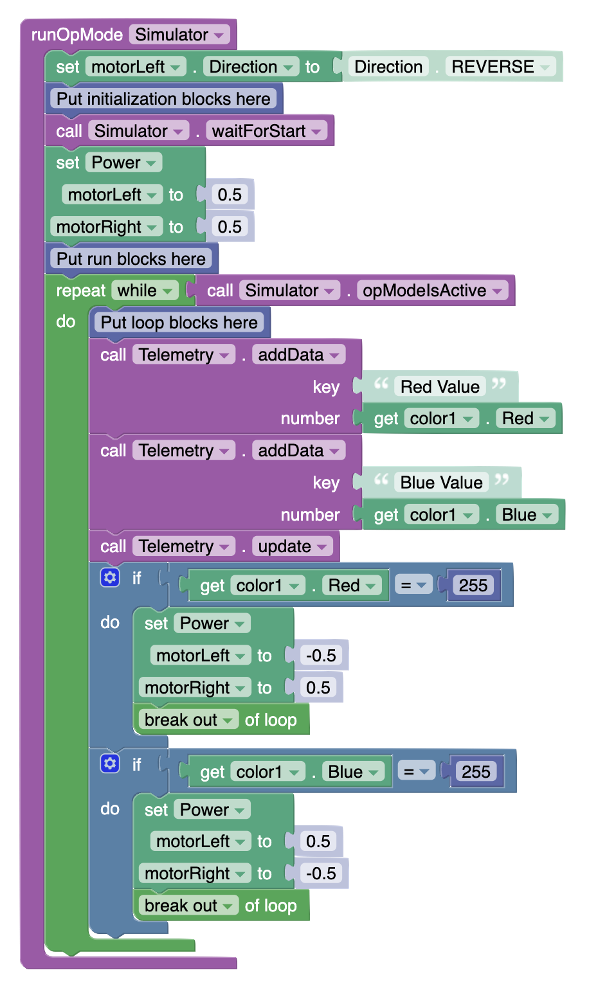
Explain that the next step is to add a pause long enough for the robot to complete a 90° rotation. This will depend on the speed they have selected as well. They should come up with the correct value through experimentation. In the following example, a 300 ms pause with a 50% and -50% speed works. Encourage students to get the best value either by changing the speed or by changing the pause.
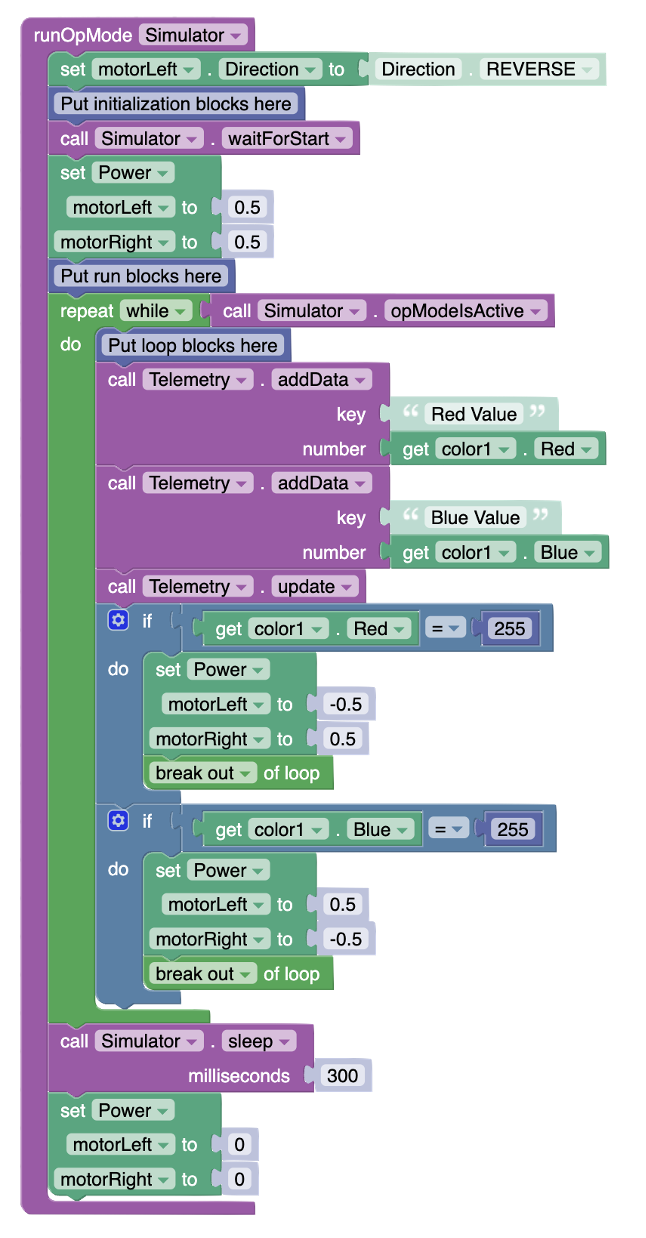
Then all the need to add is moving in a straight line to reach the flag.
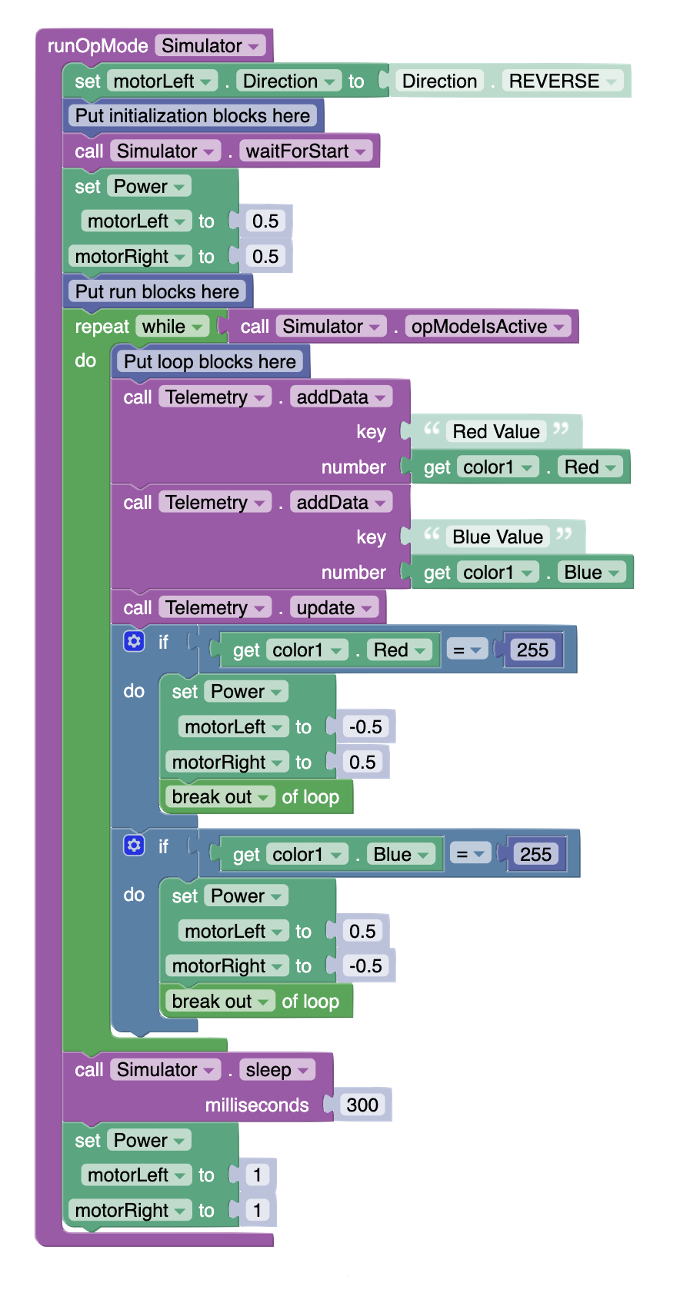
Challenge students to change the code for the robot to stop on the pad instead of pushing on the wall.

Indicate to the students that they will now focus on a different sensor called the distance sensor. Encourage them to go to puzzle 7—Distance Sense in the FTC Sensors lessons. Show a picture of a bat on the screen in front of the classroom.

Use the following questions to start a discussion in the classroom.
How do bats use sound to navigate and locate objects in their environment? Describe the process in your own words and compare it with how an ultrasonic sensor works. Explain the principle of echolocation used by bats. (e.g., bats emit high-frequency sound waves that bounce back to the bat when they hit an object. The bat then interprets these echoes to understand the environment, including object distance, size, and even texture. An ultrasonic sensor works similarly by sending out ultrasonic sound waves and measuring the time it takes for the echoes to return, allowing it to determine the distance to an object. Both systems use sound waves to map out surroundings without relying on light.)
Discuss the role of the time delay between the emission of sound waves and their return after bouncing off objects in determining distance. How is this concept applied in the technology behind ultrasonic sensors? (e.g., The time delay between the emission of sound waves and their return is crucial for determining the distance to an object. This delay helps in calculating the distance based on the speed of sound. Ultrasonic sensors apply this concept by using the time interval between sending and receiving the ultrasonic waves to accurately measure the distance to an object, similar to how bats estimate how far away something is based on how long it takes for the echo to return.)
Consider the limitations and challenges bats might face when using echolocation. How do these challenges parallel the limitations encountered by engineers when designing and implementing ultrasonic sensors in devices? (e.g., One limitation of echolocation is that it can be less effective over long distances or in noisy environments, as the echoes may become weaker or lost. Similarly, ultrasonic sensors may struggle with accuracy over long distances or in loud environments. Both systems also face challenges in differentiating between multiple objects close together. Engineers designing ultrasonic sensors must consider these limitations, just as bats have evolved to optimize their echolocation abilities within these constraints.)
Bats can determine not only the distance but also the size, shape, and texture of objects using echolocation. Discuss how advanced ultrasonic sensors attempt to mimic this ability and the potential applications of such technology. (e.g., Advanced ultrasonic sensors are being developed to detect the distance to an object and gather detailed information about its size, shape, and texture by analyzing the quality of the returned echo. This is like how bats can discern various characteristics of objects through echolocation. Such advanced sensors could have numerous applications, including robotics for more nuanced navigation and object interaction, security systems for better surveillance, and in healthcare for non-invasive diagnostics, mimicking the bats’ versatile use of echolocation.)
Have students realize that in this puzzle, their robot needs to determine the distance of the fence that can move either one way or the other way. Have the students run the simulation even before they start coding to see if the fence either opens or closes.
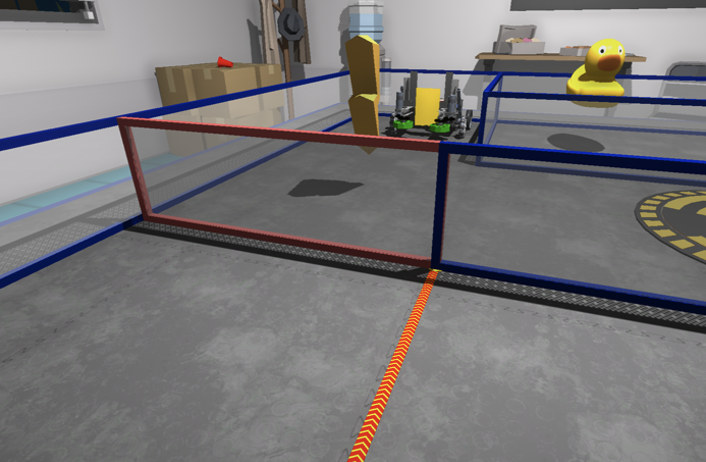
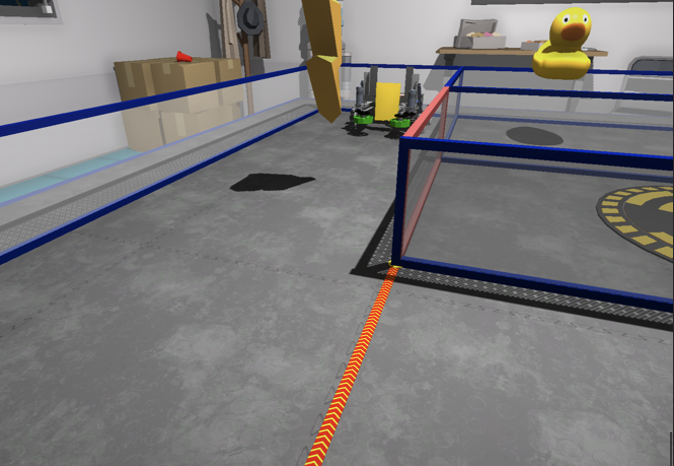
Invite students to discuss the pseudocode for this one :
Move the robot forward in a straight line
If the wall is less than 40 cm in front of the robot, turn left 90°.
Move in a straight line to reach the flag.
Students should create the first part of the code (moving forward in a straight line) without a problem. It’s recommended that they go slow (10%) to leave time for the fence to either open or close. They should also add telemetry to display the distance in front of the robot. One common mistake that students will make is using the “distance cm” block instead of the “call distance1—get distance” block. They should use the latter. Their initial code should look like this:
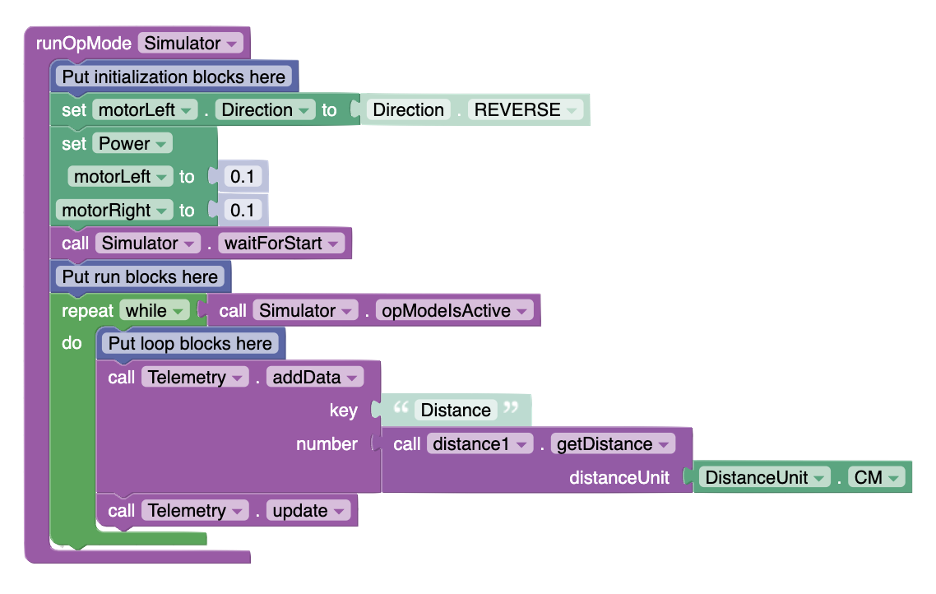
Encourage students to run the code and show the telemetry. They should notice that the distance displayed goes down as the robot approaches the wall. Ask the following question:
Why doesn’t the telemetry show a distance of 0 cm when the robot is touching the wall? (e.g., the sensor is not entirely at the front of the robot. It’s about 13 cm behind the front of the robot.)
Then they need to add a condition. In this case, they will not need two conditional statements like they did for the colour sensor. They only need to determine whether the distance is less than 40 cm. The code with the condition should look like this:
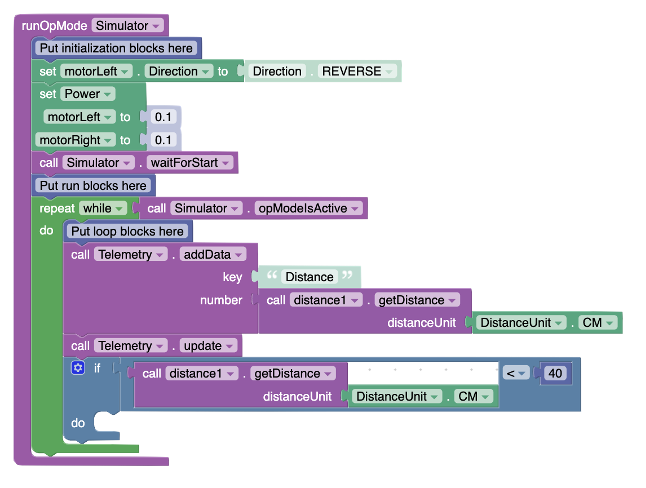
Explain that now the robot needs to start turning to the left and get out of the loop to finish the course. They should add a block to move at -30%/+30% and then break out of the look.
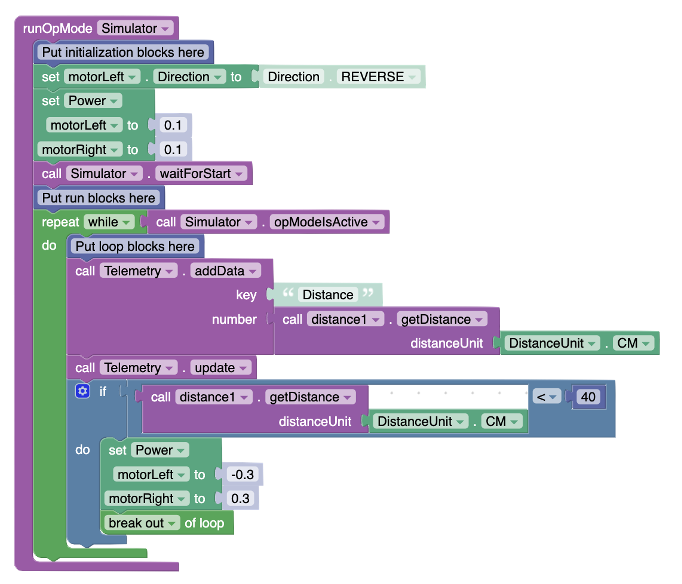
When students run this code, the robot will start spinning forever. They should try it several times to see the results for the two scenarios.
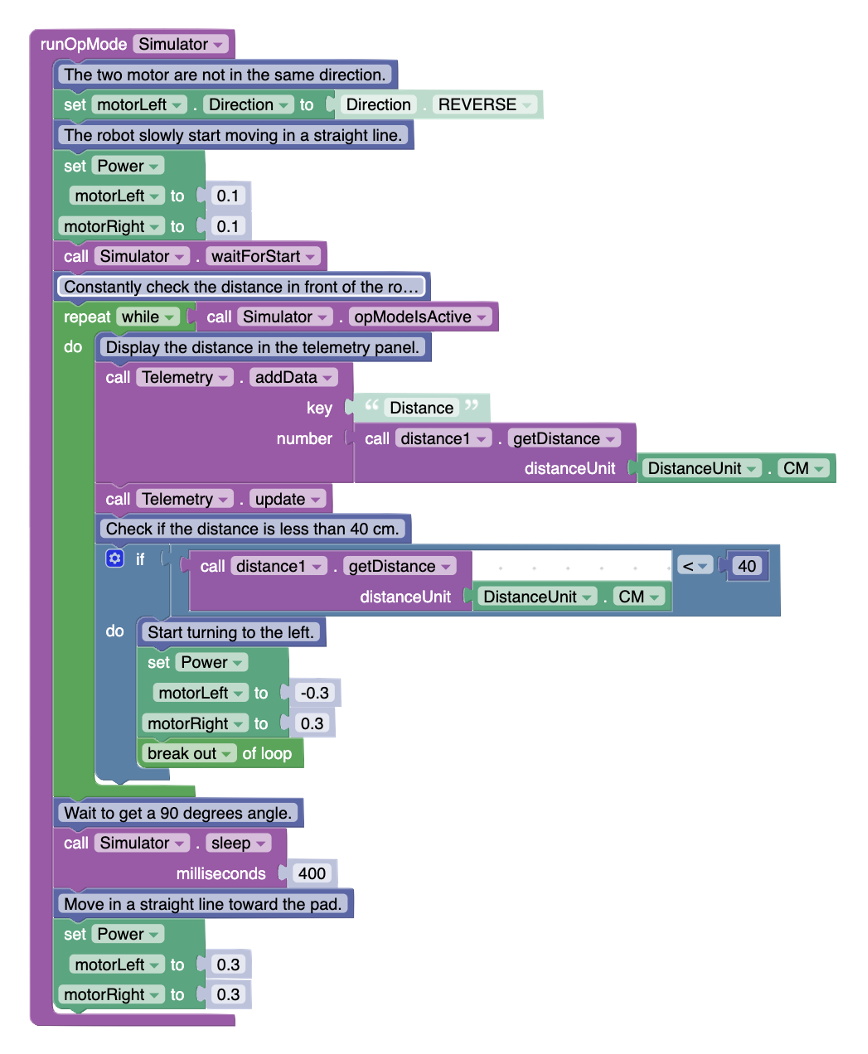
To prevent the robot from spinning forever, they need to add a pause and then go in a straight line. They must experiment to get the right timing for a 90° angle. The following code should work for a speed of -30% and +30% and a pause of 400 ms.
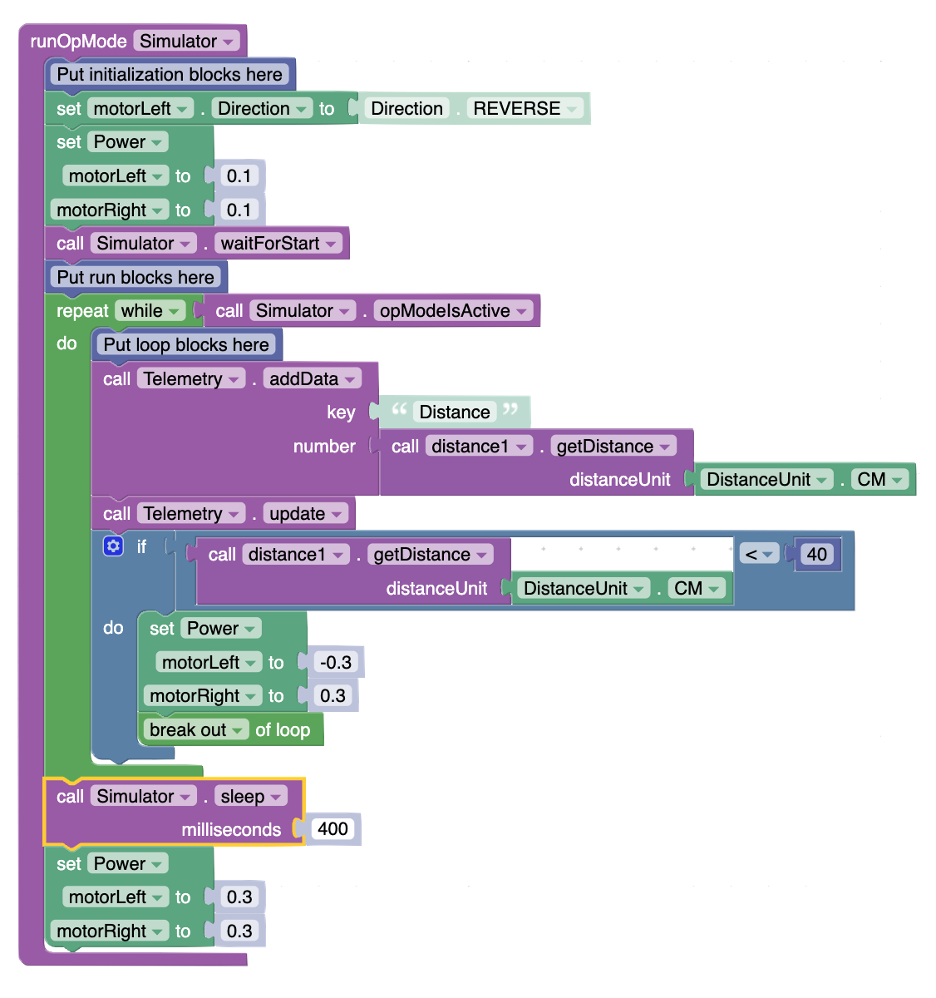
Challenge your student to go and get the duck for bonus points.
Invite students to add comments to their code to explain the various coding blocks they have used. The comment blocks are blue and available in the “Miscellaneous” section. Explain that software engineers work as teams and need to document their code with comments to ensure their colleagues can follow what their code means. Here is an example of the second version of the code for the second puzzle (Puzzle 7—Distance Sense) with comments added to it.
Get students to communicate their solutions to the first two puzzles by asking probing questions such as:
What is the purpose of using telemetry in our robot’s program? (e.g., Telemetry allows our robot to share information about its condition or environment, like the colours it detects, with us in real-time. It’s like the robot tells us what it “sees” as it moves.)
Why do we place the code for reading the colour sensor’s values inside a loop block? (e.g., The robot must constantly check the colours as it moves. By putting the code in a loop, we make sure it keeps looking for red or blue colours until it finds them.)
How does the robot decide which direction to turn based on the colour it detects? (e.g., The robot uses a conditional statement to check the colour sensor’s values. If it detects the maximum value for red, it turns left. If it detects the maximum value for blue, it turns right.)
Why is it necessary to use a “break out of loop” block after the robot starts its turn? (e.g., Without the “break out of loop” block, the robot would keep checking the colour and potentially keep turning indefinitely. Breaking out of the loop allows it to proceed to the next part of the program after making the correct turn.)
How does an ultrasonic sensor determine the distance to an object? (e.g., It sends out ultrasonic sound waves and measures the time it takes for them to bounce back. The sensor uses this time to calculate the distance to the object, like how bats use echolocation.)
What is the significance of setting a conditional for the robot to turn if the distance is less than 40 cm? (e.g., This conditional ensures the robot turns to avoid hitting the wall if it’s within 40 cm, allowing it to navigate towards the flag without crashing.)
How do you determine the correct pause duration for the robot to turn 90 degrees? (e.g., Through experimentation. I adjust the pause duration while keeping the robot’s speed in mind to find the right time that allows the robot to complete a 90-degree turn exactly.)
Why is it essential to add comments to your code? (e.g., Comments help others understand what our code does, making it easier for team members to collaborate and make changes or improvements. It documents our thought process and the purpose of different parts of the code.)
How can experimenting with different values in your code help improve the robot’s performance in tasks? (e.g., Experimenting with different values, like the speed of turns or the duration of pauses, helps us fine-tune the robot’s movements and actions, making it more efficient and accurate in completing tasks.)
Assessment of the lesson should be done through observations and conversations with students while they are coding. Evaluating the lesson’s effectiveness should encompass observing students as they engage in coding and engaging in meaningful dialogues with them about their thought processes, challenges, and strategies. This approach allows for a deeper understanding of their comprehension and application of the concepts taught, including how they troubleshoot problems and refine their code to achieve desired movements and navigation with the virtual robot. Through these interactions, educators can gauge each student’s grasp of the material, provide targeted feedback, and adjust instruction as needed to support learning outcomes.
Here is a list of “look-fors” to guide your observations and your assessment:
Engagement and Participation: Observe whether students are actively engaged with the task, experimenting with the code, and participating in discussions or asking questions.
Problem-Solving Skills: Note students’ ability to identify problems in their code, debug errors, and apply logical reasoning to overcome challenges.
Application of Instructions: Check if students are correctly applying the instructions and guidelines provided for the lesson, such as using the correct blocks or code syntax for movement, navigation, and use of sensors.
Creativity and Innovation: Look for creative approaches or innovative solutions students might be applying in their coding strategies, beyond the basic requirements of the lesson.
Motor Control Understanding: Observe students’ comprehension of how motor controls affect the robot’s movement, including speed, direction, and the execution of turns or specific maneuvers.
Use of Sensors: Evaluate how effectively students incorporate and use sensors in their coding projects. This involves observing their ability to integrate sensors for environmental data collection (colour), object detection, and navigation. Look for their understanding of the sensor’s capabilities, the accuracy with which they read and interpret sensor data, and how they use it to make decisions or adjust the robot’s behaviour.
Reaction to Failure: Pay attention to how students react to failure or unexpected outcomes, looking for resilience, persistence, and a willingness to experiment and learn from mistakes.