
Loading…
Loading…
In this lesson, students will explore how robots use cameras and AI to understand their surroundings through the Vision Portal.
Level: Beginner
(Note: This lesson introduces the Vision Portal and is designed for beginners in that specific topic. However, it assumes prior experience with FTC Sim. Students and teachers should have already completed the standard introductory lessons and be familiar with using the platform and programming robot movement.)
In this lesson, students will explore how robots use cameras and AI to understand their surroundings through the Vision Portal. They'll learn to recognize special markers called AprilTags, which provide key information to the robot. Thanks to machine learning, the robot has been trained to identify these tags and respond intelligently. Students will program their robot to make decisions based on what it sees, bringing artificial vision and autonomous behaviour to life in a fun and hands-on way.
This lesson plan is structured using the 5E framework, a widely recognized instructional model consisting of five phases: Engage, Explore, Explain, Elaborate, and Evaluate. The 5E framework systematically engages students in inquiry-based learning, encouraging active exploration and comprehension of complex topics.
In the lesson, students will:
· Learn to control a robot with four omni wheels for enhanced mobility.
· Use AI and machine learning to detect and respond to AprilTags.
· Implement conditional logic to guide robot behaviour based on visual input.
Post-it notes or a brainstorming collaborative app like Microsoft Whiteboard, FigJam or Apple Freeform.
Devices for your students (Windows computers, Mac computers, ChromeBook)
Google Chrome or Microsoft Edge (Chromium version) Web Browser
Access to the FTC Simulator website (https://ftcsim.org)
Students account created for each of your students
Projector or interactive whiteboard
To captivate your students' attention and spark curiosity about how robots use cameras and AI to make decisions, begin your lesson by sharing an engaging video on your projector or interactive whiteboard. A great choice is "Tesla Vision: How Tesla Cars See the World", available at this link: https://youtu.be/DQpeteeEuHM. This video offers a fascinating look into how Tesla vehicles use camera-based vision and AI to navigate roads and recognize objects. It provides a real-world example of autonomous technology that sets the stage for learning about robot vision, decision-making, and conditional programming.
Following the video presentation, provide post-it notes to your students and encourage them to engage in a brainstorming session about potential future applications of robots that use camera vision and AI to recognize objects and make decisions. Instruct students to jot down one idea per post-it note. Allocate a designated area on your classroom wall for students to affix their ideas. Once they have generated several ideas, have them gather at the sharing space to attach their post-it notes. If an idea has already been posted on the wall, they can place it atop the existing one. If the concept is new, they should find an available spot to display it.
Here are some of the ideas that they may come up with:
Robots that deliver packages by recognizing house numbers and obstacles.
Autonomous farming bots that detect crop health using camera vision.
AI-powered robots that assist visually impaired individuals by identifying objects.
Self-driving school robots that recognize student ID tags for safe pickup.
Warehouse robots that use AprilTags to sort and manage inventory.
Autonomous robots that guide visitors through museums or science centres.
Disaster relief robots that locate survivors using visual markers.
Mobile vending robots that navigate crowds and respond to visual cues.
Street-cleaning robots that detect and avoid pedestrians.
Robots that monitor wildlife using camera vision and AI.
Autonomous recycling bots that sort materials based on visual recognition.
Delivery drones that land precisely using AprilTag markers.
Robots that assist in space exploration by identifying terrain features.
Facilitate a discussion by raising thought-provoking questions, including:
What advantages can you identify in robots that use cameras and AI to recognize objects and make decisions? (e.g., they can perform tasks more accurately, adapt to changing environments, and reduce the need for constant human supervision.)
What potential drawbacks do you associate with camera-based AI robots? (e.g., they might misidentify objects, struggle in poor lighting, or raise concerns about data privacy and surveillance.)
How might the use of Vision Portal and object recognition impact industries like manufacturing, healthcare, or education? (e.g., robots could assist with sorting items, identifying patients or supplies, or even guiding students in learning environments.)
Can you foresee any ethical or safety concerns related to robots making decisions based on visual input? (e.g., if a robot misinterprets a visual cue, it could make a wrong decision, and there's also the risk of bias in AI training data.)
In what areas or applications do you believe vision-enabled robots could be most beneficial? (e.g., search-and-rescue missions, autonomous delivery, assisting people with disabilities, or monitoring environments.)
What potential societal and economic implications could arise from integrating AI-powered vision robots into our communities? (e.g., some jobs may be replaced, but new opportunities could emerge in robotics, AI development, and maintenance.)
Can you envision any innovative or unexpected uses for robots that use Vision Portal and AI beyond the ones we discussed? (e.g., robots that help track endangered species, assist in archaeological digs, or support astronauts in space missions.)
Encourage students to start their hands-on learning experience with the FTC Simulator platform by navigating to the provided link, https://ftcsim.org/. Have them log in using their unique username and password. Once logged in, they will need to use the following link to load the work surface they will need for the lesson: https://ftcsim.org/puzzle/navbwgswudo/
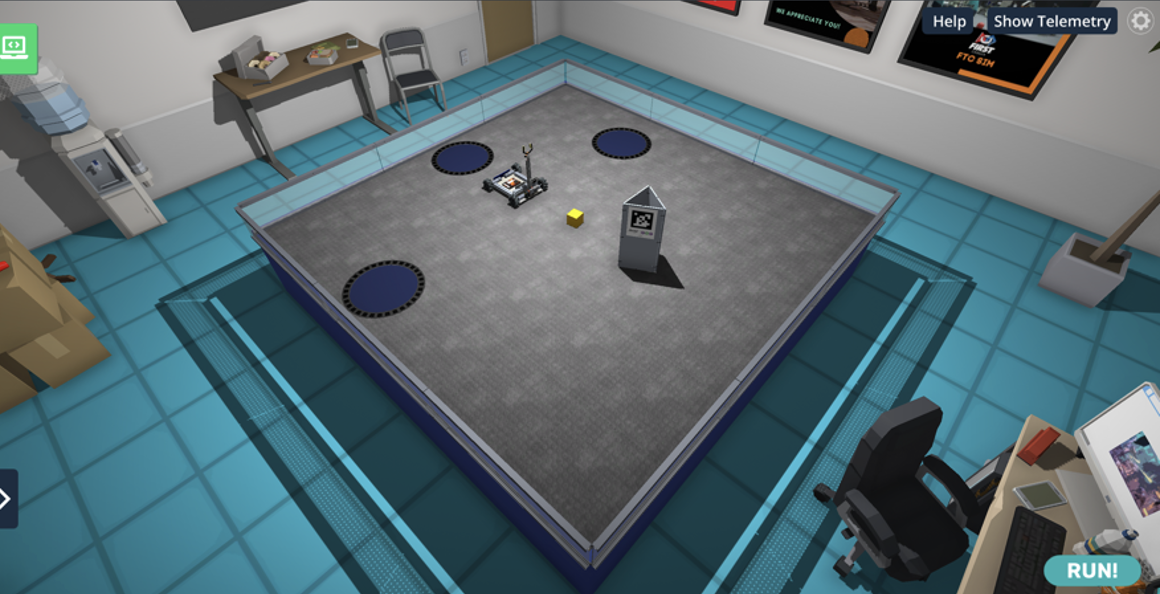
In this FTC Sim world, zoom in on the robot to clearly show students the installed camera and omni wheels.
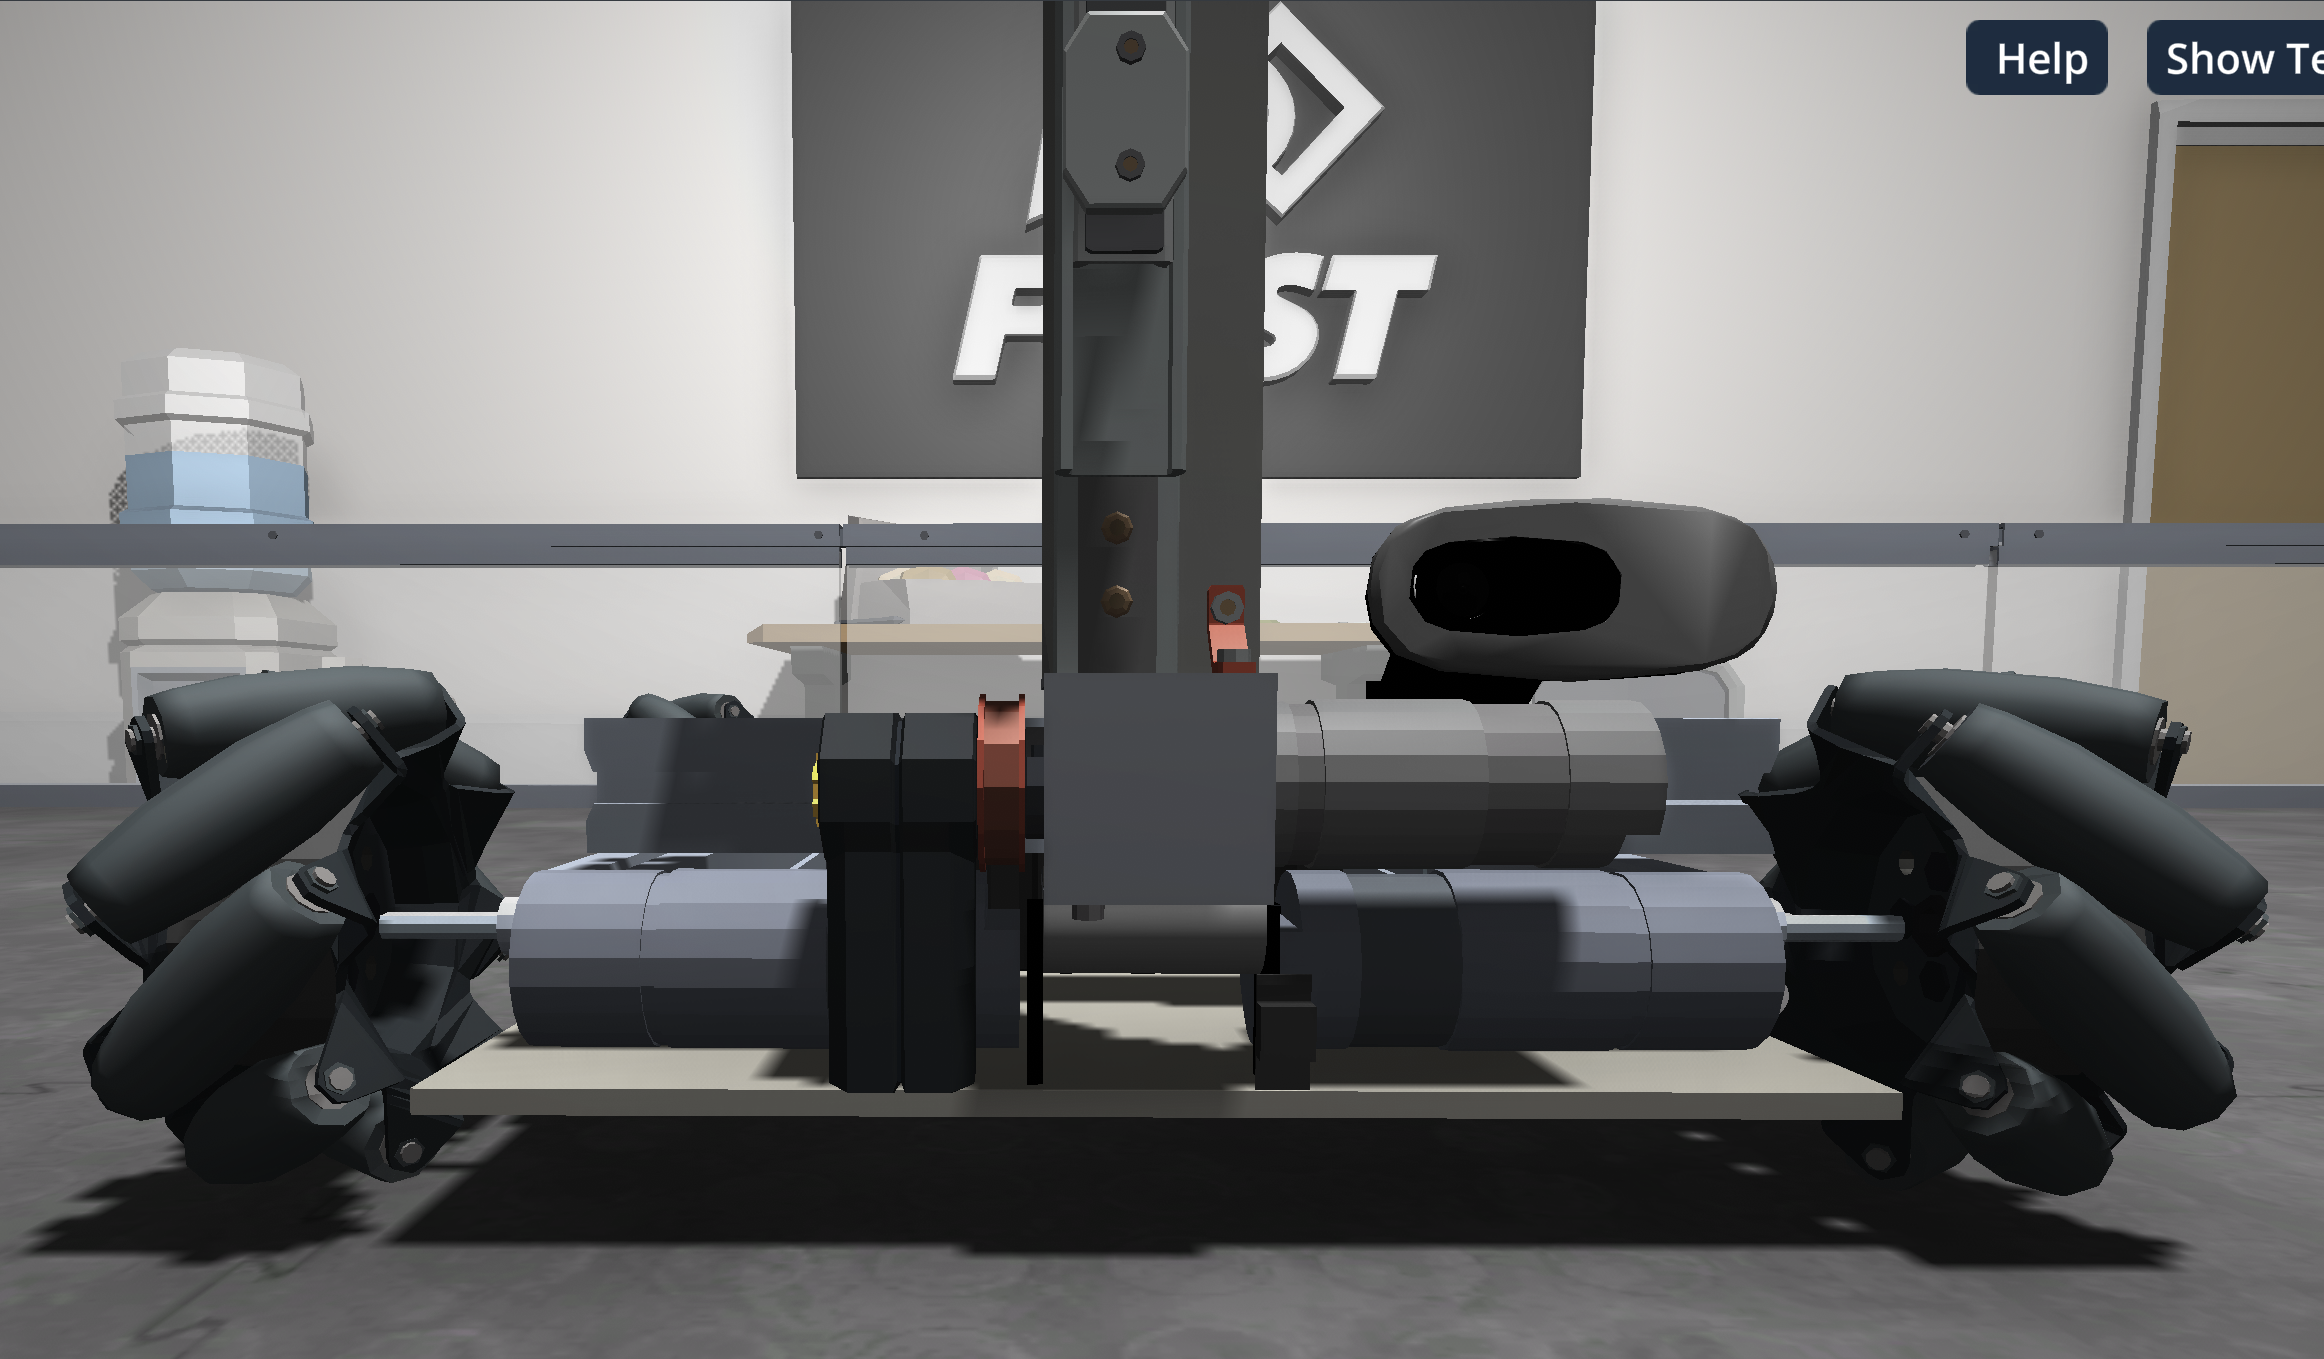
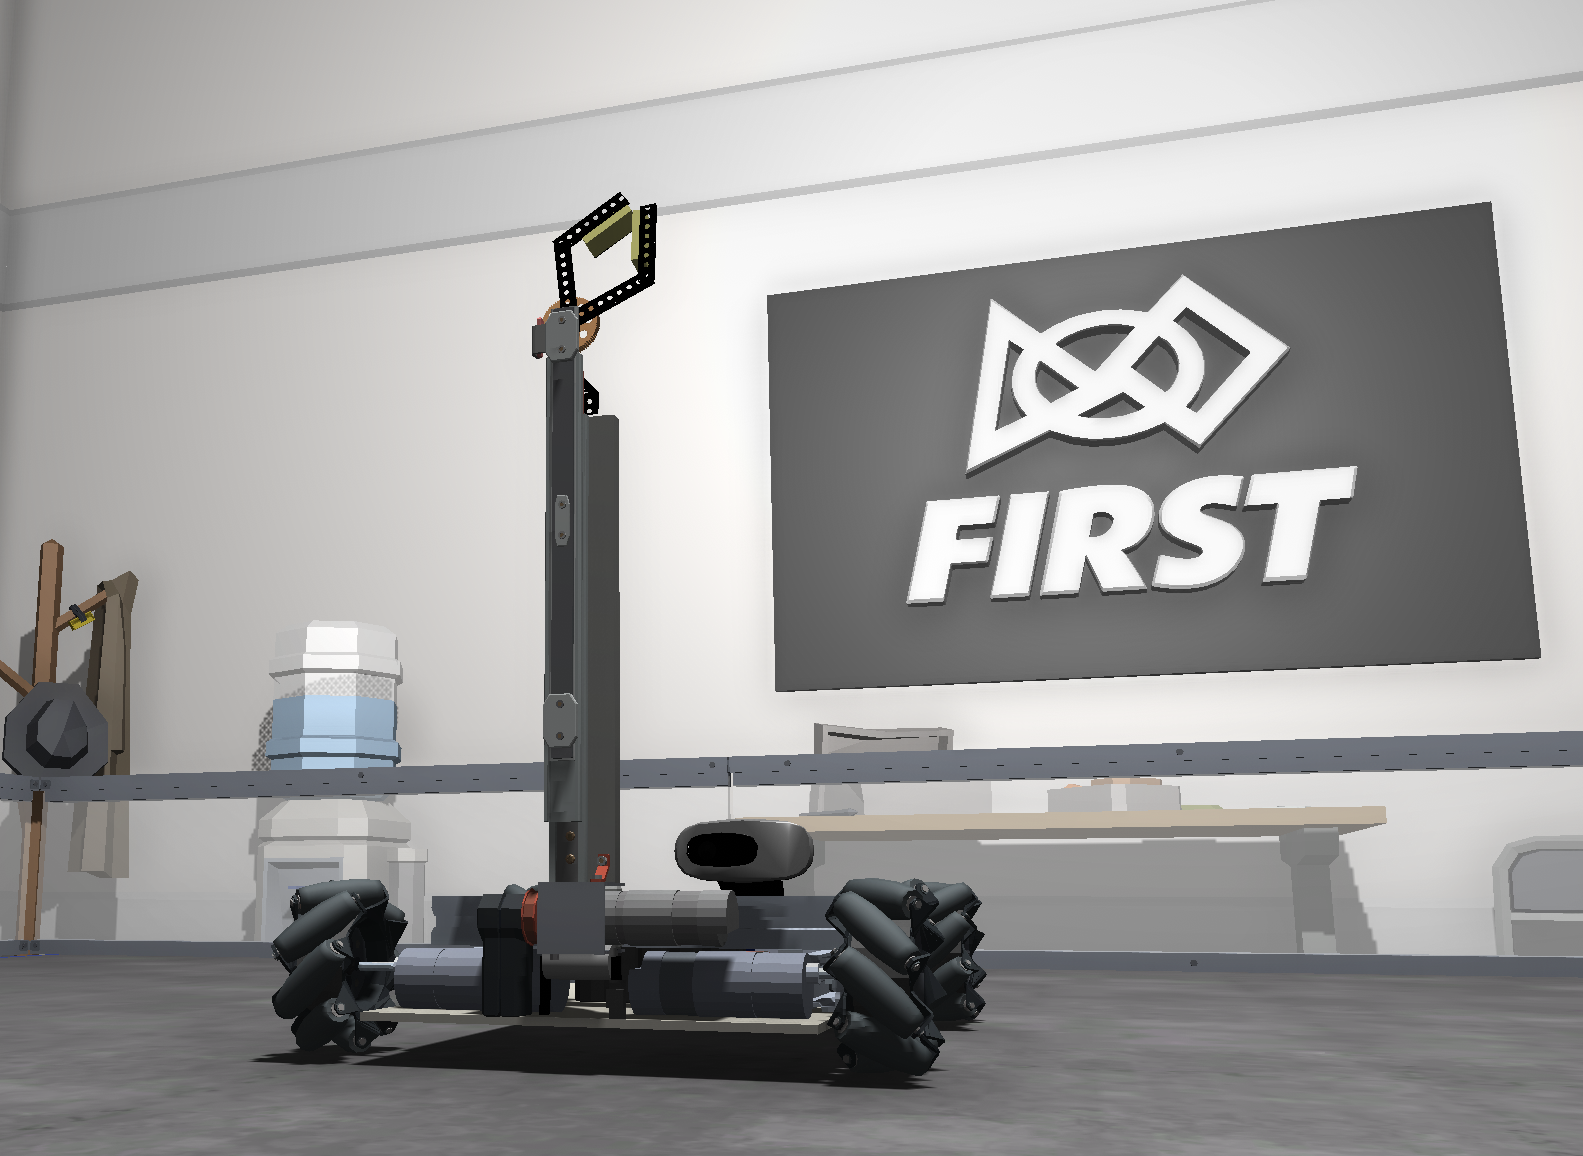
Initiate a discussion with the students by asking, "Where do you see the camera on the robot?” (e.g. The camera on the robot is mounted at the top of a vertical pole that extends from the robot's base. It's secured in a small bracket and is facing forward, allowing it to capture the robot’s surroundings from an elevated position.)
Continue the discussion by asking, "What differences do you notice between the wheels on this robot and the ones we used in previous lessons?" (e.g. In the previous lessons, the robot had smooth, solid wheels. Only the back wheels were connected to motors to make the robot move, while the front wheels were designed to glide and support the robot. In the current lesson, the robot’s wheels look different. They have small rollers or segments around the edges, and all four wheels appear to be the same. These new wheels look more complex and might allow the robot to move in different ways.)
Explain that these new wheels are called omni wheels and that each one is connected to its own motor. These special wheels have small rollers around their edges, which allow the robot to move not just forward and backward, but also sideways and diagonally. This gives the robot much more flexibility and control in its movements. Point at all four motors on the robot. Use this video to demonstrate how easier it would be for a car to park if it had omnidirectional wheels (https://www.youtube.com/watch?v=J-TOV-NBD70&t=15s)
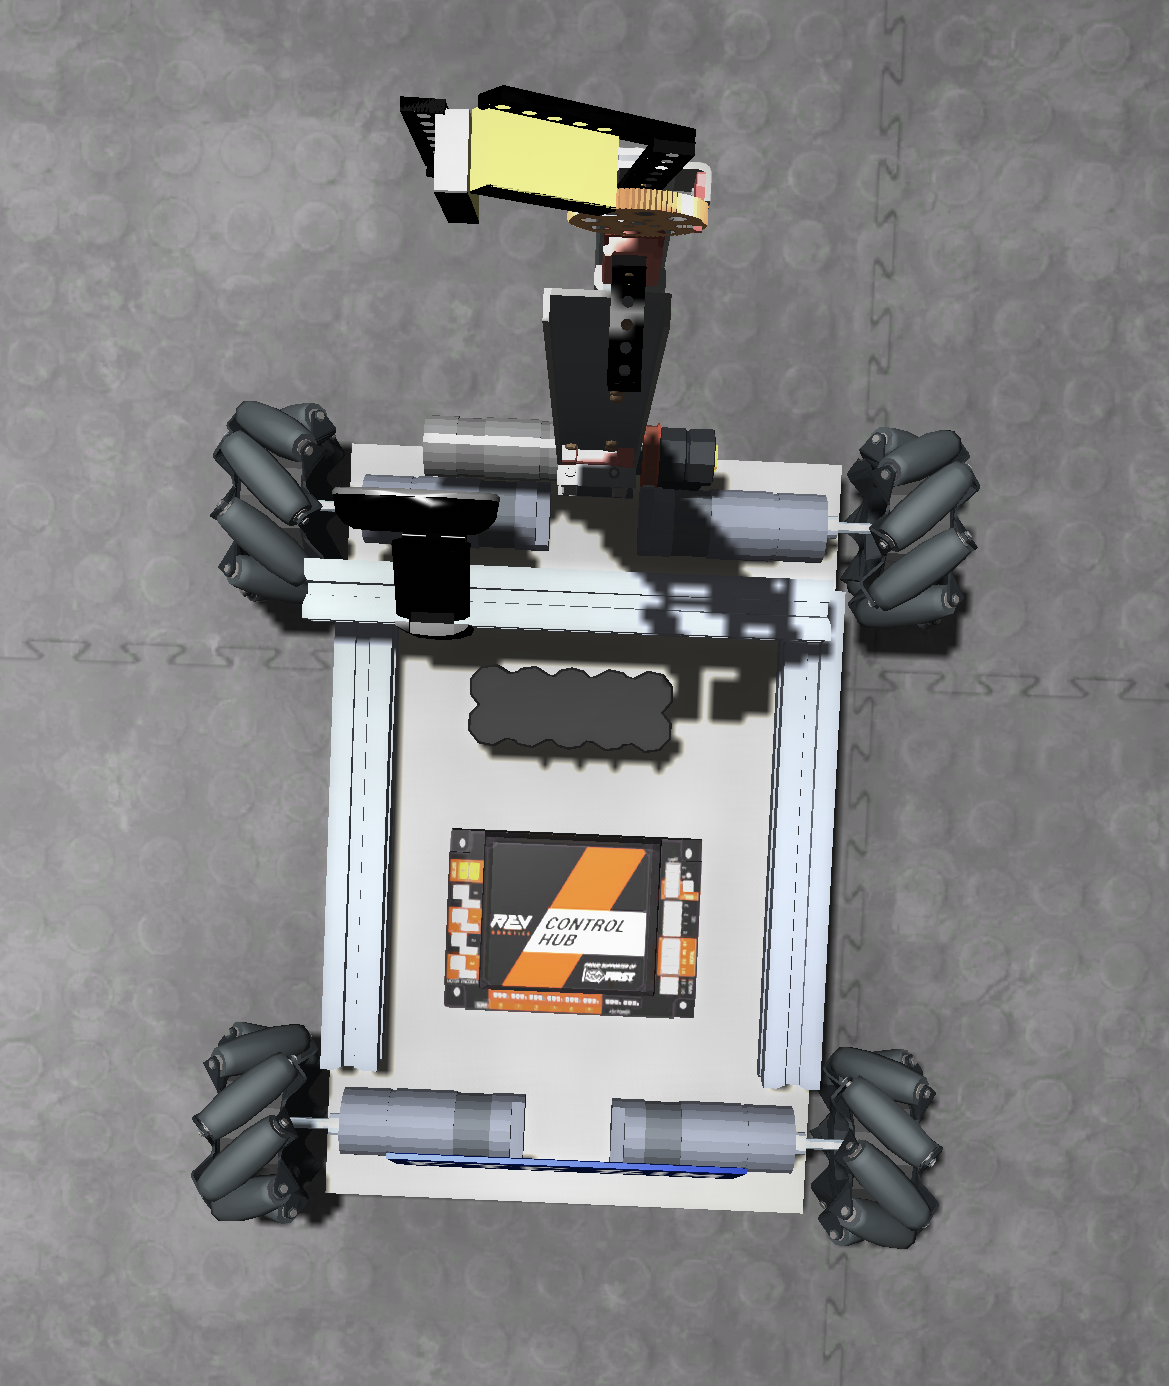
In previous lessons, we used dual motor coding blocks to control the robot’s movement, since it only had two motors. Now that we’re working with omni wheels, the robot requires four motors to move effectively: front left, front right, back left, and back right. This means the code will need to be updated to include all four motors.
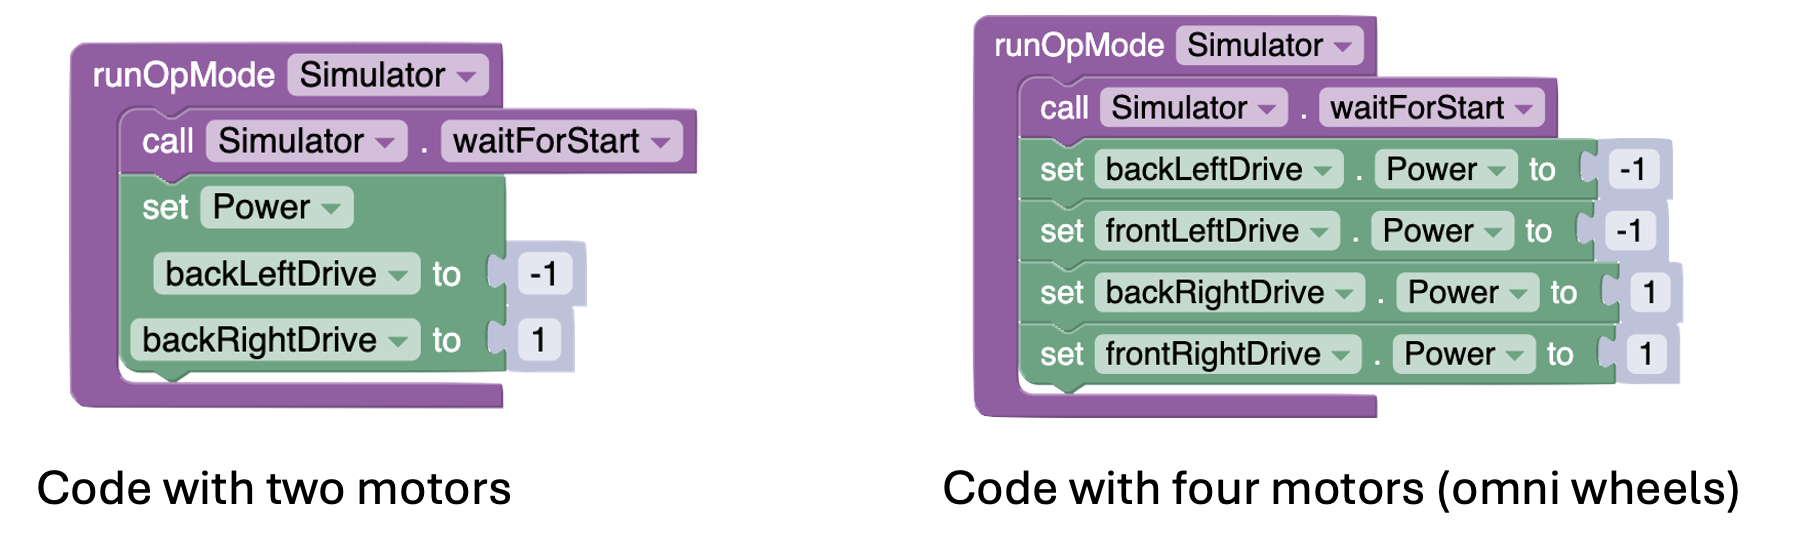
Make sure students notice how the motors on the left side require negative values in the code. That’s because they’re installed in reverse, causing them to spin in the opposite direction by default. Instead of having to manually enter negative values each time, they can simplify the process by adding two blocks in the initialization section that automatically adjust the motor direction. This way, the motors will behave consistently, and your movement code will be easier to write and understand.
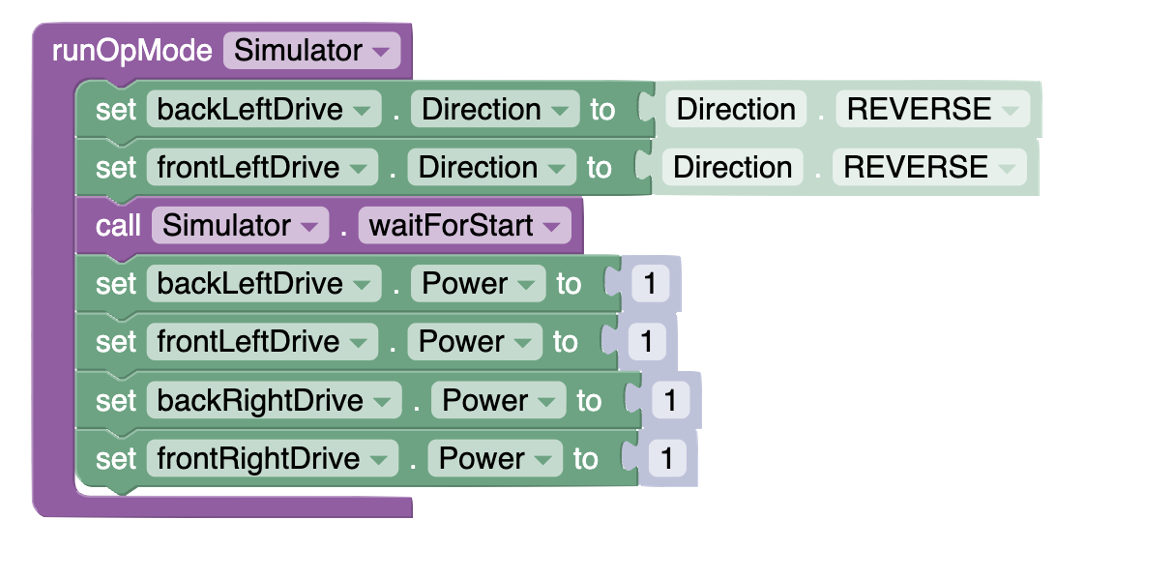
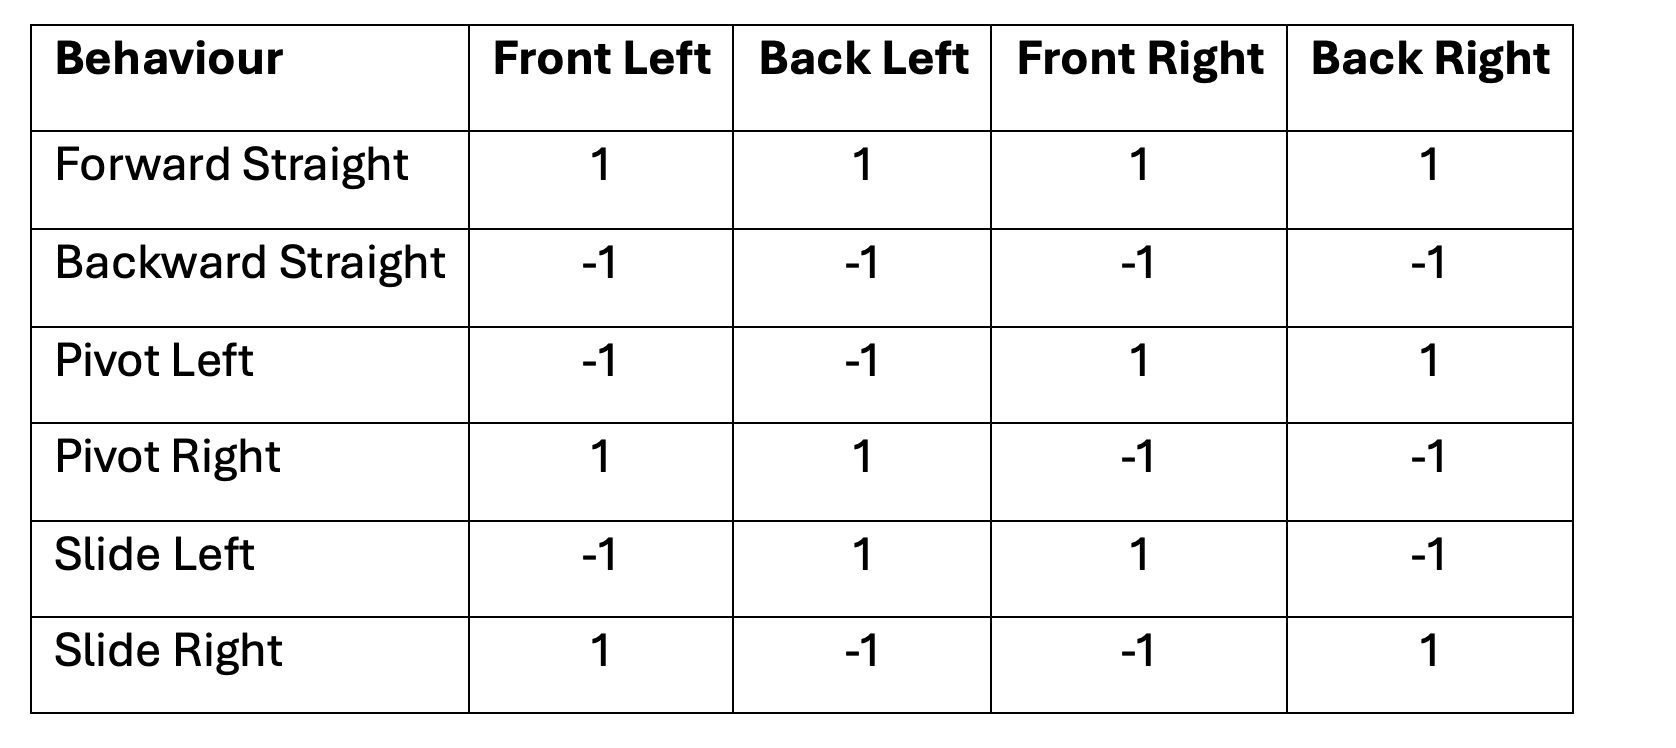
Have students try this code. It should make the robot drive in a straight line (and it will hit the big tower in front of it!). Then, have them practice making the robot move in different ways: pivot right, pivot left, forward, backward, slide to the left, and slide to the right. They should come to the following conclusion:
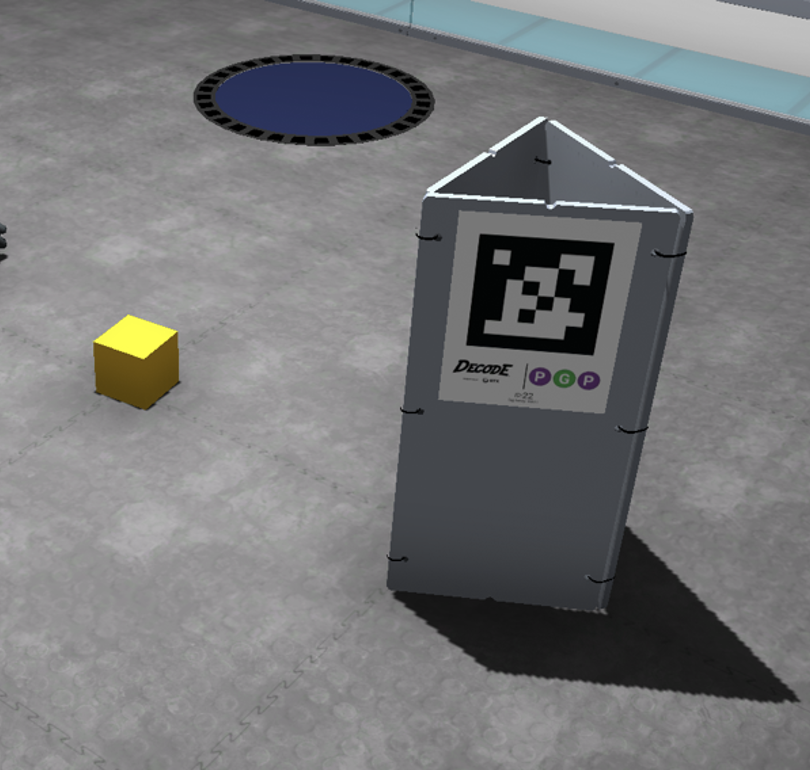
Now that students know how to maneuver the robot, it is time for them to begin exploring AprilTag. At this point, the teacher should zoom in on the large tower directly in front of the robot in the FTC Sim World, where three AprilTags are installed.
Then, show students one of the AprilTags and ask: “What do these AprilTags remind you of?” (e.g. They look like QR code.) Explain that AprilTags are visual markers that the robot can detect using its camera. Each tag has a unique identifier, which allows the robot to recognize and distinguish between different tags in its environment. AprilTags are often used in robotics for navigation, object recognition, and triggering specific actions.
Draw students’ attention to the fact that each of the three AprilTags on the tower has a unique ID: 21, 22, and 23. Explain that each time the program runs, only one of these tags is displayed on the front of the tower, directly in front of the robot. This means the robot will need to detect which tag is currently visible and respond accordingly. This introduces the concept of conditional logic based on tag ID, which is essential for autonomous decision-making.
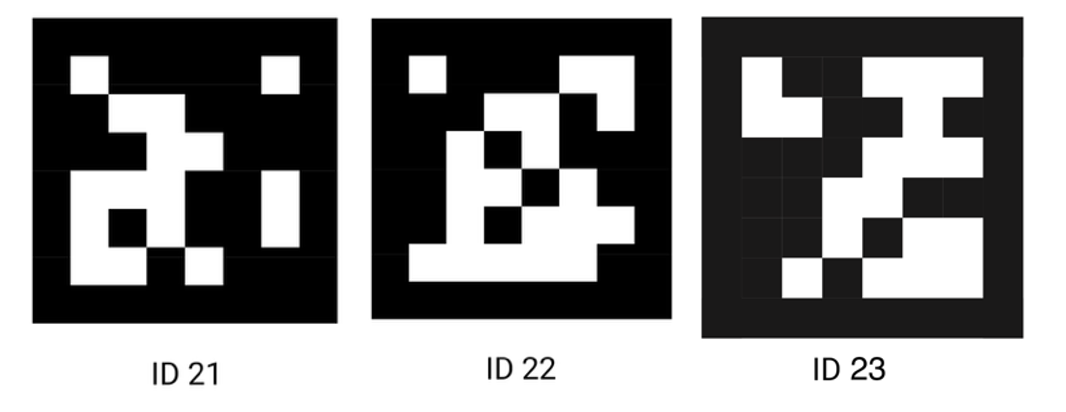
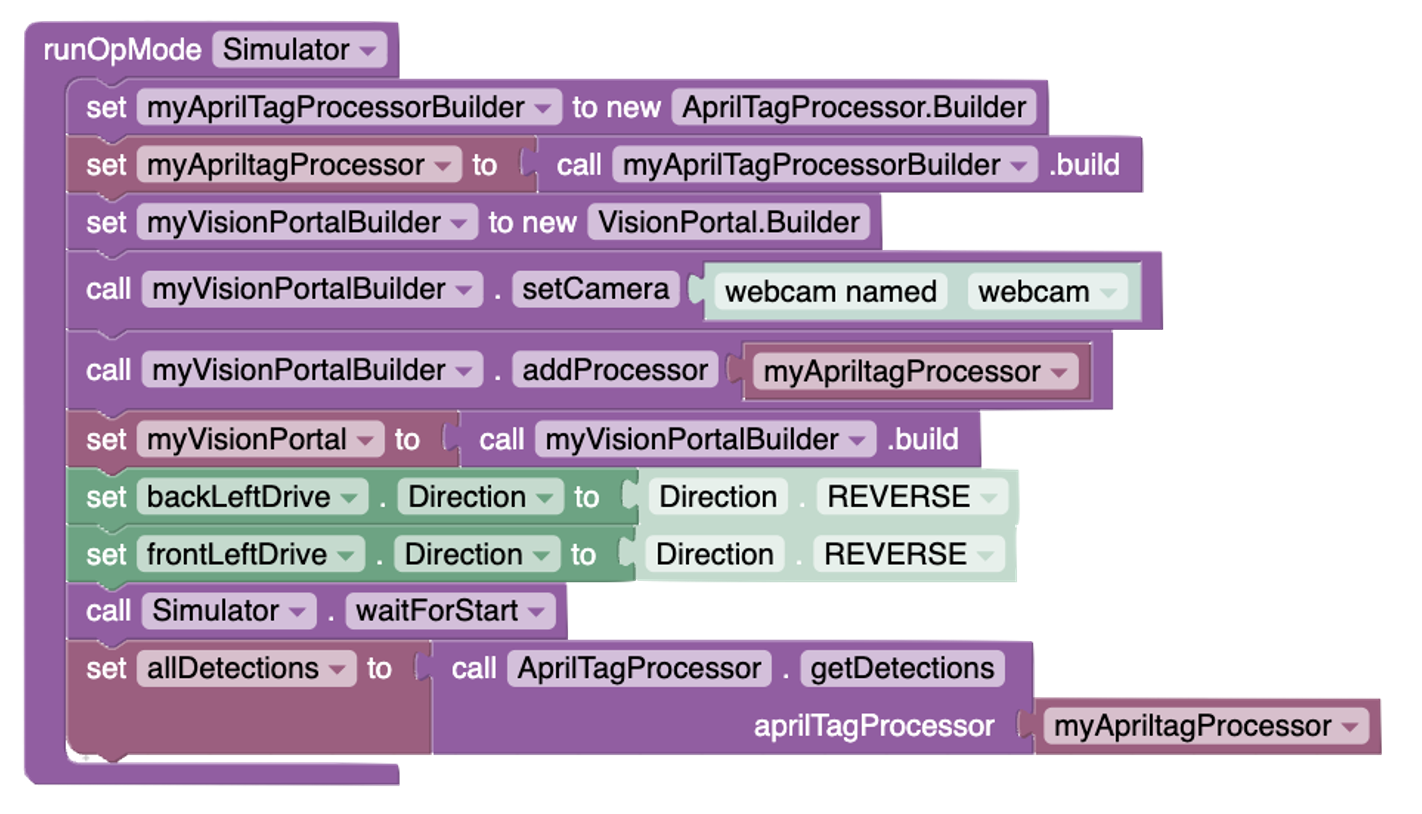
To enable the Vision Portal and AprilTag recognition, you need to add the following blocks to the initialization section of the code, before the call to Simulator.waitForStart(). These blocks are located in the “Vision” section.
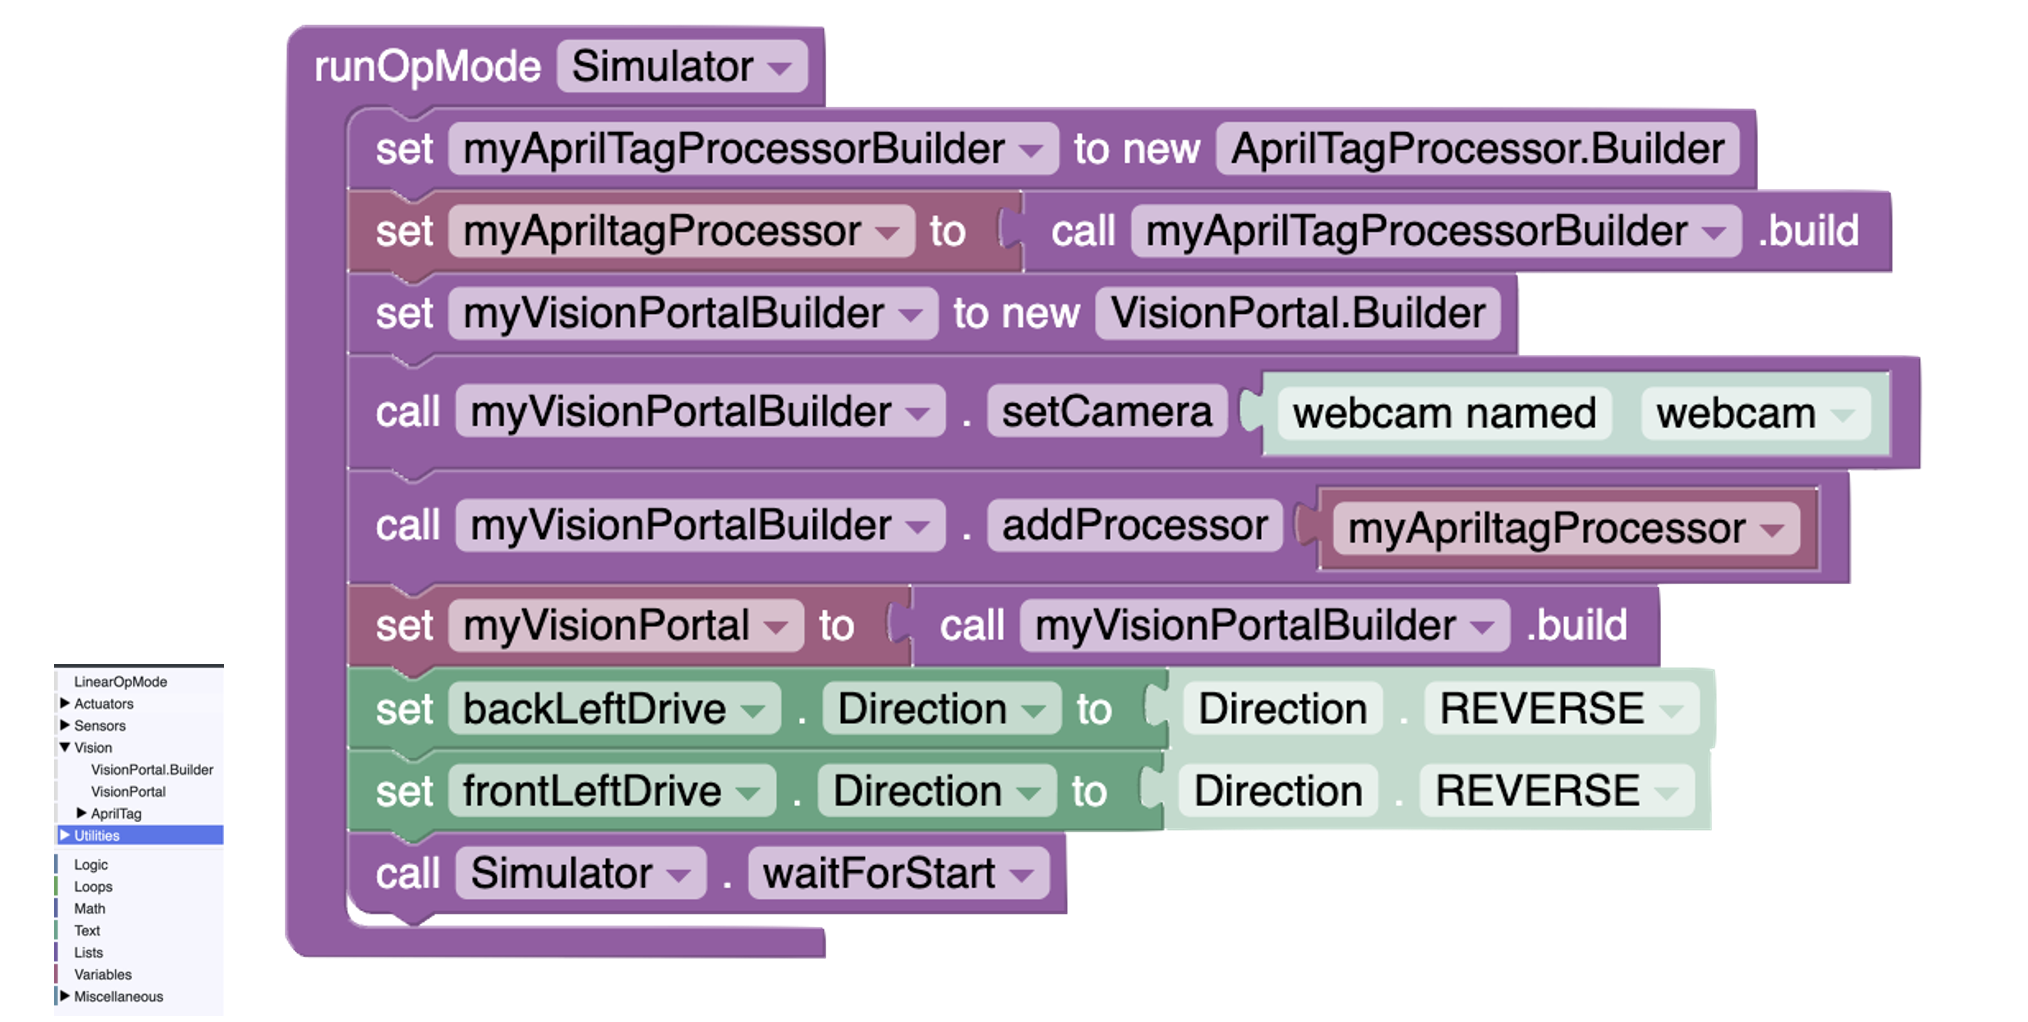
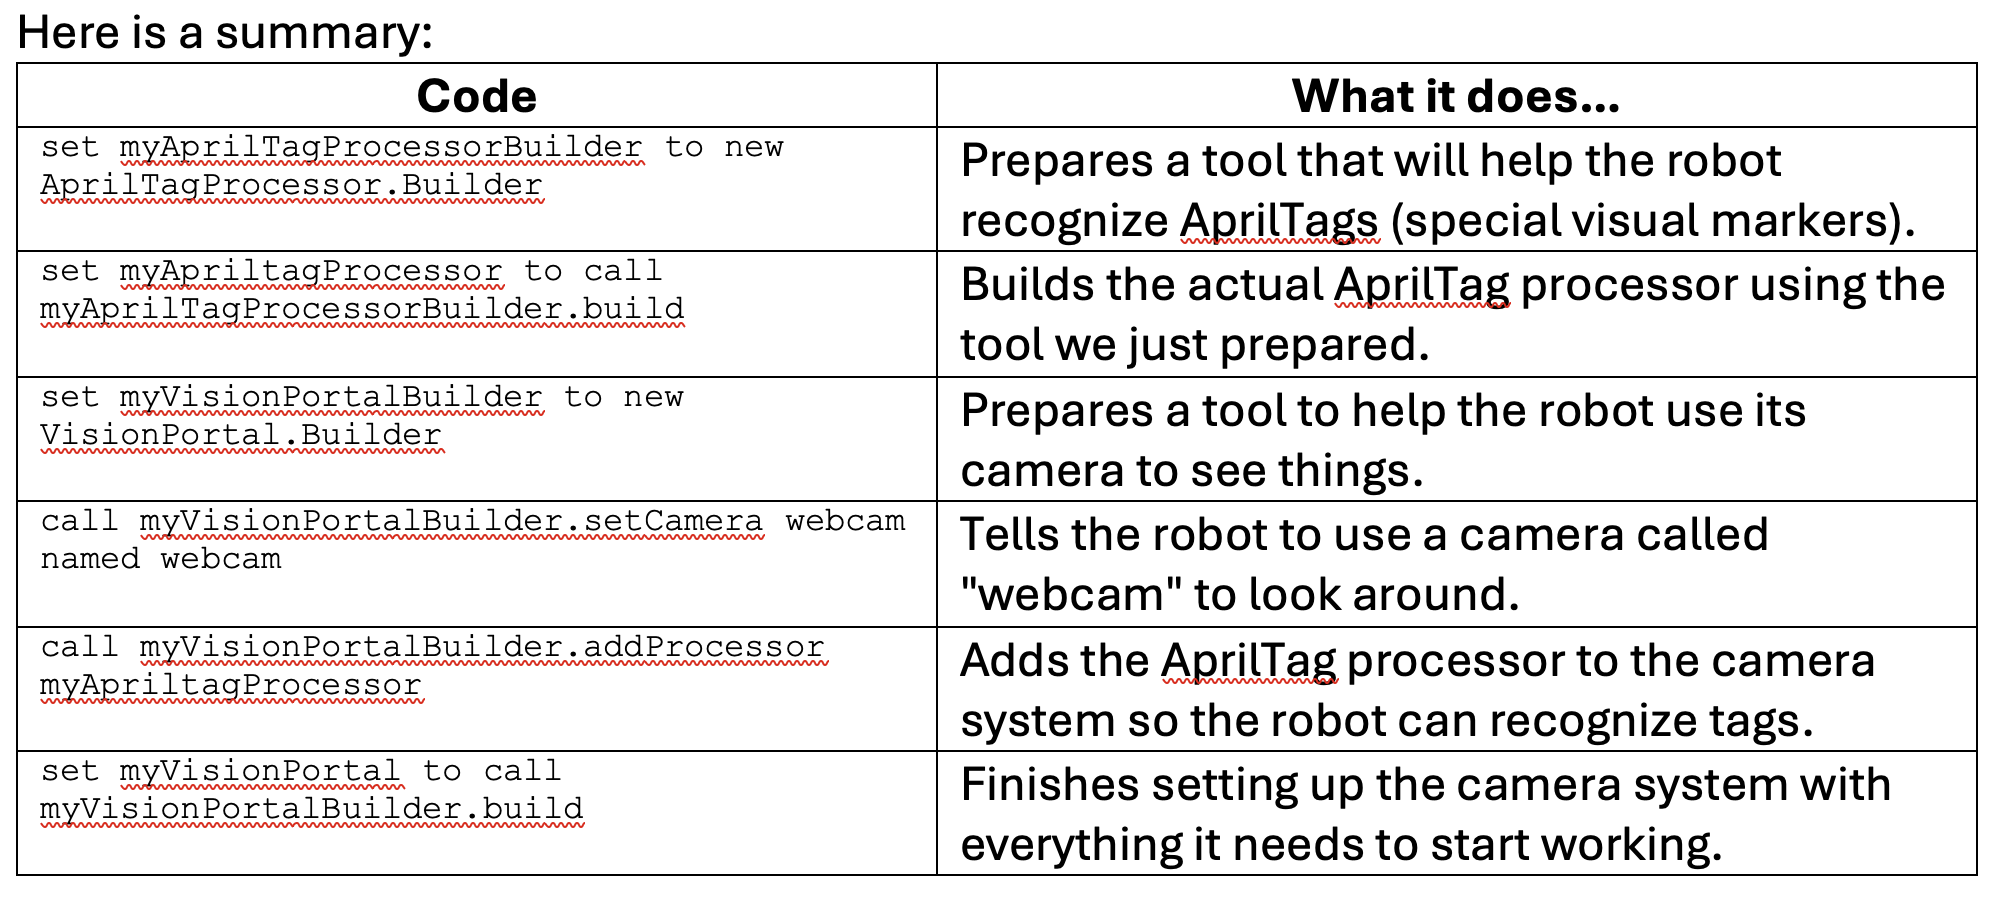
Depending on the students’ grade level and coding experience, you may choose to walk them through what each line of the code does. If this feels too advanced for your group, you can simply provide the full initialization block and focus the lesson on how the robot recognizes AprilTags in the next step. This allows students to engage with the core concept without getting overwhelmed by setup details.
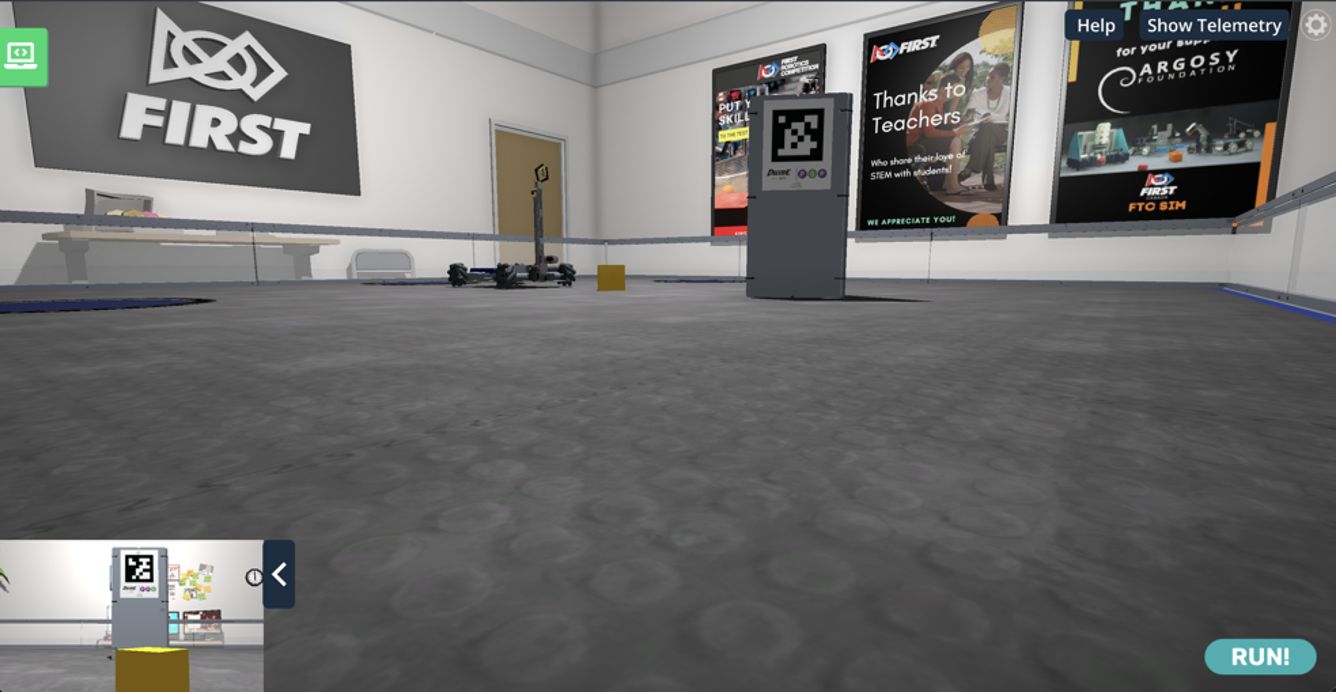
Students should now test the code by pressing “Run”. At first, it may seem like nothing is happening because the code only sets up the robot and does not include any movement commands. Ask students to click the small arrow in the bottom left corner of the screen. This opens the robot’s camera view. They should be able to see the yellow cube and the AprilTag directly in front of the robot. Encourage them to run and reset the simulation several times. They will notice that the AprilTag on the tower changes each time, switching between ID 21, 22, and 23. This shows how the simulation randomly selects one of the three tags for each run.
Students now need to create a variable that will store a list of all the AprilTags the robot can see through its camera. In this simulation, the robot should only detect one tag at a time, since the other tags are positioned behind the tower and out of view. The variable will be named AllDetections, and it will help the robot keep track of which AprilTag is currently visible.
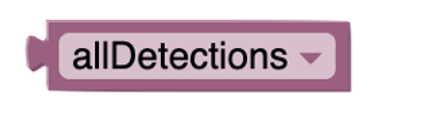
Students should now assign a value to the allDetections variable by using the AprilTagProcessor to get the list of detected tags. To do this, they need to add blocks that call the AprilTagProcessor and retrieve the current detections. The blocks they add to their code should look similar to the example shown.
Students can now add a conditional statement to check how many AprilTags the robot can see by looking at the length of the AllDetections variable. If the length is greater than zero, it means at least one AprilTag has been detected. Students should then use the Telemetry display to show a message confirming that an AprilTag has been detected, just as in the provided example. Students might need to click on “Show Telemetry” to view the information being displayed by the robot.
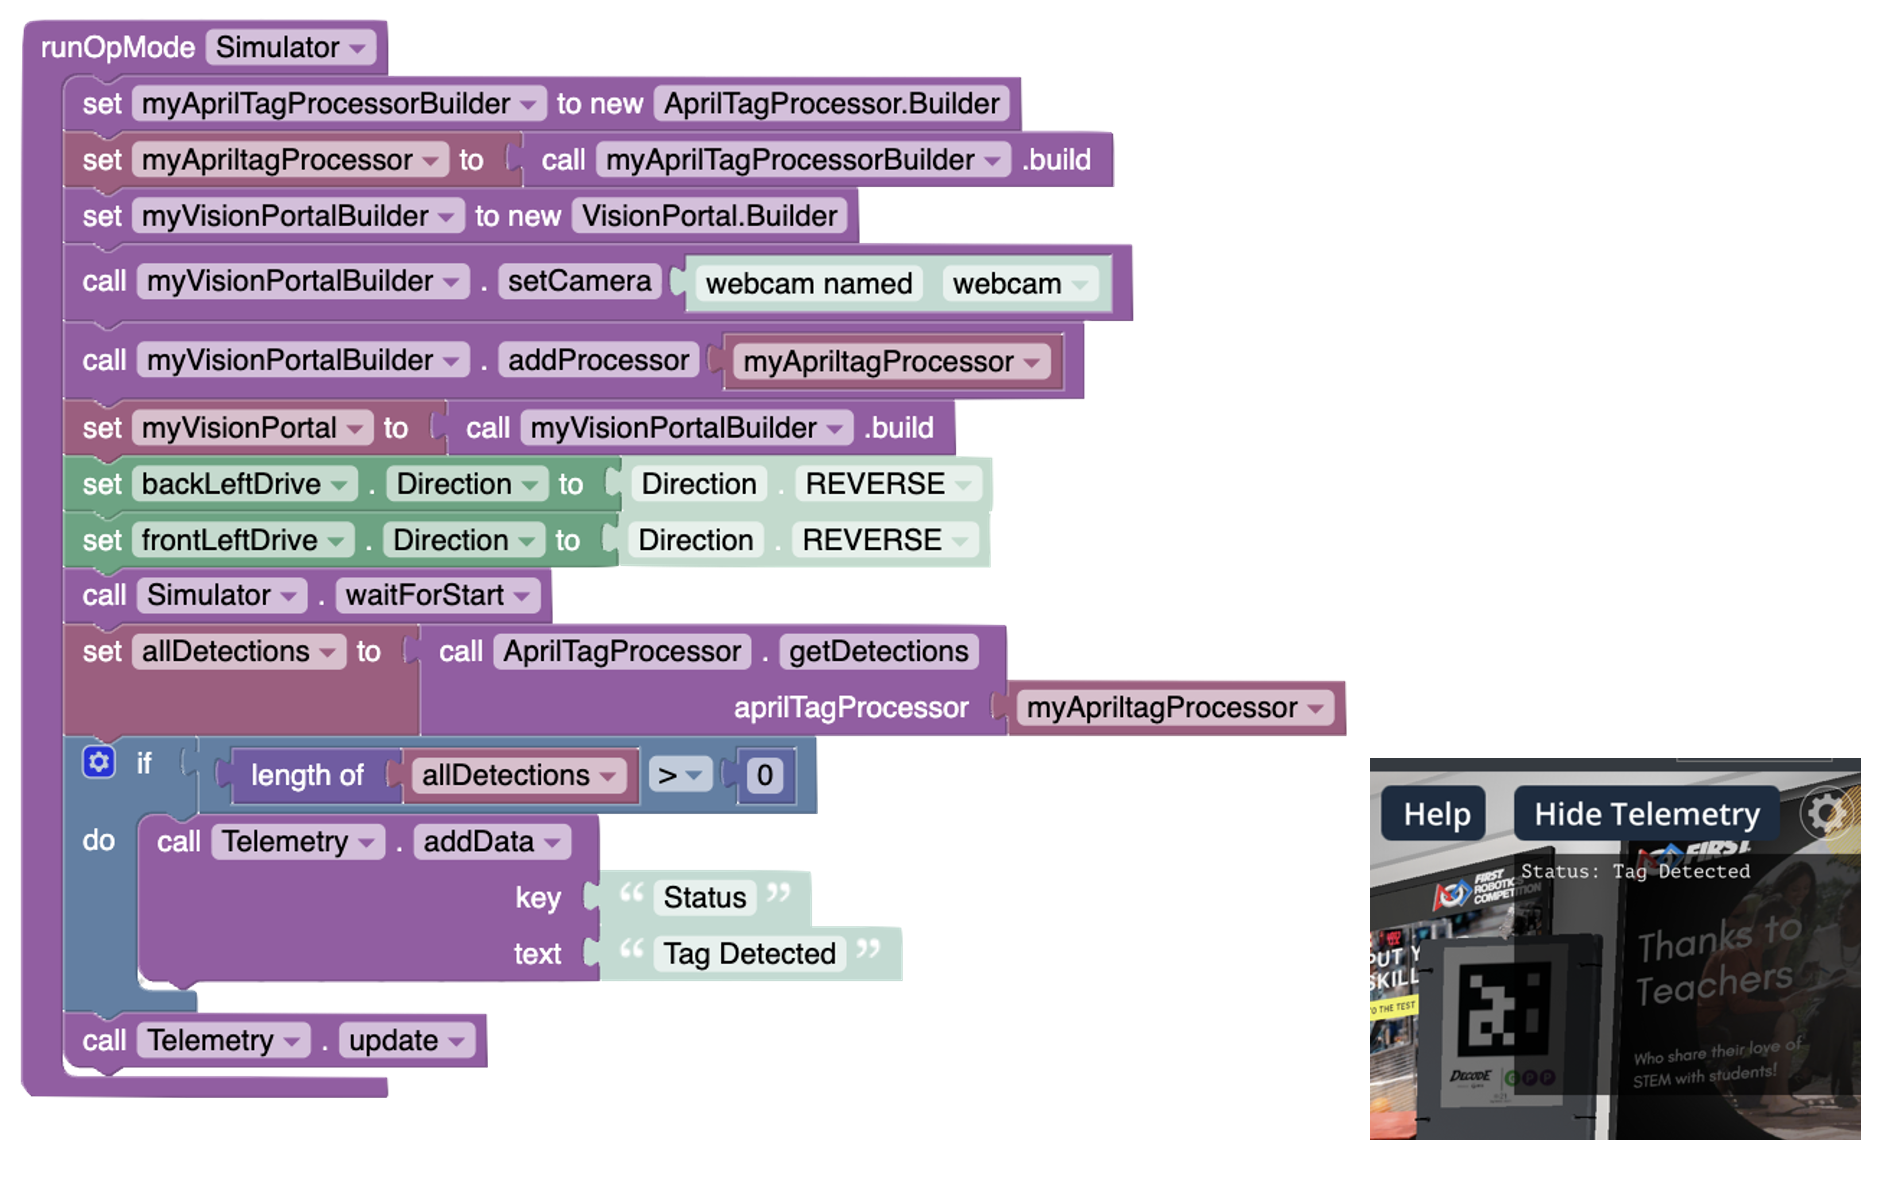
Encourage students to add code that makes the robot turn before checking for the AprilTag ID. This helps them observe how movement affects what the robot can see. If the robot turns away from the tower, it may not detect any tags because they are no longer in view. In that case, the AllDetections list will be empty, and the Telemetry display will not show a detected tag. This is a great opportunity for students to understand how camera direction and robot positioning affect tag detection.
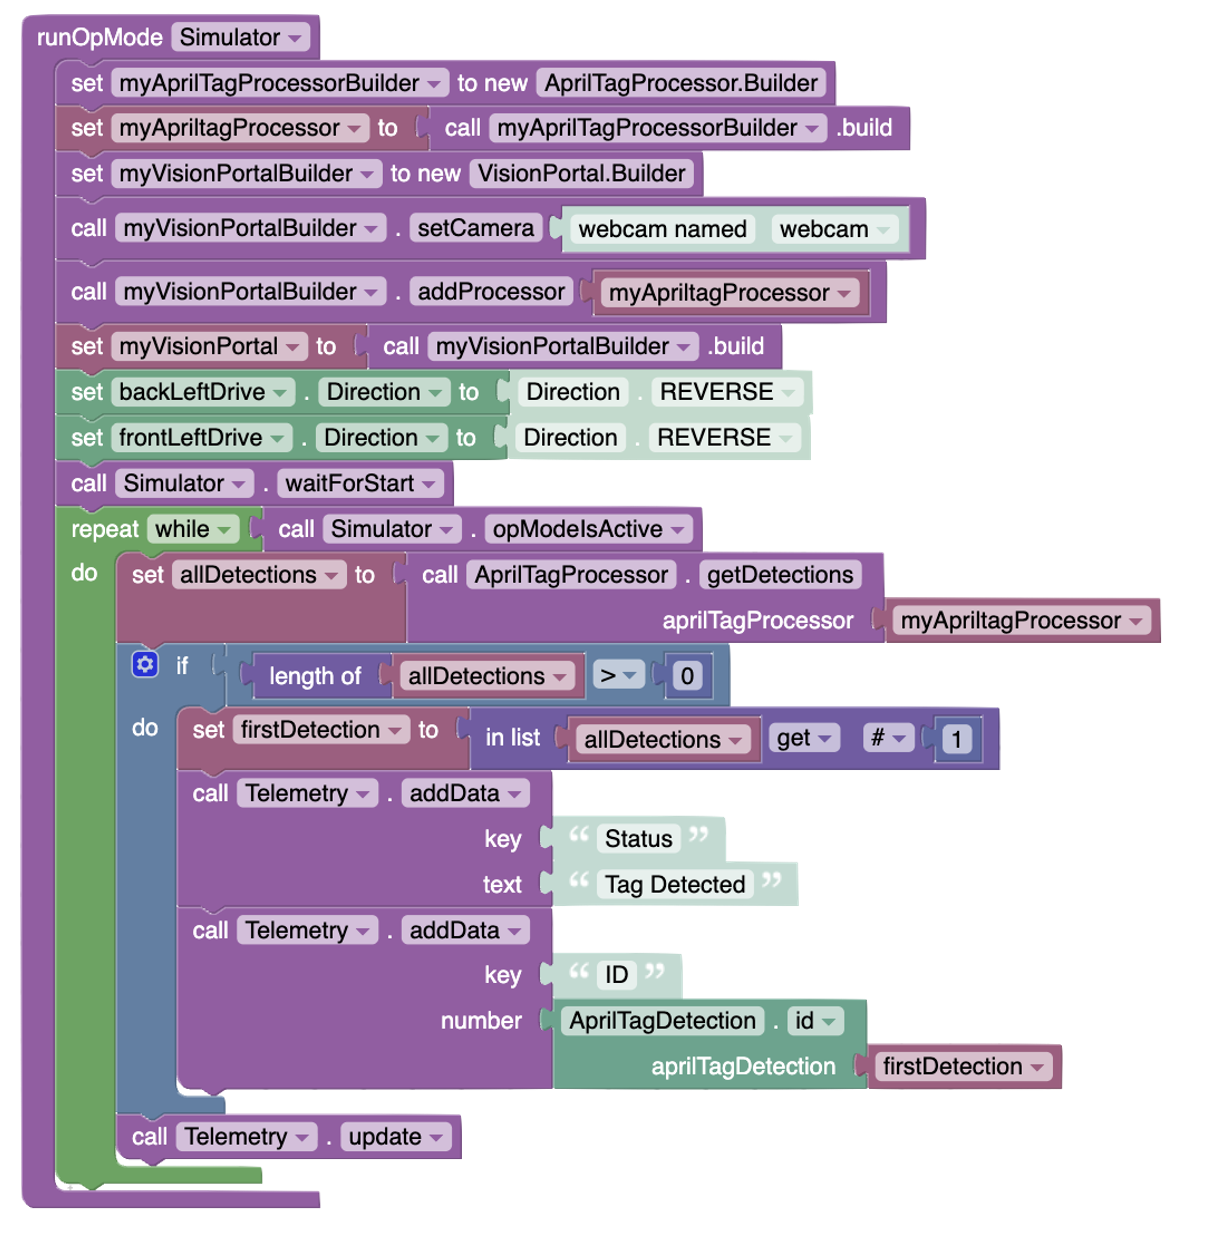
The next step is for students to show which AprilTag ID the robot is seeing. To do this, they should create a new variable called firstDetection. Since only one tag is visible to the robot at a time, this variable will store the first item in the AllDetections list. Students will then use Telemetry to display the ID of the detected tag. To do that, they will use AprilTagDetection.id from the firstDetection variable. Finally, they should place this part of the code inside a loop (repeat while...) so the robot keeps checking for tags and updating the display as it runs. Here is what the code should look like at this point.
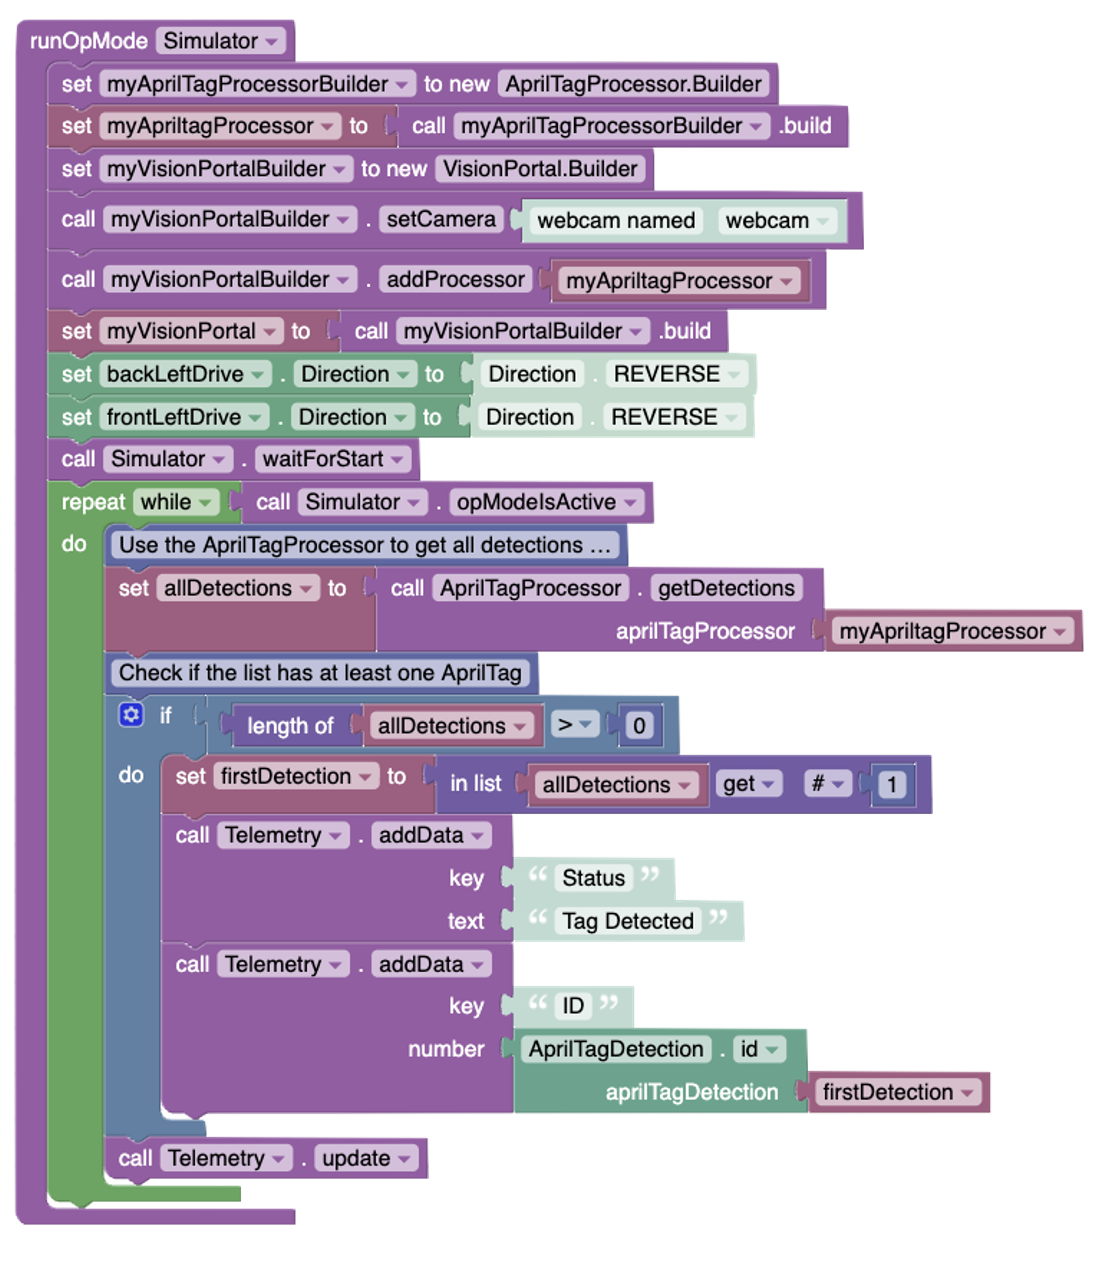
Invite students to add comments to their code to explain the various coding blocks they have used. The comment blocks are blue and can be found in the “Miscellaneous” section. Explain that software engineers work in teams and need to document their code with comments to ensure that their colleagues can understand what their code means. Here is an example of part of the code with comments.
Get students to communicate their solutions to the challenges by asking probing questions such as:
What makes omni wheels different from regular wheels? How does this affect how the robot moves?
What happens when all four motors are set to power 1? What about -1?
What is the Vision Portal, and why is it important for this lesson?
What does the AprilTagProcessor do in your code?
Why do we need to set up the camera before starting the robot?
What are AprilTags, and how are they used in robotics?
What does the variable (list) AllDetections store?
How can you tell if the robot has detected an AprilTag using Telemetry?
What happens if the robot turns away from the tower? What does that tell you about how the camera works?
Why do we check the length of the AllDetections list before trying to read the tag ID?
How could you use conditional logic to make the robot behave differently depending on which tag it sees?
Encourage students to write code that includes three conditional branches: one for when the detected AprilTag ID is 21, one for 22, and one for 23.
In this challenge, students will use the robot’s arm and grabber to pick up the yellow cube. Based on the detected ID:
· If the ID is 21, the robot should take the cube to the left pad.
· If the ID is 22, it should go to the right pad.
· If the ID is 23, it should move the cube to the pad behind the robot.
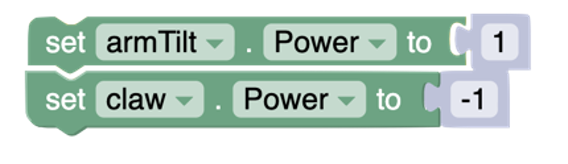
Remind students that to control the arm and grabber, they need to use the actuator motors. In the dropdown list, they will find two motor names: armTilt and claw.
· To tilt the arm backward, use a value of -1.
· To tilt the arm forward, use a value of 1.
· To open the claw, use a value of 1.
· To close the claw, use a value of -1.
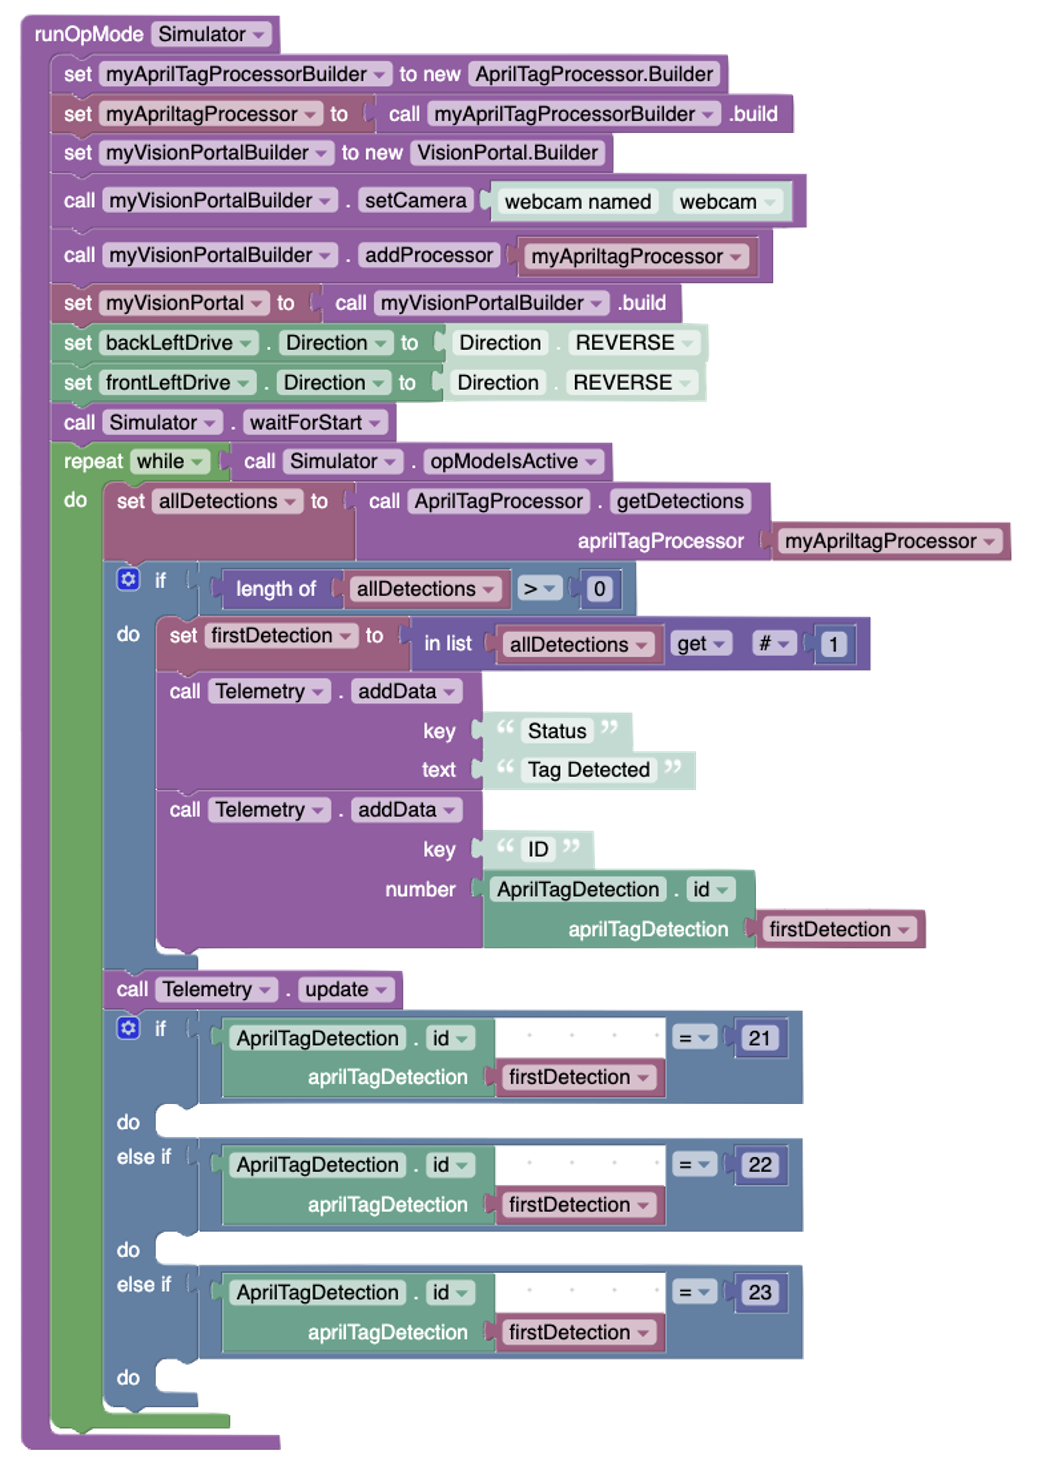
Below is a starter version of the code to help students begin building their own solution. The code is not complete, so students will need to fill in the actions for each part of the conditional based on which AprilTag ID is detected.
Assessment for this lesson should be conducted through active observation and conversation with students as they engage in coding and problem-solving. Evaluating the effectiveness of the lesson involves watching how students interact with the FTC Simulator, how they apply the Vision Portal and AprilTag recognition concepts, and how they use conditional logic to guide robot behaviour.
Engage students in meaningful dialogue about their thought processes, challenges, and strategies. This will help you gain insight into their understanding of how camera vision and AI influence robot decision-making. These interactions also provide opportunities to offer targeted feedback and adjust instruction to support learning outcomes.
Here is a list of “look-fors” to guide your observations and your assessment:
Engagement and Curiosity: Are students actively exploring the robot’s camera view, experimenting with movement, and showing interest in how AprilTags affect robot behaviour?
Understanding of Vision Portal Setup: Can students explain the purpose of the Vision Portal and how it connects the camera to the AprilTagProcessor?
AprilTag Detection and Logic: Are students able to detect AprilTags, store them in variables, and use conditional logic to respond to different tag IDs?
Problem-Solving and Debugging: Do students identify issues in their code, troubleshoot detection problems, and adjust robot movement or camera angles to improve results?
Use of Telemetry: Are students using the Telemetry display effectively to monitor tag detection and robot responses?
Motor and Actuator Control: Can students correctly use the armTilt and claw motors to manipulate the yellow cube based on tag ID?
Reaction to Failure and Iteration :How do students respond when the robot doesn’t detect a tag or behaves unexpectedly? Are they persistent, reflective, and willing to revise their code?
Code Documentation: Are students using comment blocks to explain their code and make it easier for others to understand?
This approach ensures that assessment is not just about the final result, but about the process of learning, experimentation, and thoughtful application of new concepts.
C3.1 solve problems and create computational representations of mathematical situations by writing and executing code, including code that involves conditional statements and other control structures
C3.2 read and alter existing code, including code that involves conditional statements and other control structures, and describe how changes to the code affect the outcomes
C2.1 use coding to demonstrate an understanding of algebraic concepts including variables, parameters, equations, and inequalities
C2.2 create code by decomposing situations into computational steps in order to represent mathematical concepts and relationships, and to solve problems
C2.3 read code to predict its outcome, and alter code to adjust constraints, parameters, and outcomes to represent a similar or new mathematical situation
C2.1 use variables, constants, expressions, and assignment statements to store and manipulate numbers and text in a program
C2.3 write programs that include single and nested conditional statements
C2.4 write programs that include sequential, selection, and repeating events
C2.5 write programs that include the use of Boolean operators, comparison operators, text operators, and arithmetic operators
C2.6 interpret program errors and implement strategies to resolve them
C2.7 write clear internal documentation and use coding standards to improve code readability