
Loading…
Loading…
Students continue learning about the utility of creating their own functions by creating longer programs that require the creation of more complex functions. Students create a Morse code program using motor commands and program mBot to ‘send’ messages to their friends!
Students continue learning about the utility of creating their own functions by creating longer programs that require the creation of more complex functions. Activity: Students create a Morse code program using motor commands and program mBot to ‘send’ messages to their friends!
For students to practice creating more complex functions
For students to learn about other common coding systems such as Morse code
For students to practice identifying patterns and breaking down complex patterns into smaller components
Class set of mBots and devices
Class set of scrap paper and writing utensils
Install mBlock on all devices.
Fully charge mBots/devices.
See the Teacher's Guide [attached] to become familiar with the mBot hardware and the mBlock software.
Arrange classroom to allow lots of floor space for testing programs.
Ask, "What is a function in computer programming?" Sample response: A function is a sequence or section of code that is given a name and 'stored' in a smaller piece of code.
Ask, "How are functions created and used in mBlock?" Sample response: In mBlock, you can create a function by creating a new block. The function can be used like any other block, by dragging and clicking it together with other blocks to create a program.
Ask, "What block is used to control the coloured LEDs on the mBot? How is this block used?" Sample response: The coloured LEDs are controlled by the set LED on board block in the Robots tab. Any colour can be displayed, depending on the combination of red, green, and blue values used.
Ask, "How can you play notes on the mBot?" Sample response: Notes can be played through the mBot using the play tone on note block in the Robots tab. This block allows you to choose a note from the major scale (C D E F G A B C) and the length of the note, or beat (eight, quarter, half, whole, double).
Say, "Today you will take the concept of functions even further! In this lesson you will discover how to send messages with your mBot using a different kind of code: Morse code! Morse code is a way of sending text information (i.e. letters and numbers) as a series of lights, tones, or even movements. Morse code is the oldest electrical coding system in the world and has been used by pilots, sailors, soldiers, and the public to send all kinds of messages. In Morse code, each letter in the alphabet is represented by a unique combination of dots and dashes (see the chart below). The dots and dashes are commonly displayed by flashing lights or tones."
Ask, "Have you ever heard of an SOS signal? What combination of dots and dashes make an SOS signal (HINT: Look at the chart)?" Sample response: An SOS signal is the most well known example of a signal in Morse code. It is a distress signal represented by the code: dot dot dot (S) dash dash dash (O) dot dot dot (S).
Say, "Today you will bring the oldest electrical coding system in the world together with one of the newest by using functions in mBlock to create Morse code signals! To do this you will need to create functions for the base units of Morse code, the dash and the dot. Let's get started!"

For this lesson, students may use one or all of the mBot motors, coloured LEDs, and speakers. Refer to the Teacher's Guide for additional information about this hardware.
Say, "The timing of dots and dashes is a major part of understanding Morse code. We have to keep a consistent timing or others will never be able to decode our messages! The Morse code rules for the timing of dots and dashes are as follows."
The length of one dot = 1 unit
The length of one dash = 3 units
The space between dots/dashes in the same letter = 1 unit
The space between letters = 3 units
Ask, "If a dot is 1 second long, how long is a dash?" Answer: 3 seconds
Ask, "If a dot is half a second long, how long is a dash?" Answer: 1.5 seconds
Ask, "If a dot is half a second long, how many seconds are there in the letter A, including all dashes, dots, and spaces?" Answer: 2.5 seconds. dot (0.5) space (0.5) dash (1.5) = 0.5+0.5+1.5 = 2.5.
Say, "There are several ways we might create dots and dashes using the mBot. For this example we will use the coloured LEDs. Today we will create dot and dash functions that can be placed together in sequence to create a message. Recall that functions can be created in mBlock using the Make a Block button in the My Blocks tab. Once you have named your blocks, they will appear on the left under My Blocks. Recall, the define Function blocks on the right are where we can create the sequences that will be contained in the new blocks, much like an Event block."

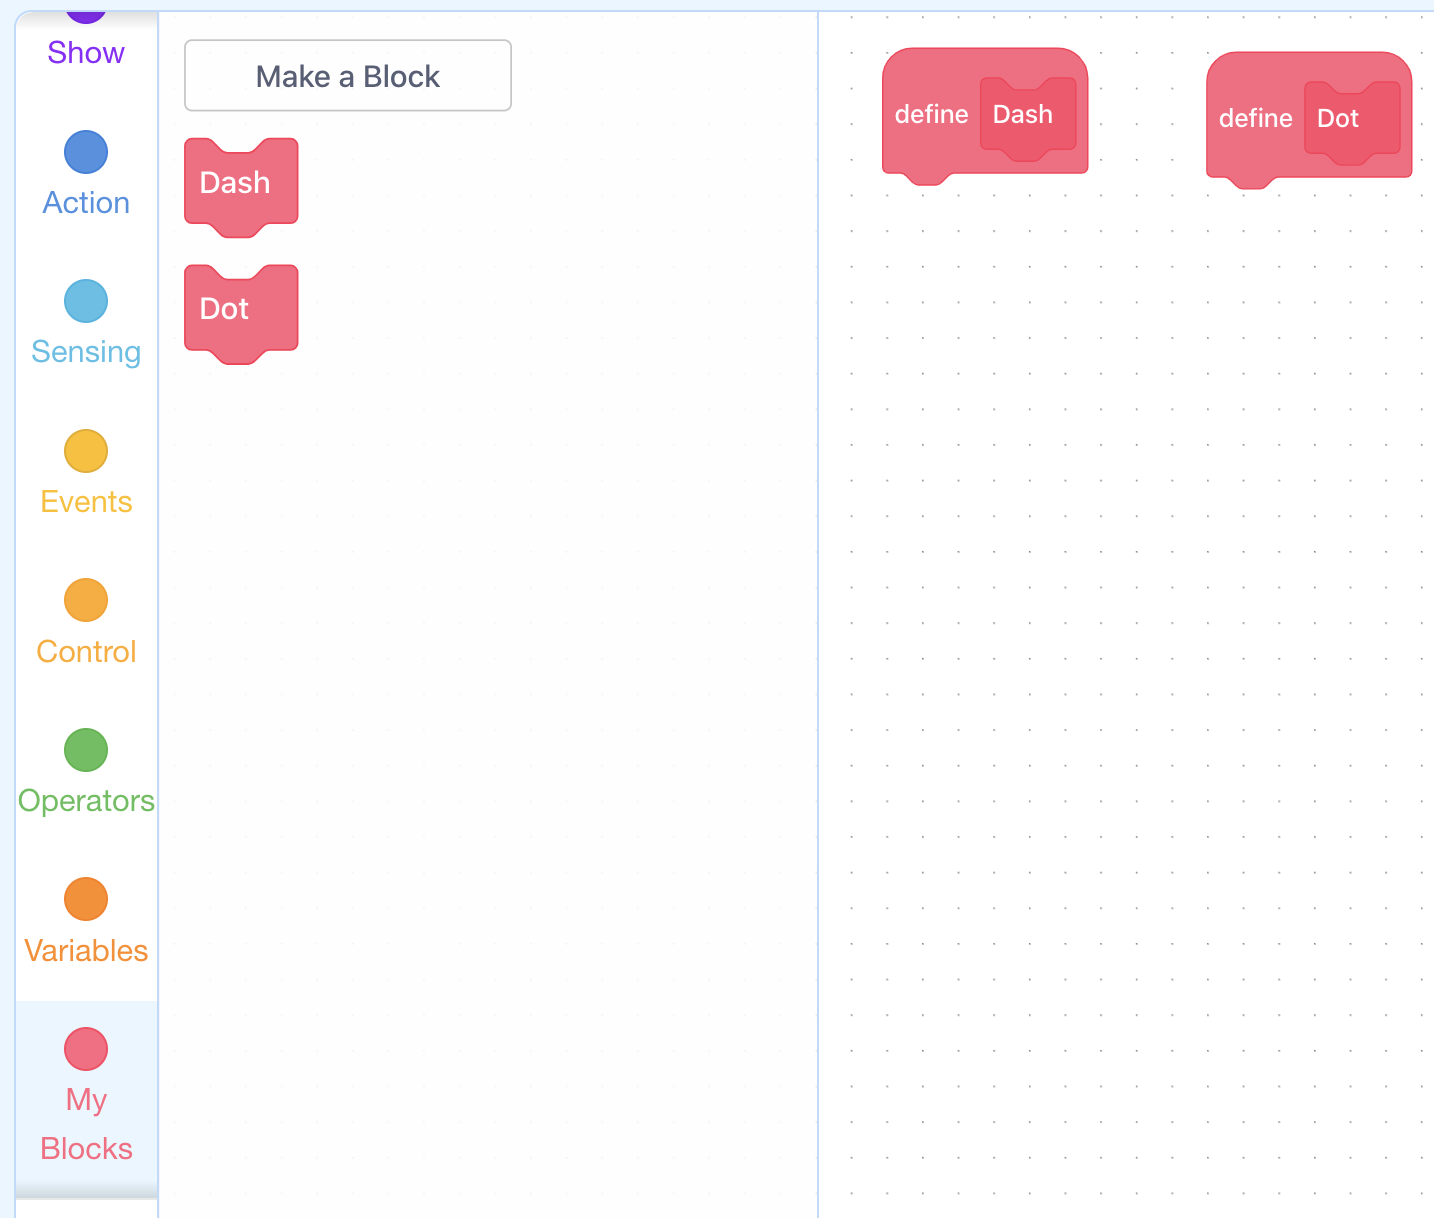
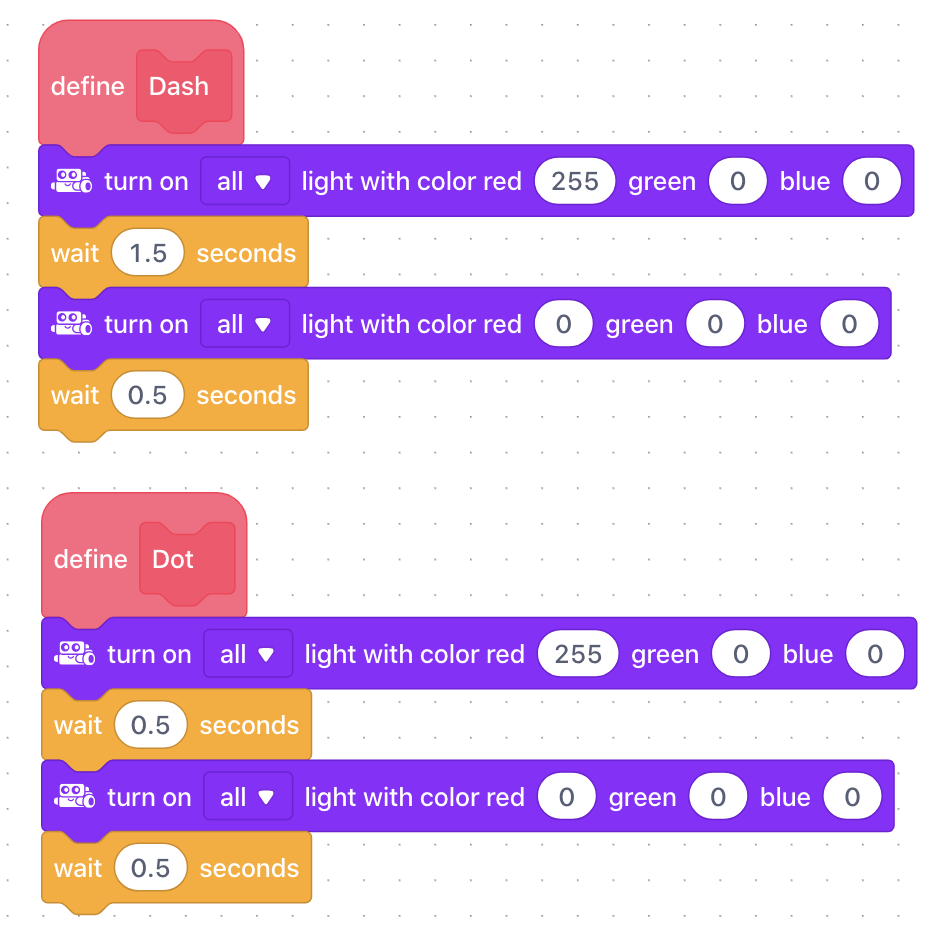
Say, "This example uses a unit length of 0.5 seconds, making a dot 0.5 seconds long and a dash 1.5 seconds long, according to the Morse code rules."
Say, "Finally, to create a Morse code message, the newly-created Dash and Dot blocks can be strung together in a sequence."
Ask, "What Morse code message is being sent by the mBot in the code below?" Answer: SOS
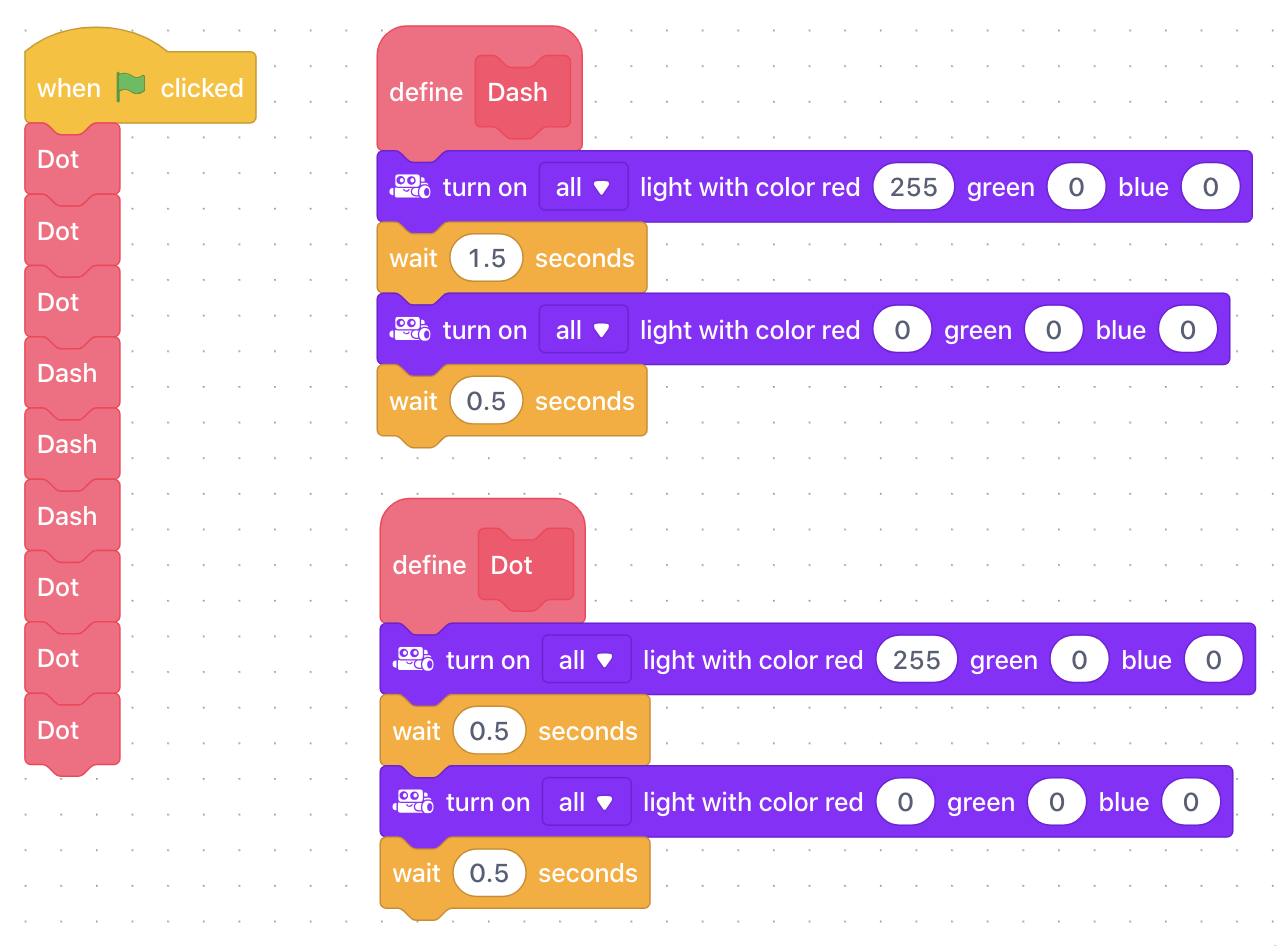
Ask, "Why is there a wait 0.5 seconds block at the end of both the Dash and Dot functions?" Sample response: This wait represents the space between dashes and dots within a letter.
Ask, "Based on the example code, what is one reason that creating dash and dot functions would be preferable to simply creating the sequence using the regular blocks?" Sample response: Creating Dash and Dot functions makes the program much shorter and easier to read.
Say, "Your first challenge is to create your very own Dash and Dot functions by creating your own new blocks. These could use the coloured LEDs that we saw in the introduction, or you could branch out and use sounds or even motor commands to create your dashes and dots. Remember the rules around unit length - you must keep a consistent unit length, so choose at the beginning! Let's get started!"
Coding Challenge #1 - Example solution
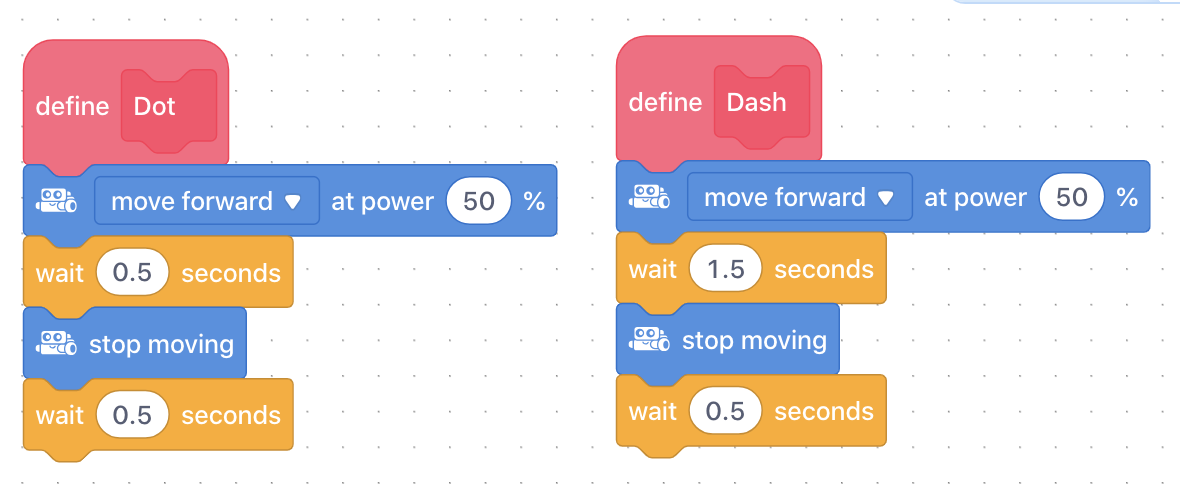
Say, "Once you have created your Dash and Dot functions, you can begin sending messages with your mBot! Choose one of the following messages to create: "CAT" or "DOG". Create your message by stringing Dash and Dot blocks together in a sequence. Once you have created your message, partner with another group and see if you can decode a crucial piece of information about them: do they prefer cats or dogs?"
Once groups are paired and ready to share their messages, have students write down the sequence of dashes and dots that they see before trying to interpret the letters they represent.
HINT: Remind students to add a wait block with the appropriate time (3 units) between letters.
NOTE: Make the Morse code chart available for students to easily view either by projecting the chart or printing it out.
Coding Challenge #2 - Example solution - DOG
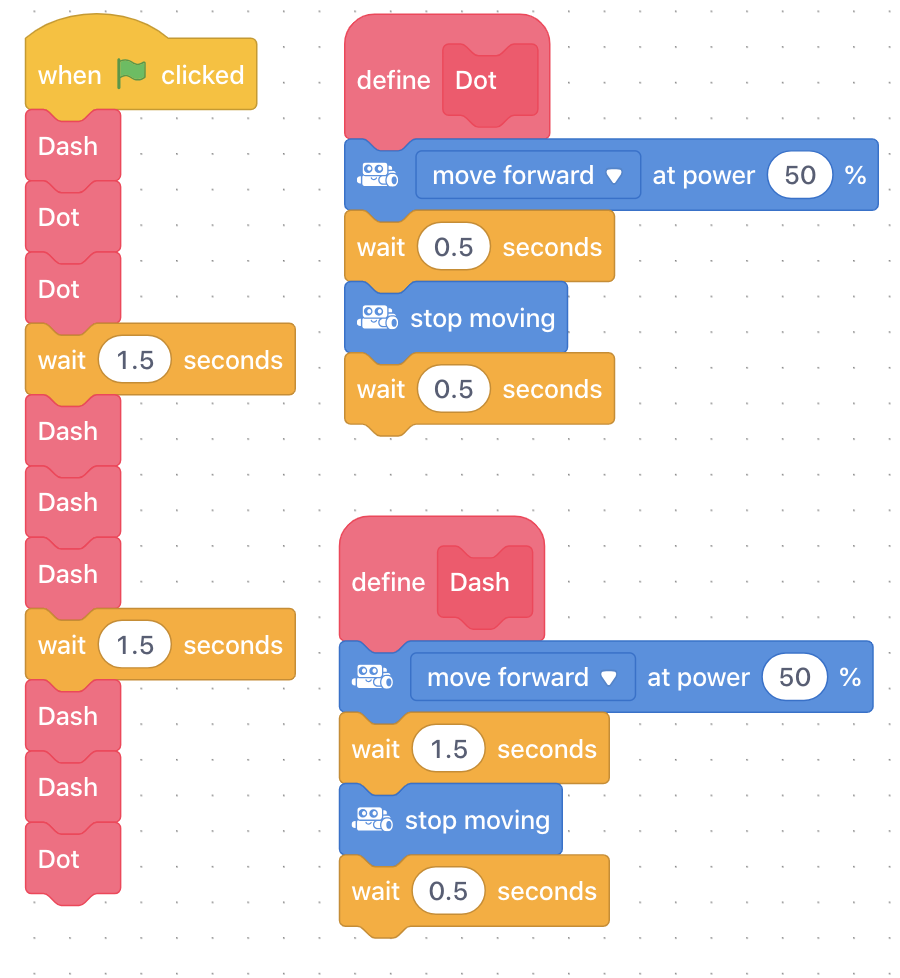
Ask, "Why would creating functions for the dots and dashes be easier to use than using the tone blocks directly?" Sample response: "With functions, the dots and dashes are easy to reuse throughout the program and take up less space."
Say, "The final challenge for this lesson is for you to use the mBot to communicate your first name in Morse code. However, to do this, you're going to have to take your use of functions to the next level. For some names, stringing together a long sequence of individual dashes and dots will become long and difficult to read. Since one of the main purposes of functions is to make our code easier to read and write, we are going to get clever and create more complex functions. Your challenge is to create a new block for each of the different letters in your name, using the Dash and Dot blocks you have already created. For example, a letter A block would look like this."
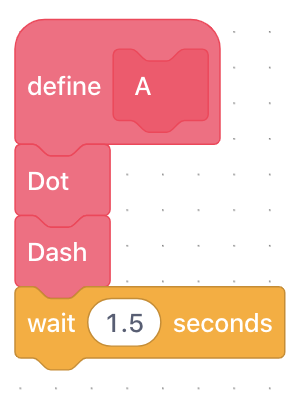
Coding Challenge #3 - Example solution
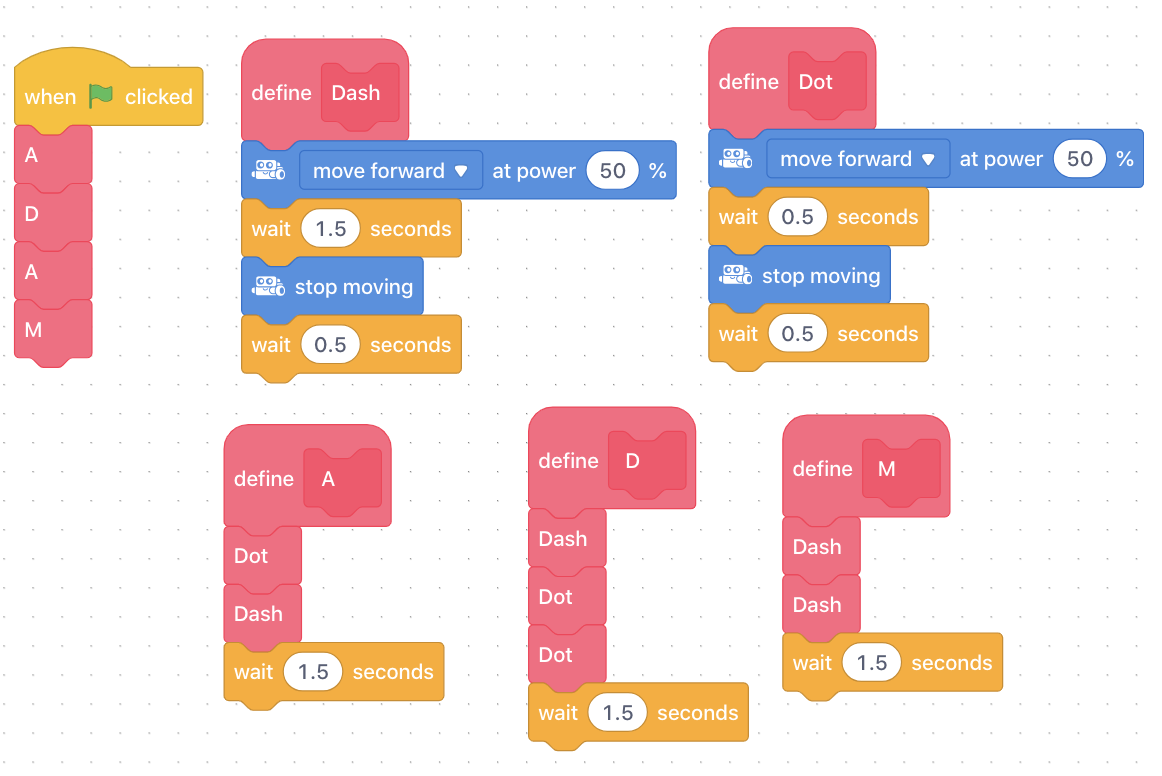
NOTE: If student names are quite long, they should also be given the option of writing their favorite movie, book, or character.
Ask, "Today we combined Morse code with mBlock code. Can you think of any other coding systems?" Example: Binary code for computing. Like Morse code, Binary code has only two symbols, 0 and 1. In computing, every letter, number, and any other piece of data is represented by a series of 0's and 1's, just like the dashes and dots of Morse code. Another example is Braille, which is a system that represents the alphabet as a series of between 1 and 6 dots, arranged vertically 3 x 3. Braille is widely used by the visually impaired to read by touch.
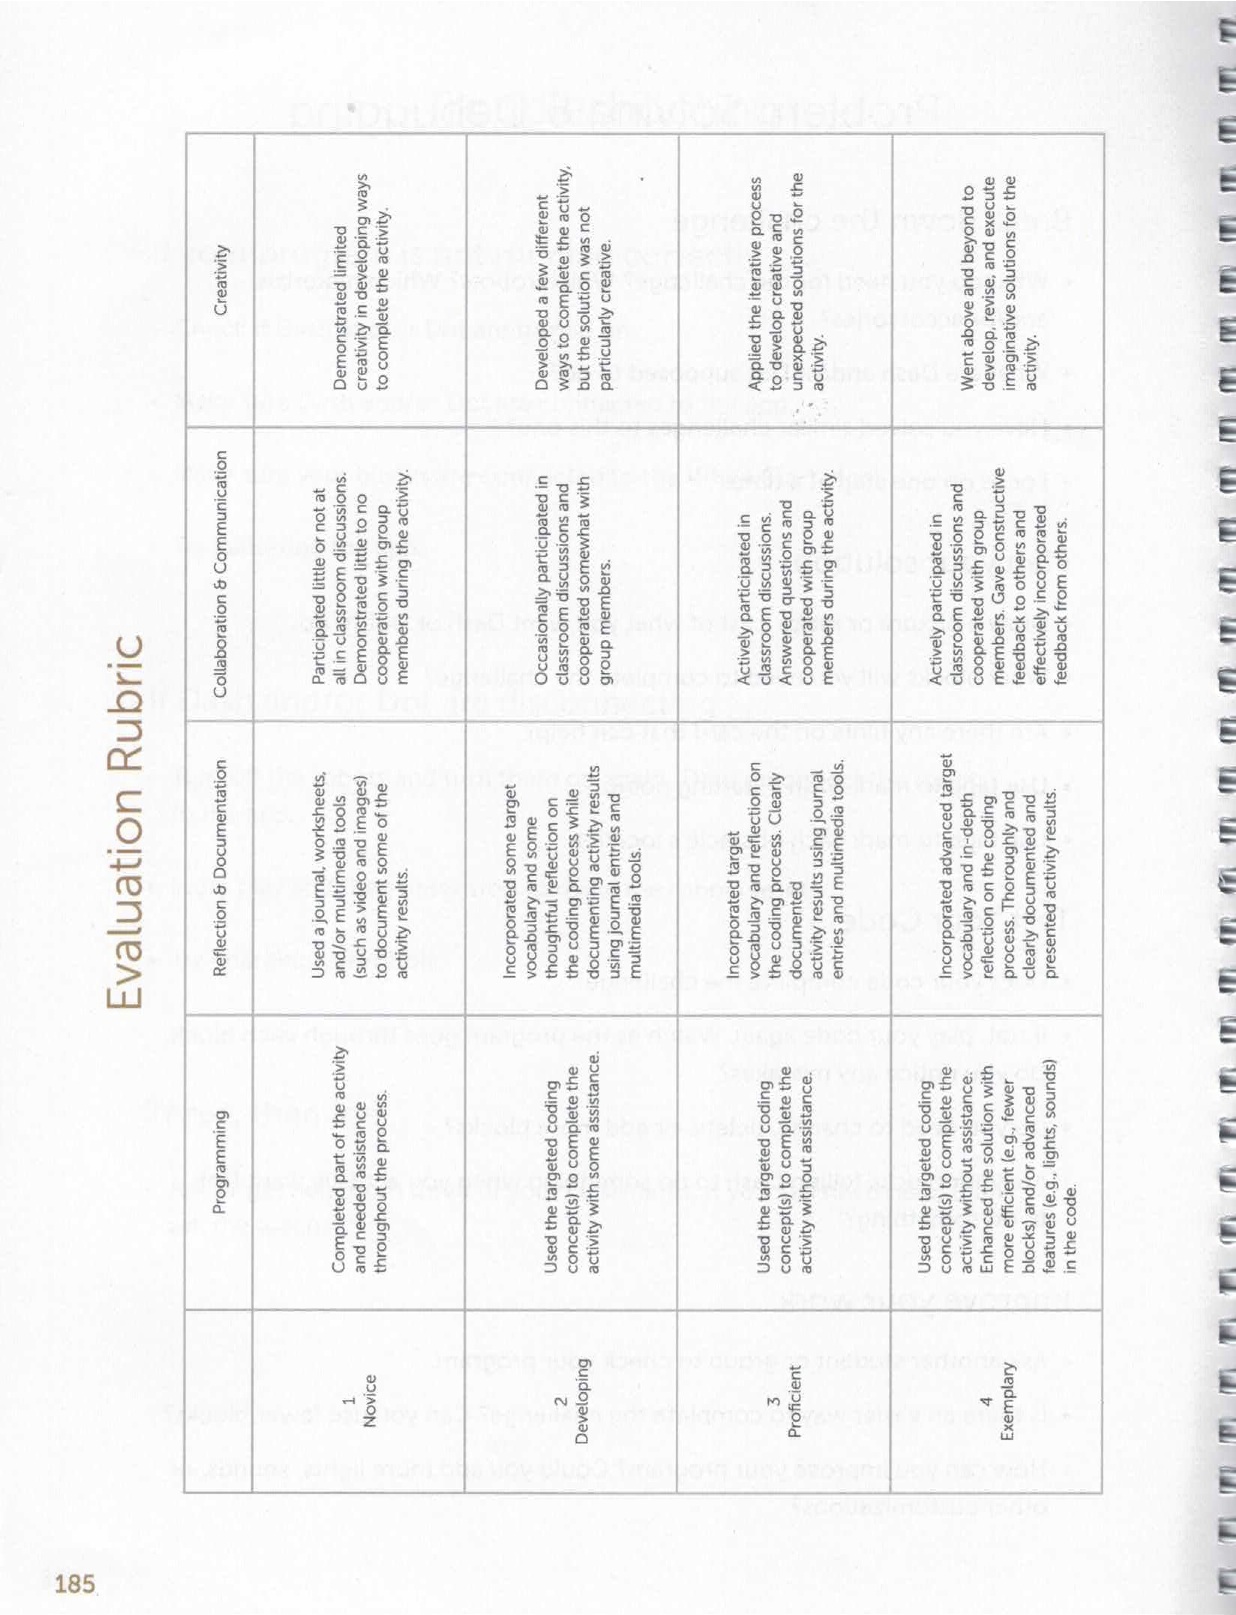
Use the Evaluation Rubric to review students' work.
[Optional] Share your students' work with the world using @logicsacademy and #mBot and #LearntoCode!
1A-AP-10 Develop programs with sequences and simple loops, to express ideas or address a problem.
1A-AP-11 Decompose (break down) the steps needed to solve a problem into a precise sequence of instructions.
1A-AP-14 Debug (identify and fix) errors in an algorithm or program that includes sequences and simple loops.
4D Students exhibit a tolerance for ambiguity, perseverance and the capacity to work with open-ended problems.
5D: Understand how automation works and use algorithmic thinking to develop a sequence of steps to create and test automated solutions.
7C: Contribute constructively to project teams, assuming various roles and responsibilities to work effectively toward a common goal.
Planning, creating, appraising and communicating in response to challenges.
Working independently and with others while exploring careers and technology
Algebra (Coding)
C3.1 solve problems and create computational representations of mathematical situations by writing and executing code, including code that involves conditional statements and other control structures
P2: Students will be expected to use digital tools to develop ideas and original works in innovative ways.
TOC1: Students will be expected to
safely use many forms of current technology for learning with growing competence
demonstrate conceptual understanding of how information and communication technology, digital tools, and authorized networks support their learning
use terminology related to information and communication technology
• Generate potential ideas and add to others’ ideas
• Identify and evaluate the skills and skill levels needed, individually or as a group, in relation to a specific task, and develop them as needed
• Select, and as needed learn about, appropriate tools and technologies to extend their capability to complete a task