
(Francais) F6: Assessment - Designing Solutions for the World
Level F, Lesson 6: In this lesson, students will work in small groups, using the Dash robot to solve a schoolwide problem. Students will use the Design Thinking Process to design an accessory and code
Educational Standards
CSTA
ISTE
NGSS
Common Core
Strategies and Extensions
Suggestions and Scaffolding
Differentiation
Activity Extensions
Wrap Up
Student Presentations
- Have students create a multimedia presentation that includes the following elements:
- Description of the classroom problem that the group has selected.
- Description of group members and roles.
- Explanation of the thinking that went into the design of their accessory.
- Description of problems they ran into and how they were solved.
- Advice they would give to younger programmers.
- List of next steps: Where can they go from here with their invention?
- Images of invented accessory for Dash.
- Screenshot of final program created in the Blockly app.
- Video of Dash using the accessory.
- Students can organize their presentation using posters or digital platforms such as Seesaw, iMovie, or Google Slides.
- Have student groups take turns presenting their projects to the class.
- Encourage students to give each other feedback on their designs, programs, and/or presentations. Possible questions/feedback includes:
- “How did you (build that accessory and what did you use)?”
- “I like how you (added lights and sounds to your program).”
- “What if you (recorded a sound for your program)?”
Follow-Up Questions/Discussion
- Did your design work as planned? Why or why not?
- Could this design be scaled up for use in the real world? If so, how would it need to be changed?
- What was the hardest part of the design process?
- If you had time to redesign, what would you change?
- When making adjustments to your prototype or program, why is it important to retest after each individual change?
Assessment
- Use our Evaluation Rubric to review students’ work and presentations.
- [Optional] Share your students’ work with the world using @logicsacademy and #dashanddot!
Before the Lesson
Prior Experience
It is recommended that students complete:
- Level A-F: All previous lessons
- [Optional] Level A-F Challenge Cards: All
You can purchase our Learn to Code Challenge Card sets and Curriculum Guide here: https://store.makewonder.com/#/education
Preparation
- Fully charge the tablets and robots.
- Install the Wonder Workshop Blockly app on each tablet.
- Have recycled materials organized in a way that gives students easy access to them.
Review
Instructions
Have students review and discuss this lesson’s coding concepts in groups. This can include:
Functions
Review how functions allow programmers to repeat parts of code over and over again. Unlike loops, you can repeat the function’s code in multiple places of the program.
- Share how functions are similar to the chorus of a song. If relevant, refer to the Level E unplugged activity about creating songs with functions.
- Remind students how the Call block allows students to call function in Blockly.
Nested Conditionals
Remind students that nested conditionals can help robots make multiple decisions when interacting with the environment. Discuss examples of nested conditionals.
- “If there are cookies, I will eat 3 cookies.. If there are cookies AND THEN if someone brings cake, then I will eat 1 cookie and 1 slice of cake.”
Variables
Remind students how variables help store pieces of information that can change. They can help keep track of things that happen to Dash. Discuss examples of variables.
- Let’s say my wallet has a variable: the amount of money that’s inside it! First, my wallet has 20 dollars inside it, so the variable is 20 dollars. Then I buy a bag of lollipops and take out 5 dollars. Now the value of my variable is 15 dollars!
- We can set a variable for the distance Dash should move. Then we can change that variable during the program to change Dash’s movement.
Guided Practice
Instructions
- Discuss how important it is to understand other people’s struggles in order to identify real-world problems.
- What types of problems affect us ALL in some way, even if it does not appear so directly (e.g., litter, healthy food options)?
- Use examples from historical or current examples (e.g., civil rights movements, wildlife conservation).
- Have students explore different types of real-world problems.
- Have them research current news events, which may inspire their thinking in regard to real-world problems
- Have them watch Robotic Hands Solving Problems and discuss how robotics can improve life in the real-world.
- Ask the class, “What kinds of problems affect the world around us?”
- Select student volunteers to call out a few example problems (e.g., physical disabilities, homelessness, obesity, natural disasters, lack of natural resources).
- Work with the class to brainstorm similar real-world problems. List the problems on the whiteboard or poster paper.
- Try to avoid smaller personal problems and urge students to consider more universal problems that stem from larger social or emotional injustices.
- Do not judge ideas as good or bad at this time.
- Once you've gotten all ideas written down, read them aloud.
- Discuss possible accessories that students could design for Dash to help solve some of the identified problems.
- Could Dash use a handle to help people with disabilities across the street?
- Could Dash deliver snacks and food to people who are hungry?
- Discuss how students could program Dash to demonstrate the accessory.
- Could you use a function to have Dash raise the handle for people to grab?
- Could you use a variable so that Dash knows when to go back and get more snacks?
Quick Check
- What is the problem that you would like to solve?
- What will you build as an accessory for Dash to solve that problem?
- How will you use the blocks in Blockly to solve your problem?
- How could you include functions or variables in your program?
- Will you have Dash say something or make a sound?
Independent Practice
Instructions
- Divide the class into small groups (ideally 2–3 students per robot) and distribute a Design Thinking Workbook to each group.
- Have groups use the Design Thinking Workbook to guide them through the design process. Make sure students get their work approved before they advance to the next design stage.
- Share the Evaluation Rubric with the class so that students are aware of your learning and performance expectations.
Design Process
Define the Problem
Have student groups use the Design Thinking Workbook to:
- Record the list of real-world problems that was created by the class.
- Discuss and add any other problems to the list.
- Narrow this list down to a top real-world problem.
- Explain the selected problem in detail.
Remind students that they may need to compromise.
Ideate
Have student groups use the Design Thinking Workbook to:
- Brainstorm and record possible solutions for their selected problem.
- Select their top solution.
- Explain the selected solution in detail with words and diagrams.
Plan
Have students use the Design Thinking Workbook to:
- Establish team roles such as:
- Lead Programmer: Holds the tablet and integrates group member ideas to create the program in Blockly.
- Documentarian: Records, writes, and/or draws all group results, thoughts, and progress. Illustrates group designs and ideas.
- Lead Builder: Collects the materials needed to build the accessory. The lead builder oversees the building and testing of the prototype.
- Draft a design of their accessory idea for Dash.
- Students can draw the design by hand or use an online program to design a 3D draft (e.g., Tinkercad).
- An alternative would be to have students each create an individual sketch and then combine the best of their ideas based on group discussion.
Have each group share their design with a teacher or adult.
- Have students make any needed adjustments to their original plan based on teacher feedback.
Build
Have students use the Design Thinking Workbook to:
- Make a list of the recycled materials they will need to build a prototype of their design.
- Gather the necessary materials.
- Build the prototype.
- If students created a 3D draft of their design, they can use a 3D printer to print out their prototype.
Have each group share their prototype with the teacher.
- Have them make any needed adjustments based on the teacher’s feedback.
Program & Test
Have students use the Design Thinking Workbook to:
- Plan a program for Dash that will help demonstrate their accessory design.
- Use the Blockly app to develop their program.
- Record the results of their code and prototype.
- Make any improvements based on their test.
The program should contain criteria that you’ve established depending on students’ coding abilities. For example, the criteria could include: functions, variables, and/or conditionals.
- Remind students of the criteria (e.g., “Don’t forget to include a variable and a Function block. Think about what kind of information you can keep track of to help you with your program.”).
Instruction
Introduction
- Say, “Today you will design a new accessory for Dash to solve a schoolwide problem! What do designers do to solve problems?”
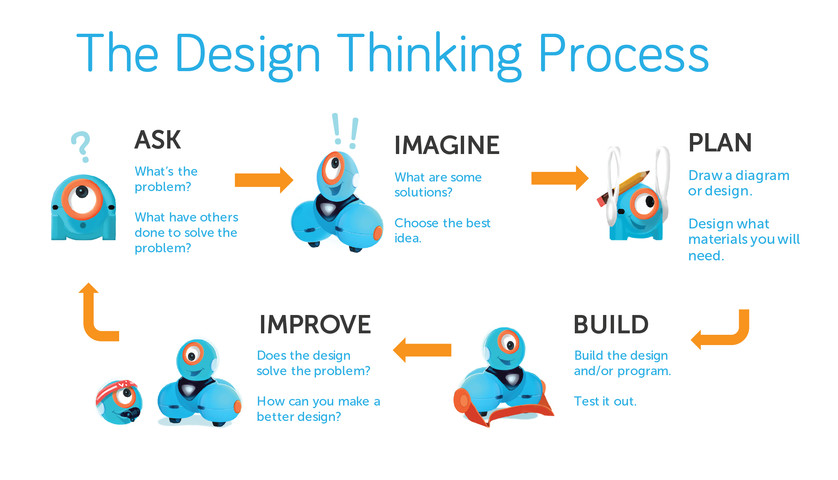
- Use the 2-5 Design Thinking Presentation to introduce the iterative design thinking process to the class. Say, “Design Thinking has been used to develop all kinds of inventions we use each day, like smartphones, cars, board games and video games. We can use design thinking to improve conditions in our classroom.”
- Understand: “Of course we understand what we are feeling, but it’s important to ask how those around us feel about things, too. When we understand how users are feeling and the problems they face, we can learn about problems that we all might share.”
- Define: “Designers must be able to identify a problem or a need that they will attempt to solve. For example: Our classroom floor gets messy after craft activities. That’s a problem.”
- Ideate: “The word ‘idea’ is the root word of the word ‘ideate.’ That’s because when we ideate, we come up with ways to solve the problem. Brainstorming allows us to come up with all kinds of ideas and then work together to decide on which ideas we’d like to try first. For example: Designing a program and accessory for Dash to sweep up the floor.”
- Plan: “Once designers select the best solution, they make a plan. They draw a diagram of their design and figure out what materials they will need. For example: You will probably need Legos to build a sweeper for Dash to clean the floor.”
- Build: “We begin by building a rough version of your group’s design. This rough version is called a prototype. We do this in the same way that we would create a rough draft when we write. It’s okay to make mistakes, because that’s how we learn to make improvements. During construction, we frequently stop to test and retest our prototype. Then we ask: How can we improve it? Each time we make a change in our design, we retest our prototype. It does not need to be perfect. It just needs to work well enough to test out the features of your group’s design.”
- Test: “Once we’ve built a Dash accessory that sweeps the floor, we must test it out. Does it work? Does it solve the problem? If not, can we tweak it in some way to make it work? Is the problem in the accessory or the program we’ve written? It’s okay to make mistakes. The important thing is to learn from our mistakes and make changes, when needed. We can also get feedback from our peers and from the people who will be using the accessory. We can use that feedback to improve our designs!”
Quick Check
- What are the different stages of the Design Thinking Process?
- Why is it important to have different stages?
- What does the word “ideate” mean, and why is it an important part of the design process?
- Which stage is most important, and why?